Contents
XMYL A001-A5112 Mini Spider Light
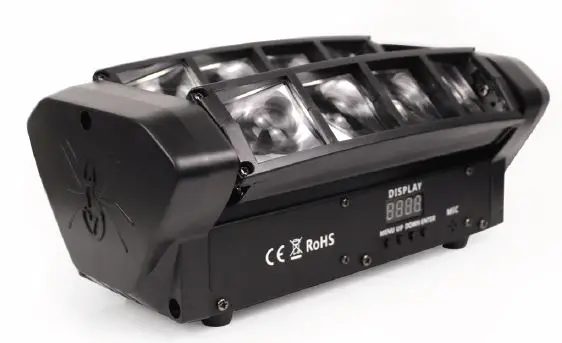
Product Information
Specifications
- Voltage: AC100-240V 50/60HZ
- Light source: 8PCS RGBW lamp bead
- Running mode: DMX512, on its own, master-slave, sound
- DMX channels: 7/15 channel
Product Usage Instructions
Unpacking Instructions
When you receive the device, open it and check whether the goods are complete. If not, please notify the carrier immediately and preserve the packaging, and if the damage is revealed, preserve the packaging and all packing materials for safe transportation of the device.
The package should include:
- 1 pcs lamps
- 1 instruction manual
- 1 power cord
- 1 bow bracket and 2 knobs
Installation Instructions
- Install the bow bracket and fix it with screws.
- Confirm that the bracket position is installed correctly.
- Position is installed successfully. Confirm whether the bracket is stable.
- Hook brackets are not included in the package.
Startup Steps for Various Modes
- Automatic mode:
- Press MENU to find SHND, press ENTER.
- Press Up or Down to adjust the value to select different effects.
- Sound Mode:
- Press MENU to find SLND, press ENTER.
- Press UP or DOWN to find Sound, press ENTER to start sound mode.
- Press MENU to find SOUD, press ENTER.
- Press UP or DOWN to select to turn on sound control mode or turn off sound control mode.
- Press MENU to find SOEN, press ENTER.
- Press UP or DOWN to adjust the value to set up sound sensitivity.
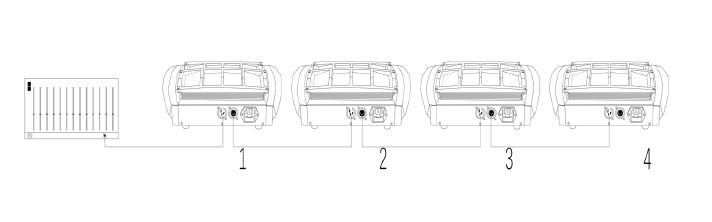
Console Mode and Master-Slave Mode
In console mode and master-slave mode:
- Connect DMX OUT to the DMX IN of the No. 1 fixture.
- Connect DMX OUT of the No. 1 fixture to the DMX IN of the No. 2 fixture.
- Press MENU to find Addr, press ENTER, display A001 press Up or Down to select the value of the console.
- For master and slave settings:
- No. 1 light fixture is set to self-propelled or voice-activated function according to the startup mode.
- No. 2, 3, and 4**** are set to DMX512 mode: DMX address code is 001.
FAQ
- Q: What should I do if the goods are incomplete?
A: If the goods are incomplete, please notify the carrier immediately and preserve the packaging. If there is any damage, preserve the packaging and all packing materials for safe transportation of the device. - Q: How many DMX channels does this product have?
A: This product has 7/15 channel DMX channels. - Q: Are hook brackets included in the package?
A: No, hook brackets are not included in the package.
Installation and operating instructions
- Plugged into a grounded power outlet for indoor use only.
- Don’t expose the device to rain or moisture, avoid the risk of fire or electric shock. Make sure that no flammable objects near the device.
- Install the equipment in a well-ventilated place at least 50cm from any surface, and ensure that the ventilation slots are not blocked.
- Disconnect the equipment from the power supply before any operation.
- The ambient temperature should not exceed 40°C, and the maximum ambient temperature is 45°C. Don’t operate the device at higher tempratures.
- The equipment should be stopped immediately,
if a fault occurs, and do not repair the equipment by yourself. Improper maintenance can result in damage and malfunction. Contact technical support for repair approval. Only the same accessories can be used with the original parts, and make sure the power cord is not blocked or damaged. - Do not expose your eyes to light sources, which can be a sign of a seizure in sensitive people.
- The lamps are only used for decoration and not suitable for ordinary household lighting.
- Replacing the fuse: Unplug the device from the power supply, remove the fuse holder from its original position with a srewdriver, take out the burnt fuse, replace the fuse with the same characteristics, then re-rotate the screw, and connect the device to the power supply superior.
- WARNING: Stop using it if the fuse is still blowing after being replaced. Please contact customer support for further instructions, continued use may cause serious damage.
- Fix the equipment with the screw holes on the bracket to ensure that the equipment is firmly fixed to prevent vibration and movement during operation, and always check whether the structure of the equipment is strong enough to withstand equipment that is at least ten times.
- The equipment must be fixed by professionals in places that elders and children cannot reach, and no one can pass under or over the pedestrian crossing.
Please read this manual carefully before operating this product.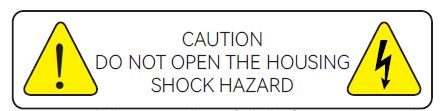
- End-of-life of the product: This sign indicates that this product should not be thrown into household waste in European Community countries and that waste should be recycled to support the sustainable recycling of resources in order to protect the environment and human health Utilize. If you need to recycle used electrical appliances, please go to an electrical appliance collection center or contact the dealer where you purchased the product to ensure the ecological recycling of the product.
- Before cleaning the device, disconnect it from the power source if connected. Do not use harsh cleaners. Wipe off dust or dirt from the product with a clean cloth. We are not responsible for damage caused by incorrect handling, improper use or wear and tear.
- We reserve the right to make technical modifications.
Please read this manual carefully before use
Note:this manual contains important information. installation,operation according to requirment of manual. Please save this manual for emergencies.
Startup steps for various modes
- Automatic mode
- Press“MENU”to find”SHND”,press“ENTER”.
- Press “Up” or “Down” adjust the value to select different effects.
- Sound Mode
- Press “MENU” to find “SLND” ,press”ENTER”.
- Press “UP” or “DOWN” to find “Soun” press “ENTER” to start sound mode.
- Press “MENU” to find “SOUD”,press”ENTER”.Press”UP” or “DOWN” to seclet to turn on sound control mode or turn off sound control mode.
- Press “MENU” to find “SOEN”,press”ENTER’.Press”UP” or “DOWN” adjust the value to set up sound sensitivity.
Technical Parameters
- Voltage:AC100-240V 50/60HZ
- Light source 1:8PCS RGBW lamp bead
- Running mode: DMX512, on its own, master-slave, sound
- DMX channels: 7/15 channel
Unpacking instructions
When you receive the device, open it and check whether the goods are complete. If not, please notify the carrier immediately and preserve the packaging, and if the damage is revealed, preserve the packaging and all packing materials for safe transportation of the device.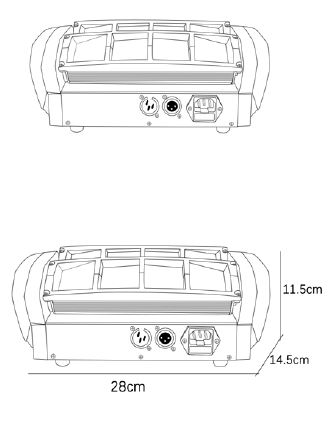
- 1 pcs lamps
- 1 instruction manual
- 1 power cord
- 1 bow bracket and 2 knobs
LED DISPLAY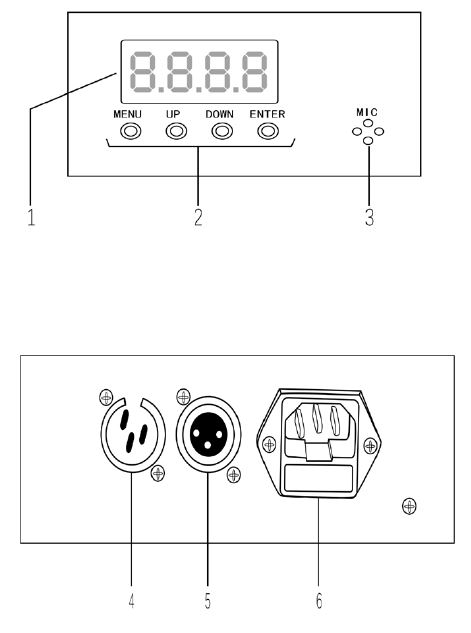
- Display
- Control buttons (MENU DOWN UP ENTER)
- Microphone
- DMX IN
- DMX OUT
- POWER IN
Procedure for Installing support
- Install the bow bracket and fix it with screws

- Install the bow bracket with the bow breaker
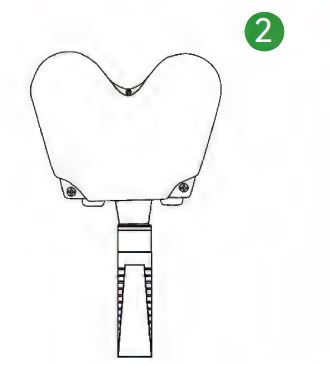
- Confirm that the bracket position is installed correctly

- Position is installed successfully Confirm whether the bracket
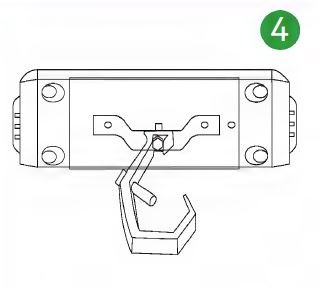
Hook brackets are not included in the package
Console mode and master-slave mode:
- DMX OUT to the DMX IN of the No. 1 fixture; DMX OUT of the No. 1 fixture is connected to the DMX IN of the No. 2 fixture;
- Press “MENU” to find “Addr”, press “ENTER”, display “A001” press “Up” or “Down” to select the value of the console; Master and slave settings: No. 1 light fixture is set to self-propelled or voice-activated function according to the startup mode; 2, 3, and 4**** are set to DMX512 mode: DMX address code is 001;
MENU
| ADDR | A001-A512 | Address Setting |
|
CHND |
7CH | 7 Channel option |
| 15CH | 15 Channel option | |
|
SLND |
SLAV | Slave option |
| MAST | Master option | |
| Soun | Sound control selected | |
|
SHND |
Sh1—sh24 | Effect selected. Sh24 auto effect |
| SPED | SPED 01-08 speed from slow to fast | |
| SOUD | ON,OFF | Sound control Switch |
| SOEN | 0-100 | Sound Sensitivity(0 close,100 the most) |
| TEST | YES | Automatically Test |
|
LED |
OFF | Backlight off |
| NO | Backlight on | |
|
1TIL |
NO | Y1 Motor rotates forward |
| YES | Y1 Motor rotates reversely | |
|
2TIL |
NO | Y2 Motor rotates forward |
| YES | Y2 Motor rotates reversely | |
| DEFT | Restoration of factory setting |
DMX Channel Function
7 Channel Mode
| Chann | Function | Value | Instruction |
| 1 | Motor1 route | 0-255 | 0°—135° |
| 2 | Motor2 route | 0-255 | 0°—135° |
| 3 | Sum Dimmer | 0-255 | 0—100% |
| 4 | Strobe | 0-9 | No Strobe |
| 10-255 | Strobe speed from slow to fast | ||
|
5 |
Effect |
0-7 | No Effect |
| 8-17 | Effect 1 | ||
| 18-27 | Effect 2 | ||
| 28-37 | Effect 3 | ||
| 38-47 | Effect 4 | ||
| 48-57 | Effect 5 | ||
| 58-67 | Effect 6 | ||
| 68-77 | Effect 7 | ||
| 78-87 | Effect 8 | ||
| 88-97 | Effect 9 | ||
| 98-107 | Effect 10 | ||
| 108-117 | Effect 11 | ||
| 118-127 | Effect 12 | ||
| 128-136 | Effect 13 | ||
| 137-146 | Effect 14 | ||
| 147-156 | Effect 15 | ||
| 157-166 | Effect 16 | ||
| 167-176 | Effect 17 | ||
| 177-186 | Effect 18 | ||
| 187-196 | Effect 19 | ||
| 197-206 | Effect 20 | ||
| 207-216 | Effect 21 |
| 217-226 | Effect 22 | ||
| 227-236 | Effect 23 | ||
| 237-246 | Effect 24 Self-propelled multi-
effects |
||
| 247-255 | Effect 25 Sound | ||
| 6 | Effect speed | 0-255 | From fast to slow |
| 7 | Reset | 241-250 | For 5 seconds to reset |
15 Channel Mode
| Channel | Function | Value | Instruction |
| 1 | Motor1 route | 0-255 | 60°—150° |
| 2 | Motor2 route | 0-255 | 60°—150° |
| 3 | Sum Dimmer | 0-255 | 0—100% |
|
4 |
Strobe |
0-9 | No Strobe |
| 10-255 | Strobe speed from slow to
fast |
||
| 5 | LED1 Dimming | 0-255 | 0—100% |
| 6 | LED2 Dimming | 0-255 | 0—100% |
| 7 | LED3 Dimming | 0-255 | 0—100% |
| 8 | LED4 Dimming | 0-255 | 0—100% |
| 9 | LED5 Dimming | 0-255 | 0—100% |
| 10 | LED6 Dimming | 0-255 | 0—100% |
| 11 | LED7 Dimming | 0-255 | 0—100% |
| 12 | LED8 Dimming | 0-255 | 0—100% |
| 13 | Marco Function | 0-7 | No Effect |
|
13 |
Marco Function |
8-17 | Effect 1 |
| 18-27 | Effect 2 | ||
| 28-37 | Effect 3 | ||
| 38-47 | Effect 4 | ||
| 48-57 | Effect 5 | ||
| 58-67 | Effect 6 | ||
| 68-77 | Effect 7 | ||
| 78-87 | Effect 8 | ||
| 88-97 | Effect 9 | ||
| 98-107 | Effect 10 | ||
| 108-117 | Effect 11 | ||
| 118-127 | Effect 12 | ||
| 128-136 | Effect 13 | ||
| 137-146 | Effect 14 | ||
| 147-156 | Effect 15 | ||
| 157-166 | Effect 16 | ||
| 167-176 | Effect 17 | ||
| 177-186 | Effect 18 | ||
| 187-196 | Effect 19 | ||
| 197-206 | Effect 20 | ||
| 207-216 | Effect 21 | ||
| 217-226 | Effect 22 | ||
| 227-236 | Effect 23 | ||
| 237-246 | Effect 24 Self-propelled
multi-effects |
||
| 247-255 | Effect 25 Sound | ||
| 14 | Effect speed | 0-255 | From slow to fast |
| 15 | Reset | 241-250 | For 5 seconds to reset |