![]()
BT310
12V & 24V Battery Analyzer
USER MANUAL
Contents
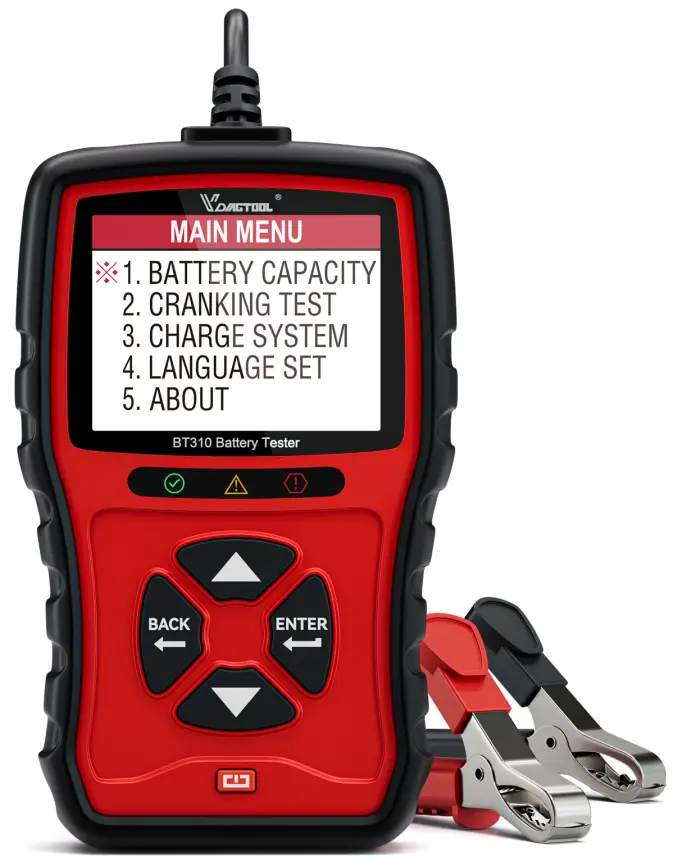
BT310 Car Battery Tester
BT310 12V & 24V Battery Analyzer
Welcome
Thank you for purchasing VDIAGTOOL BT310 Battery Tester. Please take time to read and understand this user manual before operation.
About
Applying advanced conductance testing technology and incorporating reverse polarity protection, the VDIAGTOOL BT310 Battery Tester will provide the technician, professional and DIYer with critical information about 12v and 24v battery health status and identifying battery and charging problem quickly, easily and accurately.
Packing List
- VDIAGTOOL BT310 Battery Tester
- User Manual
Compatibility
Refer to the battery label for battery type and CCA values( Cold Cranking Amp)
- VRLA ((Valve-regulated lead-acid battery))
- GEL (Gelled Electrolyte Lead Acid Battery)
- AGM (Absorbent Glass Mat)
- SLA (Sealed Lead Acid Battery)
- STANDARD LSI (Starting, Lighting, and Ignition)
Note: If you vehicle battery is not the battery mentioned about and you were not sure which type it is, please contact us via customer support and send us some battery pictures or ask your retailer.
Cautions
- Using this tester in accordance with those instructions, taking into account the working conditions and the work to be performed. Hazardous results could occur if tool is used for purpose not intended;
- Using it for 12V/24V battery, working voltage: DC 9V to 36V;
- Ensure the battery terminal are clean, grease and dust car result in inaccurate test result;
- Check the insulating layer of the clamps to ensure they are in proper condition without damage, exposed wires, or disconnections to avoid electric shock;
- Wearing eyes protection when working around battery;
- Test it in a well-ventilated area, vehicle exhaust contain toxic carbon monoxide;
- Keep hair, hands & clothing as well as tester leads& cords away from moving blades& belts;
- Keep the tester out of the reach of children;
Note: For safer and more friendly use, connect the black clip (negative pole) first, and then connect the red clip (positive pole);
Please do not shake the clip at will when connecting the positive and negative poles.
Features

| Buttons | Operation |
| Increase the value / Page up | |
 |
Decrease the value / Page down |
| Back | Cancel / Return |
| ENTER | Confirm / Enter / Proceed |
 |
Restart unit / Return under any status |
 |
Battery good condition light |
| Battery warning condition light | |
 |
Battery bad condition light |
| Red Clamp | Positive connection |
| Black Clamp | Negative connection |
Operation Instructions
7.1 Main menu
The tester is powered solely by the vehicle battery. Connect the Red (+) positive battery clamp to the (+) positive battery terminal. And connect the Black (-) negative battery clamp to the (-) negative battery terminal. Ensure that the clamp is securely attached to the correct terminals. The display will show the page 1 below if all corrected. If not, you may get errors pages (page 2) below, please double check the clamps and connection and have another try;
 Choose preferable Battery Voltage and enter the page below, choose “12V” for example, Press “ ENTER” You will enter MAIN MENU, and choose the Preferable Languages;
7.2 BATTERY CAPACITY ( For example, for 12V Battery )
Thistesterdeterminesconditionofthebatteryaccordingtotheratedvalue labeledonthebattery.
7.2.1 Before Test
The engine and all the other accessory load must be OFF in order to have accurate result. Turn on the vehicle headlight for 2-3 minutes till the battery voltage back to the normal values if the battery voltage is just fully charged.
7.2.2 Steps
7.2.2.1 Press to select “BATTERY CAPACITY” and press “ENTER” to continue.
7.2.2.2 Press to select preferable “BATTERY TYPE” ,press “ENTER” to continue.
7.2.2.3 Press to select “CCA TYPE” which is displayed on the battery rating label page below, and press “ENTER” to continue.
CCA TYPE:
CCA: Cold Cranking Amps, specified by SAE & BCI, most frequently used value for starting battery at O’ °F(-18C);
IEC: Internal Electron technical Commission Standard;
EN: European Automobile Industry Association Standard;
DIN: German Auto Industry Committee Standard;
JIS: Japan Industrial Standard, displayed on the battery as combination of the numbers and letters, e.g. 55D23, 80D26;
GB: China Standard.
Note: Choose the right CCA TYPE according to your own battery information.
7.2.2.4 Press to select “CCA RATED” which is displayed on the battery rating label, and press “ENTER” to continue.
CCA RATED: Enter the exact CCA RATED according to your own battery information.
Note: Number near or equal to the battery CCA RATED is recommended.
7.2.2.5 Press “ENTER” to start Battery Test, the test result will be displayed as below.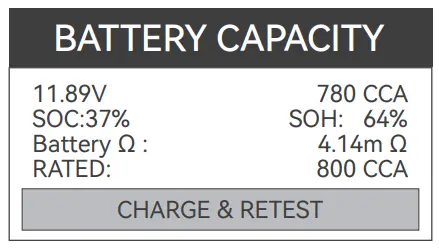 7.2.2.6 Reference Table Replace the battery if the LED indicator is Red. Battery State of Health (SOH) and Test Result Reference Table
| LIFE | RESULT | NOTE | LED |
| >80% | GREAT | Good to Use | GREEN |
| >60% | NORMAL | Not Bad | GREEN |
| >45% | CAUTION | Keep Caution | YELLOW |
| <45% | SUGGESTREPLACE | Replace Needed | RED |
Reference Table for 12V Battery
7.3. CRANKING TEST
This test determines cranking state by testing cranking voltage and time.
7.3.1 Before Test
The engine and all the other accessory load must be OFF first in order to have accurate result.
7.3.2 Steps
7.3.2.1 Connect the Red (+) positive battery clamp to the (+) positive battery terminal. And connect the Black (-) negative battery clamp to the (-) negative battery terminal. Ensure that the clamp is securely attached to the correct terminals.
7.3.2.2 Ensure the tester is in the MAIN MENU page below, press “BACK” key till you find padre below or just press restart key fist till you find the MAIN MENU page below and try it.
7.3.2.3 Press to and select “CRANKING TEST”. 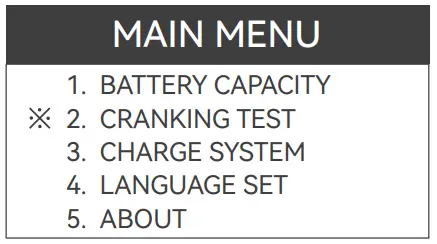
7.3.2.4 Press “ENTER”to initiate the Cranking Test and start the engine according to the instruction on the tester’s screen, You will get page below.
7.3.2.5 Reference Table (CRANKING V = Cranking Voltage)
| Reference Table (For 12V System) | ||
| Cranking Voltage | Cranking Ability | Action to Battery |
| >10.7V | Good | No Action |
| 10.2V~10.7V | Normal | Keep Caution |
| 9.6V~10.2V | Bad | Replace It Soon |
| <9.6V | Very Bad | Replace It Immediately |
Cranking Test Result Reference Table
7.4. CHARGE SYSTEM
This test determines charging system by testing its condition under loaded and unloaded status.
7.4.1 Before Test
The engine and all the other accessory load must be OFF first
7.4.2 Steps
7.4.2.1 Connect the Red (+) positive battery clamp to the (+) positive battery terminal. And connect the Black (-) negative battery clamp to the (-) negative battery terminal. Ensure that the clamp is securely attached to the correct terminals.
7.4.2.2 Ensure that the tester is in the MAIN MENU page below first, press “BACK” key till you find page below or just press restart key first till you find the MAIN MENU page below and try it.
7.4.2.3 Press to and select “CHARGING SYSTEM”. 
7.4.2.4 Press “ENTER” to confirm and Start the engine according to the instructions on the tester’s screen, you will get test result page below.

7.4.2.5 Reference Table
| Reference Table (For 12V System) | ||
| Status | Battery Voltage | Engine Performance |
| All Electric System Off (Depress Accelerator) |
>13.5 | Normal |
| 13.2-13.5 | General | |
| 13.0-13.2 | Keep Caution | |
| <13 | Inspection Immediately | |
| All Electric System On (Depress Accelerator) |
13.4-14.8 | Normal |
| 13.2-13.4 | Keep Caution | |
| <13.2 | Inspection Immediately | |
| For reference only. Bad batteries will affect the test results. | ||
Charging Test Result Reference Table
7.4.2.6 Note: Tool saves the result of the last test, not all testing data.
7.5 LANGUAGE SET
7.5.1 Steps
7.5.1.1 Ensure that the tester is in the MAIN MENU page below first, press “BACK” key till you find page below or just press restart key first till you find the MAIN MENU page below and try it.
7.5.1.2 Press to select “LANGUAGE SET”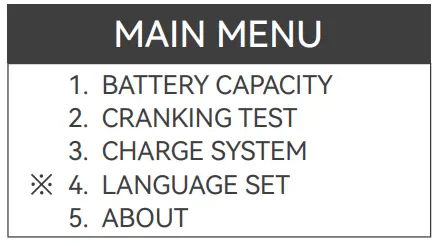
7.5.1.3 Choose Preferable Language and press “ENTER” to confirm.
Supports Language (English, Deutsch, Espanola, Lefrancais, Japanese, Portuguese, Polska, Italian, Magyarnyelv, Sven ska, Slovak, Cesky, Nader Lands, Pyccknn)
Tecnical Specification
| Display | 2.8” TFT colorful display |
| Working Temperature | -4°F – 140°F |
| Dimension | 21.8cm × 14.4cm × 6.8cm |
| Weight | 0.45kg |
FAQ
● Q: Is BT310 able to test vehicle alternator?
A: BT310 can test alternator(charging test) Q: Will BT310 hold the last result in memory?
A: Yes, it will keep the last result for data review. Q: Could it test 12 volt truck battery?
A: Yes, BT310 works on all the 12 volt and 24 volt battery, ranging fron 100-2000CCA. Q: How to set the CCA RATED?
A: You can set the data near the standard number of your battery. Q: Is the CCA value tested by this tester correct?
A: CCA is considered as ac control standard with the produce of the battery. According to the accumulated records, the tesed value of new battery is 10-15% higher than the standard value, and along with consuming of the battery, the value is getting close to standard, even lower afterward. Q: Can this battery tester to be used in vehicle and out of vehicle?
A: Yes, it can be used in vehicle or out of vehicle. Q: What does SOC, SOH, CCA mean?
A: SOC=State of charge / SOH= State of health / CCA= Cold Cranking Ampere. Q: What the meaning of the abbreviations in the instructions, such as CCA, IEC, EN, DIN,JIS, GB?
A: Those are some industrial standard of different countries. CCA= Cold Cranking Ampere. IEC= International Education Consortium. JIS= Japanese Industrial Standards. Simply choose it according to your battery specification. Q: Is there any way to contact seller if we have any questions?
A: Feel free to contact us via amazon customer support or contact us at [email protected], we will reply within 24 hours and try our best to help you.
Warranty & Support
10.1 VDIAGTOOL Two Year Limit Warranty
VDIAGTOOL warrants to its original purchaser that VDIAGTOOL products will be free from defects is the material or workmanship 24 our from the day of purchase. For the report from the date of warranty period, VDIAGTOOL will, according to the technical support and analysis and confirmation, either repair or replace the defective part or product.
10.2 The Limit Warranty Void Under the Following Conditions
Misused, disassembled, altered or repaired by Non-VDIAGTOOL technical repair specialist. Careless handling and violation of operation.
10.3 Support
E-Mail: [email protected]
Website: www.vdiagtool.com
For wholesale business or become our distributors:
E-Mail: [email protected]
Share us with your friends, join our community to get tutorials, support and more.
Scan qr code below to subscribe to our social media:

https://qr.page/g/18xMhLT9eOS
Facebook Page:
https://www.facebook.com/profile.php?id=61550760872613
Facebook User Group:
https://www.facebook.com/groups/1278852129665315
Instagram:
https://www.instagram.com/vdiagtool_official
Twitter:
https://twitter.com/VdiagTool
Tiktok:
https://www.tiktok.com/@vdiagtool_official
YouTube:
https://www.youtube.com/@VdiagTool12
Reddit:
https://www.reddit.com/r/vdiagtool/
Invent with us, test products before they hit market, help us make better products for everyone:
Test our new products before they hit market and help us make better products.
E-Mail: [email protected]
Create social media content, post online and help our community:
E-Mail: [email protected]
![]() SHENZHEN CHUANG XIN HONG TECHNOLOGY Co., Ltd.
SHENZHEN CHUANG XIN HONG TECHNOLOGY Co., Ltd.
Address: Room 801, Block A, Zaman Business Building,
Shieling Industrial Zone, Xanrey Village,
Xanrey Community, Xili Street, Nanshan District, Shenzhen, Guangdong.
Phone: +86-0755-86266490
E-mail: [email protected]
Website: www.vdiagtool.com