TMX-PRO Professional Monitoring Blood Glucose System
User Guide RE4TVHP08R42
Contents
Before Testing
✔ ALWAYS read the Owner’s Booklet before testing for the first time and before using this Quick Reference Guide.
Meter and Test Strip
Front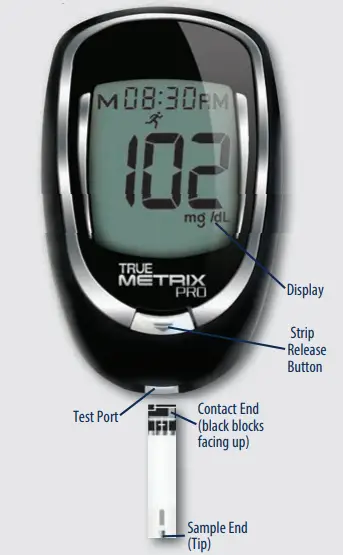
Back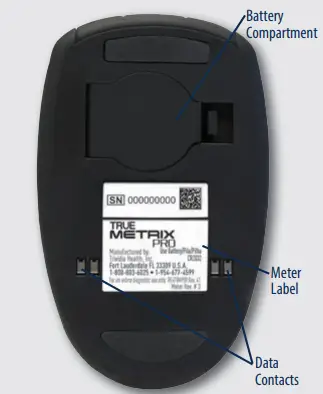
Blood Glucose Testing

Step 1
Wash your hands with warm, soapy water.
Dry thoroughly. Do not use alcohol. Put on disposable gloves.
Step 2
Gather your materials and prepare your lancing device. Remove test strip from vial and close vial immediately.
Step 3
Insert strip into Test Port with black blocks facing up. The meter turns on.
Step 4
Select area on patient to be lanced. Clean with soap and warm water, rinse and dry thoroughly.
Lance fingertip. Allow blood drop to form.
Step 5
Wait until Drop Symbol appears in Display. With strip still in meter, touch Tip of strip to blood drop. Allow blood to be drawn into strip. Remove test strip from blood drop immediately after meter beeps and dashes appear across Meter Display.
Step 6
Glucose result will be displayed with alternating date and time.
Step 7
Hold meter in a vertical position with strip pointing down. Press Strip Release Button to discard the used strip from the meter. Testing is complete.
Step 2 Tips
Peel and discard the clear protective sticker from the Meter Display.
Remove one Test Strip from vial. Then immediately press down vial cap firmly to close. See below for additional storage conditions.
Step 3 Tips
With meter off, insert Test Strip into Test Port with Contact End (black blocks) facing up. The Meter turns on.
DO NOT place Test Strip in backwards.
Step 5 Tips

With strip in Meter, touch Tip of strip to blood drop.
DO NOT place blood onto Test Strip before inserting Test Strip into Meter Test Port. 
DO NOT place blood drop on top of Test Strip or any other location except the Sample End (Tip) of the Test Strip.
After Testing
✔ ALWAYS store the test strips in the original vial with the cap tightly closed.
✔ ALWAYS keep the cap of the test strip vial tightly closed.
✘ NEVER transfer test strips from one vial to another. Do not expose to heat, moisture, or humidity.
✘ NEVER compare the meter to other meters.
✘ NEVER immerse meter or test strips in liquids or place any liquids onto meter or into the Test Port.
✔ Store TRUE METRIX® PRO System in a dry place at room temperature (40°F-86°F) at 10%-80% relative humidity. DO NOT FREEZE.
✔ Dispose of used test strips and lancets in accordance with local regulations.
Additional Information
- ALL parts of your blood glucose monitoring system could carry blood-borne pathogens after use, even after cleaning and disinfecting.1,2
- Cleaning and disinfecting the lancing device and the meter destroys most, but not necessarily all, blood-borne pathogens.
- Wash your hands thoroughly with soap and warm water before and after handling the meter, lancing device, lancets, or test strips as contact with blood presents an infection risk.
- If the meter is being operated by a second person who provides testing assistance, the meter and lancing device should be disinfected prior to use by the second person.
- It is important to keep the meter and the lancing device clean and disinfected. For instructions on how to clean and disinfect the meter and lancing device, see Meter Cleaning and Disinfecting and Lancing Device Cleaning and Disinfecting in the Owner’s Booklet.
Customer Consultation
English or Spanish, Monday – Friday,
8AM -8PM EST, 1-800-803-6025
www.trividiahealth.com
Manufactured by:
1. FDA Public Health Notification: Use of Fingerstick Devices on More than One Person Poses Risk for Transmitting Bloodborne Pathogens: Initial Communication. Available at https://wayback.archive-it. org/7993/20170111013014/https://www.fda.gov/MedicalDevices/Safety/
AlertsandNotices/ucm224025.htm. 2. Infection Prevention during Blood
Glucose Monitoring and Insulin Administration. Available at https://www.cdc.gov/injectionsafety/blood-glucose-monitoring.html.
- than One Person Poses Risk for Transmitting Bloodborne Pathogens: Initial Communication.
org/7993/20170111013014/https://www.fda.gov/MedicalDevices/Safety/
AlertsandNotices/ucm224025.htm. 2.
Glucose Monitoring and Insulin Administration.
cdc.gov/injectionsafety/blood-glucose-monitoring.html.
© 2021 Trividia Health, Inc. TRUE METRIX and Trividia Health logo are trademarks of Trividia Health, Inc. RE4TVHP08 Rev. 42
© 2021 Trividia Health, Inc. TRUE METRIX and Trividia Health logo are trademarks of Trividia Health, Inc.