Contents
TRUE FINE TD10041W Celina 7 in. 1-Light Black Wall Sconce Light

Product Information
The Wall Sconce is a lighting fixture that comes with a shade, screws, and mounting hardware. The package contents include a fixture body (A), shade (B), screws (C), mounting plate (DD), and wire nuts (BB). The product requires assembly and comes with an instruction manual that includes information on hardware contents, safety information, preparation, estimated assembly times, and required tools.
Hardware Contents
- A: Fixture Body
- B: Shade
- C: Screws (2)
- DD: Mounting Plate (1)
- BB: Wire Nuts (3)
Package Contents
- Fixture Body (A) x 1
- Shade (B) x 1
- Screws (C) x 2
- Mounting Plate (DD) x 1
- Wire Nuts (BB) x 3
Product Usage Instructions
- Before beginning assembly of the product, make sure all parts are present. Compare parts with package contents list and hardware contents list. If any part is missing or damaged, do not attempt to assemble the product.
- Estimated Assembly Time: 25 minutes. Tools Required for Assembly (not included): Flathead screwdriver, Phillips screwdriver, Pliers, Electrical tape, Wire cutters, Safety glasses. Helpful Tools (not included): Wire strippers, Step ladder.
- Install the shade (B) to the fixture body (A) and fix it with screws (C).
- Attach the mounting plate (DD) to the outlet box (not included) with the long mounting screws (CC).
- Strip 3/4 in. of insulation from wire ends. Twist stripped ends together with pliers (not included), black to black (power) and white to white (neutral). Attach copper wire to ground wire. Helpful hint: If necessary, attach copper ground wire to grounded outlet box.
- Attach wire nuts (BB). Tape wire nuts (BB) and wires together.
- Place fixture (A) onto the mounting plate (DD). Secure with short mounting screws (AA).
- Install the bulb (not included), use one E26 bulb.
Please read and understand the entire manual before attempting to assemble, operate, or install the product. For any further assistance or queries, please contact customer service at [email protected].
PACKAGE CONTENTS

| PART | DESCRIPTION | QUANTITY |
| A | Fixture | 1 |
| B | Shade | 1 |
| C | Screw | 2 |
HARDWARE CONTENTS(shown actual size)

SAFETY INFORMATION
Please read and understand this entire manual before attempting to assemble, operate or install the product
WARNING
- TURN OFF ELECTRICITY at main fuse box (or circuit breaker box) before beginning installation by removing fuse (or switching off circuit breaker).
- MINIMUM 90°C SUPPLY CONDUCTORS.
PREPARATION
- Before beginning assembly of product, make sure all parts are present. Compare parts with package contents list and hardware contents list. If any part is missing or damaged, do not attempt to assemble the product.
- Estimated Assembly Times: 25 minnutes
- Tools Required for Assembly (not included): Flathead screwdriver , Phillips screwdriver, Pliers, Electrical tape, Wire cutters, Safety glasses.
- Helpful Tools (not included): Wire strippers, Step ladder.
- Customer Service: [email protected]
ASSEMBLY INSTRUCTIONS
- Install the shade (B) to the fixture body (A) and fix it with screws (C).

- Attach the mounting plate (DD) to the outlet box (not included) with the long mounting screws (CC). Hardware Used

- Long mounting screw
- Mounting plate

- Strip 3/4 in. of insulation from wire ends. Twist stripped ends together with pliers (not included), black to black (power) and white to white (neutral). Attach copper wire to ground wire. Helpful hint:
If necessary, attach copper ground wire to grounded outlet box.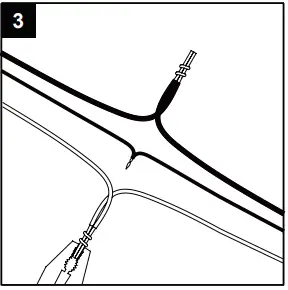
- Attach wire nuts (BB).Tape wire nuts (BB) and wires together.
Hardware Used - Place fixeture (A) onto the mounting plate (DD). Secure with short mounting screws (AA).
 Hardware Used
- Short mounting screw
- Mounting plate

- Install the bulb (not included), use one E26 bulb.
