tp-link 7106510711 Smart Thermostatic Radiator Valve User Guide

Contents
Figure1: Compatibility
M30 x 1.5
(No adapter required.)
(No adapter required.)
RA Adapter

CAL Adapter

RAVL Adapter
RAV Adapter

GIA Adapter

M28 Adapter

CAL Adapter
RAVL Adapter
RAV Adapter
GIA Adapter
M28 Adapter
Figure 2: Overview
Indicates the position of the display
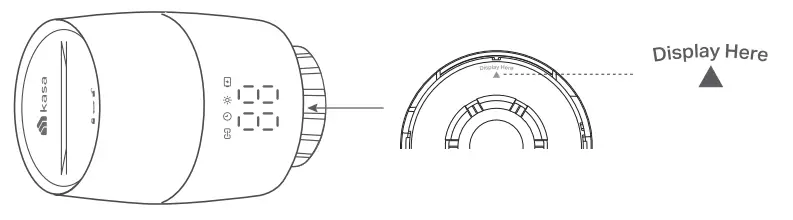
LEDs
Install Requirements
- Kasa Smart Thermostatic Radiator Valve is only compatible with the thermostatic valve, not manual valve.
- No need to shut off water before changing the radiator valve. Water will not leak.

- Avoid installing the valve in the same room where you have installed the boiler thermostat.
Install the Valve
- Unscrew the existing valve.
- Refer to Figure 1 to install the new valve. The ▲ at the bottom of the valve indicates the position of the display.
- For M30 x 1.5 connector: Screw the new valve directly.
- For non-M30 x 1.5 connector: Check whether one of the provided adapters fits the connector. If none of them fit your connector, please purchase a proper one yourself.
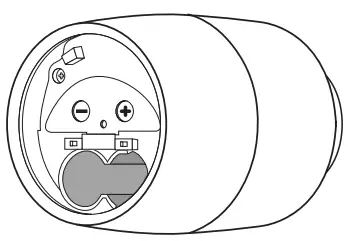
- Remove the cover of the valve by rotating counterclockwise using the provided cover-opener.

- Open the battery cover and insert two AA LR6 alkaline batteries. Make sure the positive and negative terminals face the correct direction
Compatible Batteries:
| Battery Type | Voltage | Work Temp. |
| AA LR6 alkaline battery | 1.5V | 0℃ -40℃ |
o NOT use rechargeable batteries or 1.2V AA batteries.
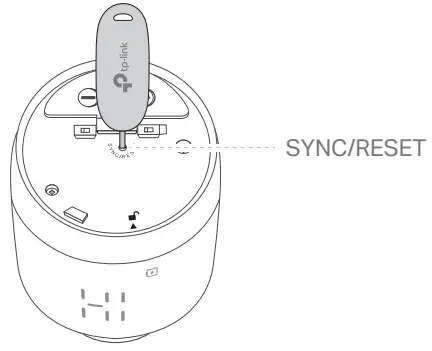
Set Up the Valve
- Kasa smart hub required. Download the Kasa Smart app in the App Store or Google Play.
- Use the provided cover-opener to press and hold the SYNC/ RESET button for 5 seconds to reset the valve.
- Open the Kasa Smart app, tap + and select Smart Thermostats. Follow the app instructions complete setup.

Don’t Have a Hub?
You can adjust temperature manually. After inserting the batteries, the valve is ready to use. Rotate the valve to adjust the temperature.
 Check frequently asked questions at
https://www.tp-link.com/support/faq/3404/
Visit www.tp-link.com/support/ for technical support, user guides, FAQs, warranty & more.
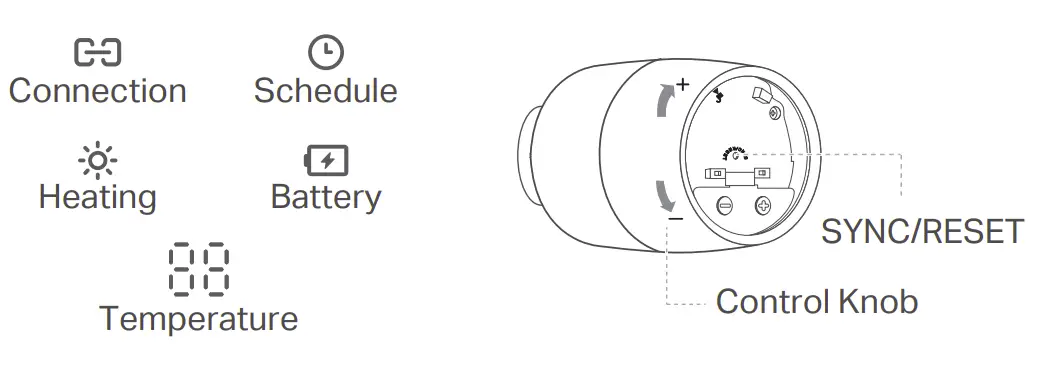
LED Explanations
| Connection | Blinking slowly | Ready to be paired; Offline |
| Blinking fast | Pairing; Device resetting | |
| Solid on | Pairing complete | |
 Schedule Schedule |
Solid on | Adjust temperature based on your schedule |
 Heating |
Solid on | Raise temperature |
| LED is off | Keep/lower temperature | |
| Blinking | Low battery | |
| Solid on | Sufficient battery power |
| 88 | Blinking 88 twice, then blinking | Starting up |
| Moving light HI | Calibrating | |
| Switching between LC and normal temperature | Child lock enabled | |
| Switching betwee Fr nand normal temperature | Frost protection | |
| Displaying Lo | Low battery;Valve can’t work properly | |
| Displaying FF | Sleep mode enabled | |
| Displaying E1 | No valve detected or valve not compatible | |
| Displaying E2 | Valve blocked |
Button Explanations
| Button | Operation | Result |
| Control Knob | Rotate clockwise | Raise temperature. |
| Rotate counterclockwise | Lower temperature. | |
| Rotate with no shown display | Activate the display. | |
| SYNC/ RESET | Press and hold for 5 seconds | Restore to factory default settings, and enter pairing mode. |
Visit www.tp-link.com/support/
for technical support, user guides, and more information