Contents
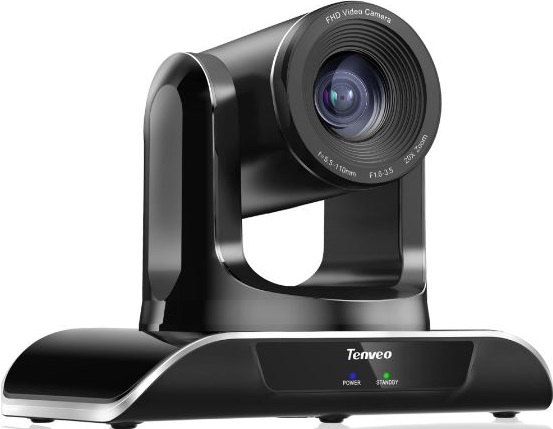
Tenveo VHD-PRO PTZ Optical Zoom Conference Room Camera
Product Description
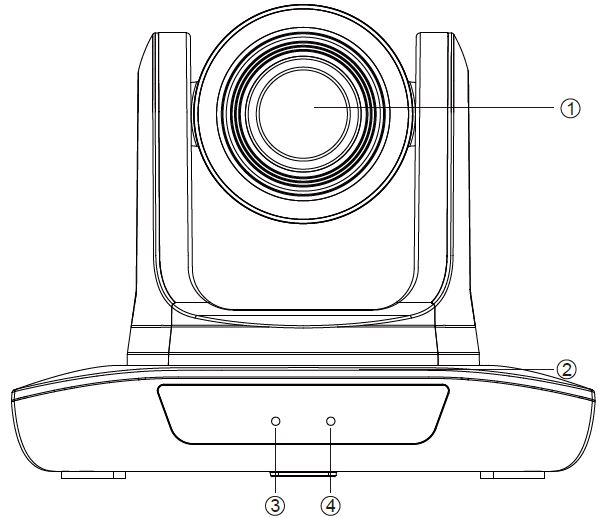
Front
- Lens
- Pan & Tilt
- Power
- Standby
Back
- DC 12V
- RS-485
- RS-232
- IR Receiver
- USB
- HDMI

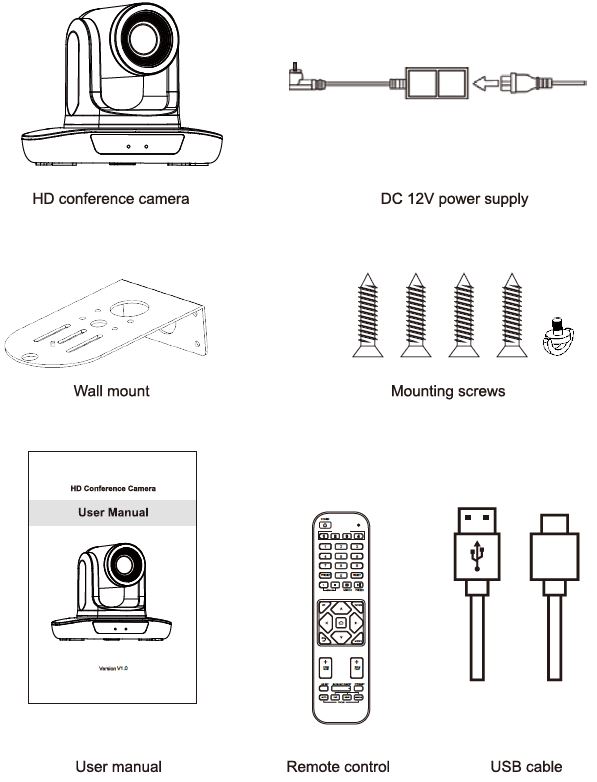
Packing List
Performance Characteristics
| Model No. |
1080P 3X Zoom |
1080P 10X Zoom |
1080P 12X Zoom |
1080P 20X Zoom |
4K 12X Zoom |
| Sensor | 1/2.8”SONY CMOS | 1/2.8”SONY CMOS | |||
| Effective Pixels | 2.38 megapixel | 8.29mega pixel | |||
|
Video Signals |
1080p@60/50/30/25fps, 720p@60/50/30/25fps |
4K@30/25fps,
1080p@60/50/30/25fps, 720p@60/50/30/25fps |
|||
| Zoom |
3x optical zoom |
10x optical zoom |
12x optical zoom |
20x optical zoom |
12x optical zoom |
| Lens |
f=2.38-7mm |
f=5.76-46.09mm |
f=3.42-40.02mm |
f=5.9-94.4mm |
f=3.42-40.02mm |
| Aperture |
F1.96-3.64 |
F1.8-2.6 |
F1.88-3.77 |
F1.8-3.9 |
F1.88-3.77 |
| Horizontal Angle |
103.69°(W)-42.12°(T) |
54.7°(W)-6.8°(T) |
80.56(W)-7.89°(T) |
52.1°(W)-3.4°(T) |
80.56(W)-7.89°(T) |
| Vertical Angle |
67.14°(W)-24.87°(T) |
30.8°(W)-3.8°(T) |
49.61°(W)-4.46°(T) |
29.3°(W)-1.9°(T) |
49.61°(W)-4.46°(T) |
| Diagonal Angle |
113.91°(W)-47.55°(T) |
62.8°(W)-7.8°(T) |
89.51°(W)-9.04°(T) |
59.8°(W)-3.9°(T) |
89.51°(W)-9.04°(T) |
| Video Output |
USB3.0, HDMI |
USB3.0, HDMI |
|||
| LAN |
/ |
/ |
|||
| Network Protocol |
/ |
/ |
|||
| Video Encoding Format |
H.264, H.265, MJPG, YUY2 |
H.264, H.265, MJPG, YUY2 |
|||
| Video Resolution |
1080P (1920 *1080) etc |
4K (3840*2160) etc |
|||
| Signal Standard | NTSC/PAL | ||||
| Preset Position | Users can set up to 255 presets (10 presets by IR remote) | ||||
| Control Interface | RS-232 (input only), RS-485, USB | ||||
| Shutter | 1/30s-1/10000s, auto | ||||
| Baud Rate | 2400/4800/9600/38400bps | ||||
| Control Protocol | VISCA, PELCO-D, PELCO-P(RS-232, RS-485) | ||||
| USB Protocol | UVC1.1 | ||||
| Minimal Illumination | 0.1Lux | ||||
| SNR | ≥50dB | ||||
| Horizontal Rotation | 350° (±175°) 0.1°/s~100°/s | ||||
| Vertical Rotation | 180° (±90°)0.1°/s~80°s | ||||
| Power Supply | DC 12V/2A | ||||
| Power Consumption | 12W | ||||
| Work Temperature | 0°~+50° | ||||
| Work Humidity | 0~95% RH | ||||
| Product Size | 247.1*152*169.6mm/285*217*197mm(before / after packing) | ||||
| Product Weight | 1.37kg/2.45kg (net / gross weight) | ||||
Remote Control Button Description

| No | Name | Function |
| 1 | Lunch Window | Remote control launch window |
| 2 | Power Key | Enter into standby mode by pressing it |
| 3 | Camera Select Key | Select the camera needed to control |
|
4 |
Preset Position |
Preset position setup keys,
include【PRESET】and【RESET】 Set the preset position Reset the preset position |
| 5 | Brightness | Increase or decrease video brightness |
| 6 | Screen Freeze | Turn on or turn off Screen Freeze |
| 7 | Mirror | Turn on the video (left and right) mirror |
|
8 |
Up |
The camera rotates horizontally in the regular installed direction |
|
9 |
Down |
The camera rotates horizontally in a reversed installed direction |
|
10 |
PTZ Control Key |
PTZ moves according to the arrow. Press PTZ will return to the middle position PTZ will return to the middle position |
| 11 | Return Key | Return to the previous operation |
| 12 | Menu | Enter or exit the OSD Menu after pressing it |
| 13 | ZOOM Slow Key | Zoom in + or out – slowly |
| 14 | ZOOM Fast key | Zoom in + or out – quickly |
| 15 | L/R Set Key | Long press 10 Seconds to switch the left and right directions |
| 16 | Backlight KEY | Turn on/off the backlight compensation |
| 17 | PTZ Reset Key | The camera returns to its original position |
|
18 |
Auto Focus |
Auto/far/near/manual Default: Autofocus |
Attentions for Remote Control
- Please check whether the indicator corresponding to the camera selection area is on or not.
- If the remote control doesn’t work, please replace the batteries.
- Make sure the Number keys on the camera selection area are consistent with the remote control address in the menu.
Camera Menu Setup
When operating a remote control, press MENU) to enter the main menu of the video camera.
Level 1 Menu – Main Menu

- Language: Support Chinese/English
- Click the Home button on the Remote to enter the level 2 sub-menu Click the Menu button on the Remote to exit the menu.
Level 2 Menu – Exposure

- Mode: Auto/Manual
- Backlight: On/Off the backlight
- ExpComp: Exposure compensation, optional item is 0 to 15
- Flicker: Support 50Hz/60Hz
- When changing the exposure mode to Manual, the sub-menu is as follows,

- lris: F No. Setting, the value should be
- F1.6/F2.0/F2.4/F2.8/F3.4/F4.0/F4.8/F5.6/F6.8/F8.0/F9.6(Suitable for 10x and 12x Zoom PTZ Camera)
- Shutter: Shutter value setting, the value is between 1/100000 and 1/25 Gain: Exposure Gain Setting, the optional item is 0 to 99
- Flicker: Off/50HZ/60HZ
Level 2 Menu – Color

- Brightness: Set image brightness dynamically. Default 50, optional item is 0-99 Contrast: Set image contrast dynamically. Default 50, optional item is 0-99 Hue: Set the relative brightness of the image. Default 50, optional item is 0-99 Saturation: Set image color effect. Default 50, optional item is 0-99 Sharpness: Set sharpness level. Default 50, optional item is 0-99
- WB mode: Auto/Manual/VAR
- When the WB mode is Auto, the Rtuning and Btuning values can be tuned and the range is 0 to 99
- When the WB mode is Manual, the sub-menu will be the following:

- In manual WB mode, the above values can be adjusted. The Rgain and Bgain value can be tuned, the range is 0 to 99. When the WB mode is VAR, the sub-menu will be the following:

- The range for the color temp can be adjusted between 2500K to 9000K.
Level 2 Menu – Image

- Flip: Off/On, Enable/disable the picture up/down
- Mirror: Off/On, Enable/disable the picture left/right flip
- Video Format: 1080P60/1080P50/1080P30/1080P25
- 720P60/720P50/720P30/720P25
- Menu Mirror: Off/On, Enable/disable the menu picture left/right flip Mode: ISOC/BULK
- USB mode: Adjust between asynchronous transfer mode and bulk transfer mode. Style Mode: Normal, PC, Bright
Video Format
1080P supports video formats as follows

- 4K supports video formats as follows:

Level 2 Menu P/T/Z

Acc Curve: Adjust the rotation speed of the Pan and Tilt, Fast/Middle/Slow,
Level 2 Menu-Communication

- Protocol: Default Visca, option item Visca/PELCO-D/PELCO-P/Auto Address: Set the camera’s address, option item 1-7 in Visca,
- 1-255 in PELCO-D, 1-32 in PELCO-P
- Baudrate: Default 9600, option item 2400/4800/9600/38400
- RC Address: Set the IR remote control’s address to control the corresponding camera, option item ALL/1/2/3/4
Level 2 Menu-Information

- Model: UHD Camera (FHD for 1080P Camera and UHD for 4K Camera) Version: 1.0.1.0
- Date: 2023-08-21
- Notice: The version number here is just an example, the actual parameters shall prevail.

Restore: No/Yes, before you Exit the Menu, please choose to restore all settings on the menu or not.
Common Operation Instructions
Camera Select
Set the IR remote control’s address to control the corresponding camera, option item 1/2/3/4.

Camera Direction Control
 Turning up
 Turning down
 Turning left
 Turning right
- Turning to default

Note: Press the direction key when you need to adjust the angle. If you want to move the camera slowly, just click the direction key; If you want to move the camera fast at a large scale, just long-press the button.
Camera Focus Mode Control
- [AUTO Switch the focus mode to AUTO
- ( MANUAL Switch the focus mode to MANUAL
- (FAR) Far focus manually
- (NEAR) Near focus manually

Camera Zoom Control
Press any one of the 4 [ZOOM) to make the zoom function. These 4 keys are not applicable for fixed-focus cameras.

Preset Setup, Call, Cancel
- Reserve Preset: Press [PRESET, then press one of the numbers (0- 9) to reserve a preset that corresponds to the NUMBER.
Note: You can set up 10 presets at most by the remote control. - Call Preset: Press the NUMBER (0-9) directly to call the reserved preset.
Note: It won’t work if there’s no preset reserved in the corresponding number. - Remove Preset: Press [RESET 1, then press one of the numbers (0- 9) to remove a preset that corresponds to the NUMBER.

RS-232 Interface Distribution

RS-485 Interface Distribution
| PIN NUM | FUNCTION |
| A | DTR IN+ (connect to RS-485) |
| B | DSR IN-(connect to RS-485) |

Installation Instructions
Surface Installation
Put the camera on the desk flatly, and make sure the camera is in a horizontal position. If you want to put the camera on an oblique surface, please ensure the angle of inclination is less than 15 degrees to ensure the camera’s pan and tilt work normally.

Wall Mount Installation

Trouble Shooting
Before requesting service from the service engineer, please refer to the following methods to remove failures. If the failures still can’t be solved, please contact us for assistance.
- Q: The video of the camera cannot be displayed on the screen.
A: Please check the connection between the power cable, video cable, camera, and monitor, and fix the connector on each end. - Q: It’s unable to Pan, Tilt, and Zoom cameras.
A: Because the menu was displayed on the monitor. Please re-operate after exiting the menu. - Q: Why does the camera rotate for about 10 seconds after powering on?
A: This is the normal self-test of the camera. - Q: Poor Image quality while using in church or other low-light conditions.
A: Press the menu (ON/OFF) to adjust the backlight effect to suit the church lighting properly. - Q: The remote control is not working or is insensitive.
A: Not work, please replace batteries.
Not sensitive: Choose the correct “IR select” number to respond to the camera. Control the camera within 10m (32.8ft). Remove the obstacles. Aim at the sensor which is in front of the camera when controlling it. - Q: The USB interface is not identifiable.
A: Please check if the USB cable and extension cable are well connected or not. If yes, change to another USB interface and try to connect again. - Q: It won’t be controlled via RS-232/RS-485 when the camera connects to the PC.
A: Make sure there is a correct connection between the camera and the PC. (Refer to RS-485 and RS-232 Pins distribution). - Q: Why no ceiling mount bracket?
A: The camera comes with a wall mount only. ceiling mount or tripod brackets need to be bought separately. - Q: Does this camera have a built-in mic?
A: No, this camera comes with no built-in mic. - Q: Can we control the camera only with the remote control?
A: You can control the camera by remote control, keyboard controller (joystick), and software.
Maintenance Services
All products purchased from our company are guaranteed to keep in good repair for 36 months. If there are any quality problems during the guarantee period, we will maintain them for free.
Under any of the following warranties, related maintenance costs will be collected:
- The product was not normally used.
- Fire, electric shock, outside object collapse, or other natural disasters cause the equipment damaged.
- Unauthorized repair, misuse, abuse, or change.
Warranty Card
Thank you so much for choosing our products.
User’s Info
- Name:………………………………………..Tel:………………………………….
- Email:………………………………………..Post Code:………………………..
- Address:…………………………………….
- Product’s Info:……………………………………………………………………..
- Product Name:……………………………………………………………………..
- Factory Serial Number:…………………………………………………………
- Fault Description………………………………………………………………….
Attention
- This card is considered as the protection to fix the warranty, so please reserve it carefully. Please fill in truthfully.
- Please indicate the model number, factory serial number, and a detailed description of the fault information.