![]() TRUNK WITH HANDLES
TRUNK WITH HANDLES
AGR-386
Contents
DECOR AGR-386 Gray Wood Storage Trunk
Purchase Date: / / Order/Customer Reference Number:
Thank you for choosing Sunnydaze Decor. We stand behind our brand and the quality of the items we sell.
Replacement parts or products will be sent at our discretion within the 1-year warranty period. Proof of purchase, with the date of purchase as well as photos of the merchandise defect, must be provided. Photos are used to determine the cause of defects and for future quality control. Register your warranty at https://tiny.cc/SunnydazeWarranty If you have any questions, comments or concerns, feel free to contact us by phone at 833-982-1977, by email: [email protected], or via our contact us page at https://tiny.cc/SunnydazeContact
Carefully review assembly and care instructions before using this product. Save this document for future reference.
Assemble components on a soft, clean surface to avoid scratching or damaging the finish.
![]() 2-PERSON ASSEMBLY RECOMMENDED
2-PERSON ASSEMBLY RECOMMENDED
SCAN THIS CODE WITH YOUR SMARTPHONE TO VIEW OUR ASSEMBLY VIDEO

HELPFUL HINTS
Sunnydaze Decor advises reviewing this manual fully, and assembling the unit soon after purchase.
Check that all parts are accounted for and familiarize yourself with the assembly before beginning.
HELPFUL HINTS
Sunnydaze Decor advises reviewing this manual fully, and assembling the unit soon after purchase.
Check that all parts are accounted for and familiarize yourself with the assembly before beginning.
SAVE THIS MANUAL FOR FUTURE REFERENCE.
INTRODUCTION
Read the manual carefully to ensure you fully understand all use, care, assembly, and safety information.
| Read this manual carefully and follow the assembly instructions in the order listed. Pay close attention to assembly drawings. | |
| Regularly clean with a clean microfiber cloth to prevent dust accumulation. | |
| Do not paint the unit. Do not use abrasive materials or cleaners to clean the furniture. |
|
| Indoor use only. Do not expose the furniture to heat or humidity. |
|
| When cleaning nearby the furniture, do not allow contact with water or cleaners as it may deteriorate the furniture. | |
| Do not allow metal components to come in contact with water or cleaners as it may cause rust and staining. | |
| Assemble on a soft, flat, clean, and dry surface. Use a soft, protective barrier when assembling the furniture. TIP: Use the box carton as a protective layer to separate and protect the parts from scratches and other damage during assembly. |
|
| Do not push or drag furniture as doing so may damage the unit. Only move furniture when it is empty. Always ask for help when moving furniture. |
|
| Avoid Accidents – Do not climb, sit or stand on the furniture. Do not allow children to play on or inside the furniture. |
|
| Keep sharp objects away as they may scratch or damage the unit. Do not use the furniture as a writing surface without a padded barrier. |

NOTICE:
Manufacturer and seller expressly disclaim any and all liability from personal injury, property damage or loss, whether direct or indirect, or incidental, resulting from the incorrect attachment, improper use, inadequate maintenance, or neglect of this product.
COMPONENTS
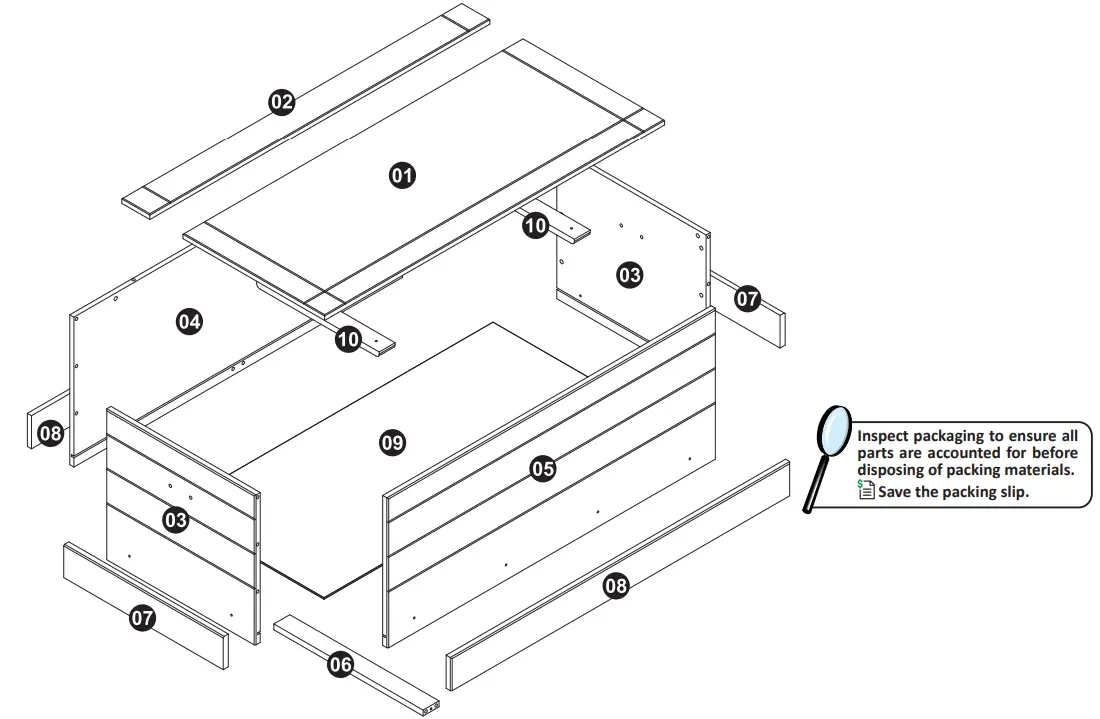
| SEQ. | PART NAME | QTY. |
| 1 | Lid | 1 |
| 2 | Cap Panel | 1 |
| 3 | Side Panel (L/R) | 2 |
| 4 | Back Panel | 1 |
| 5 | Front Panel | 1 |
| 6 | Bottom Support Rail | 1 |
| 7 | Short Trim Board (L/R) | 2 |
| 8 | Long Trim Board (L/R) | 2 |
| 9 | Bottom Panel | 1 |
| 10 | Lid Support Rail | 2 |
![]()
2-PERSON ASSEMBLY RECOMMENDED
Tools Required (not included)
 |
Phillips Screwdriver |
 |
Rubber Mallet |
WARNING
CHOKING HAZARD — This item contains small parts that can be swallowed. Keep children and pets away during assembly.
| No. |  Hardware Hardware |
Qty. |
| A |  Wood Dowel Wood Dowel |
18 |
| B |  M4.5x28mm Pan Screw M4.5x28mm Pan Screw |
2 |
| C |  M4x16mm Bolt M4x16mm Bolt |
4 |
| D |  Connector Connector |
19 |
| E |  Tack Tack |
6 |
| F |  Handle Set Handle Set |
2 |
| G |  M3x16mm Flat Screw M3x16mm Flat Screw |
8 |
| H |  M4.5x25mm Pan Screw M4.5x25mm Pan Screw |
35 |
| J | 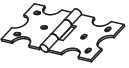 Hinge Hinge |
2 |
| K |  M3.5x14mm Pan Screw M3.5x14mm Pan Screw |
12 |
| L |  Lid Support Lid Support |
2 |
ASSEMBLY
Carefully review all steps and fully understand assembly before beginning.
IMPORTANT: Take care not to over-tighten screws as doing so may crack the wood or strip the screw hole, causing a weak connection and reduced stability.
STEP 1
03: 2
04: 1
06: 1
A: 18
Locate and lay out two Side Panels (03),
Back Panel (04) and Bottom Support Rail (06).
Install Wood Dowels (A) as noted below, and shown in the diagrams above:
Side Panels (03), install six Wood Dowels (A). Repeat with the remaining side panel.
Back Panel (04), install two Wood Dowels (A).
Bottom Support Rail (06), install four Wood Dowels (A).
STEP 2
D: 19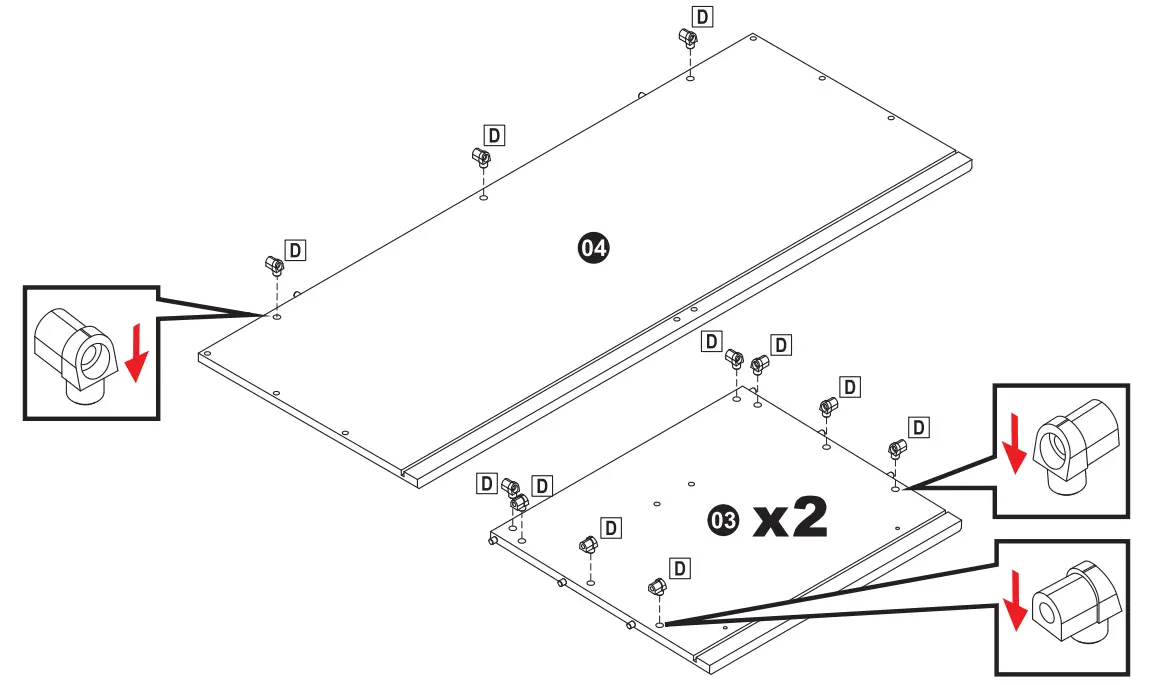
TIP: Install connectors by gently tapping them into the designated holes using a rubber mallet.
With the angled edge facing the inside of the panel, install eight Connectors (D) into two Side Panels (03). Then, install three Connectors (D) into Back Panel (04).
STEP 3
H: 6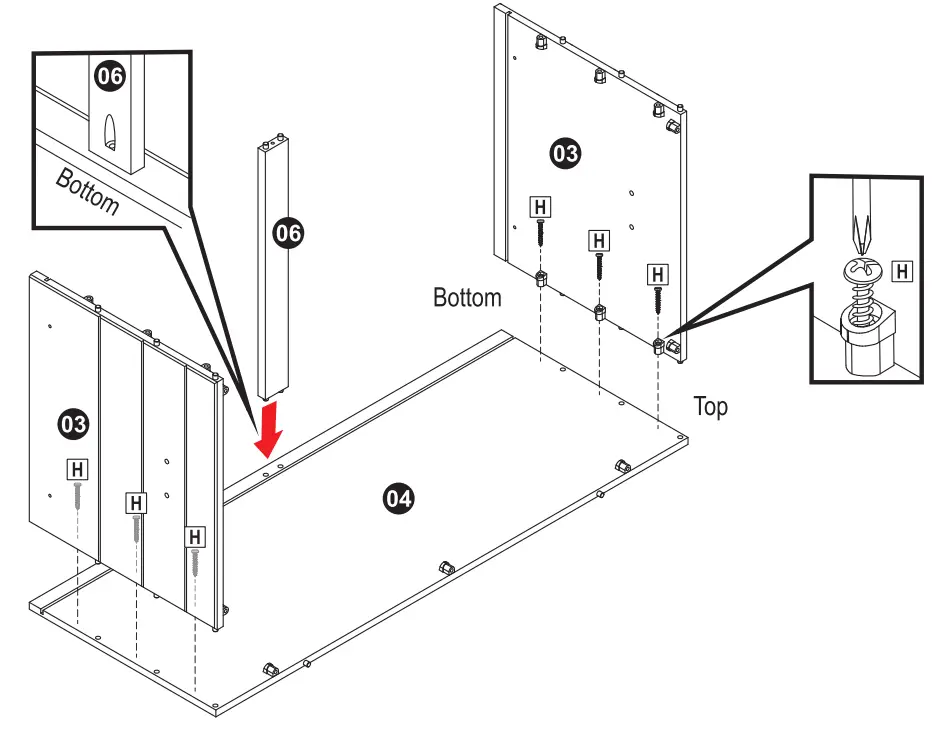
IMPORTANT:
Ensure components are installed in the correct direction, as shown in the diagram.
Ensuring the bottom grooves align, secure two Side Panels (03) to Back Panel (04) using six M4.5x25mm Pan Screws (H).
Ensuring the angled mounting holes face the bottom, align Bottom Support Rail (06) with the back panel, as shown.
NOTE: The support rail will be secured in Step 6.
STEP 4
09: 1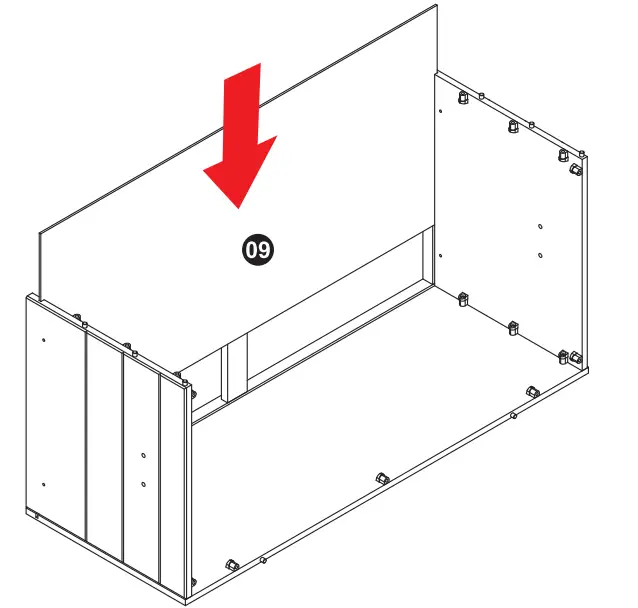
Slide Bottom Panel (09) into the grooves, as shown.
STEP 5
05: 1
H: 6
STEP 6
B: 2
Secure Bottom Support Rail (06) to the front and back panels using two M4.5x28mm Pan Screws (B).
STEP 7
07: 2
H: 4
![]() Assistance is recommended for this step.
Assistance is recommended for this step.
Align two Short Trim Boards (07) with the bottom of the side panels, as shown.
To ensure they remain flush with the unit while hardware is secured, have an assistant firmly hold the trim boards in place. From the inside of the trunk, secure each trim board using two M4.5x25mm Pan Screws (H).
STEP 8
08: 2
H: 8

Align two Long Trim Boards (08) with the bottom of the unit, as shown.
Have an assistant firmly hold the trim boards in place to ensure they remain flush with the unit while hardware is secured. From the inside of the trunk, secure each trim board using four M4.5x25mm Pan Screws (H).
STEP 9
02: 1
C: 4
F: 2
H: 5
Align the components of Handle Sets (F) with the side panels. Ensuring the handle plates remain straight, secure each handle set using two M4x16mm Bolts (C).
Align Cap Panel (02) with the dowels on the back panel. Secure the cap panel using five M4.5x25mm Pan Screws (H).
STEP 10
01: 1
10: 2
H: 6
J: 2
K: 6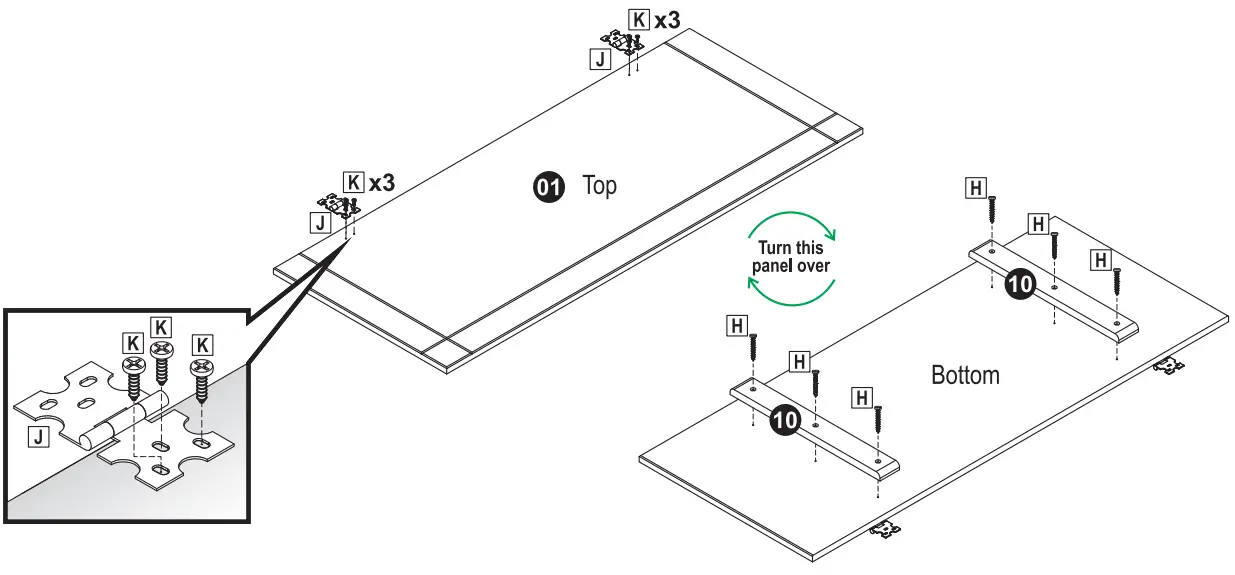
Lay Top (01) face-up on a clean, smooth surface.
Align two Hinges (J) with the indents on the top and mostly fasten them using six M3.5x14mm Pan Screws (K).
Turn the top over and align two Lid Support Rails approximately 5 inches (5in, 12.7cm) from each short edge of the top. Secure each support rail using three M4.5x25mm Flat Screws (H).
STEP 11
K: 6
Ensuring Top (01) is aligned with Cap Panel (02), secure the hinges to the cap panel using six M3.5x14mm Pan Screws (K).
STEP 12
G: 8
L: 2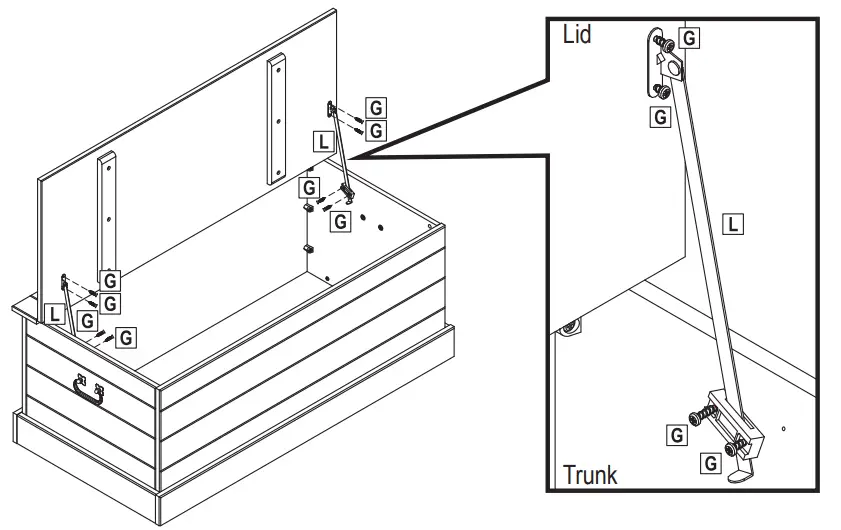
Align the metal mounting plate of Lid Support (L) with the indents on the underside of the lid and secure using two M3x16mm Flat Screws (G).
Align the plastic mounting bracket, at an angle, with the indents on the inside of the trunk and secure using two M3x16mm Flat Screws (G).
NOTE: There are 3 indents on the side panels, this is a result of the manufacturing process so the panels are interchangeable (can be installed on the left or right side and still allow for proper alignment of the lid supports).
STEP 13
E: 6
For even spacing, carefully measure and install eight Tacks (E) as indicated above.
HELPFUL MEASURING HACK
To help ensure tacks are evenly spaced, we developed a hack to make this step easier.
Grab a blank white piece of paper or tracing paper, a writing utensil, a ruler and scissors.
The blocks below are sized to the dimensions noted in the above diagrams.
Place the blank piece of paper over the blocks below. Use a writing utensil to mark the corner of each block.
Use a ruler to connect the dots of each block. Write the size inside the block and cut them out.
Align the cutout with the designated corner (shown aboveUse the sharp end of one of the tacks to make a small indent at the inside corner of cutout.
After tack placement has been marked, install tacks using a rubber mallet. 
SAFETY STATEMENTS & WARNINGS
- Residential use only. Not for commercial or industrial use.
- For indoor use only.
- Ensure fittings are tight before use. Periodically check fitting to ensure they are tight.
- Only use this unit on a flat, level surface.
- Do not sit, stand or climb on the unit.
- Supervise children; never allow children to climb on or play in this unit as doing so may cause serious injury.
- Do not place liquids or hot items directly on the furniture.
- Never use chemical cleaning products or polishes as they may damage the finish.
- Do not exceed the weight capacity of the furniture.
- Never move the unit when items are inside, empty the unit before moving.
- Do not place the unit in direct sunlight.
- Avoid placing unit near heating or cooling vents as forced air is very drying and can damage the unit.
- Do not write on furniture without a padded barrier to protect the surface.
Any modification to the product or failure to follow recommended care will void the product warranty.
If you experience issues with assembly or the product was damaged during shipping, please contact our customer service team directly through one of the methods mentioned at the top of page 1.
Please have the item number and order information ready to expedite response time.
NOTICE:
Manufacturer and seller expressly disclaim any and all liability from personal injury, property damage or loss, whether direct or indirect, or incidental, resulting from the incorrect attachment, improper use, inadequate maintenance, or neglect of this product.