Contents
SSV WORKS RZ5-Q5A2 5 Speaker Plug and Play System
WIRING DIAGRAM OF COMPLETE KIT
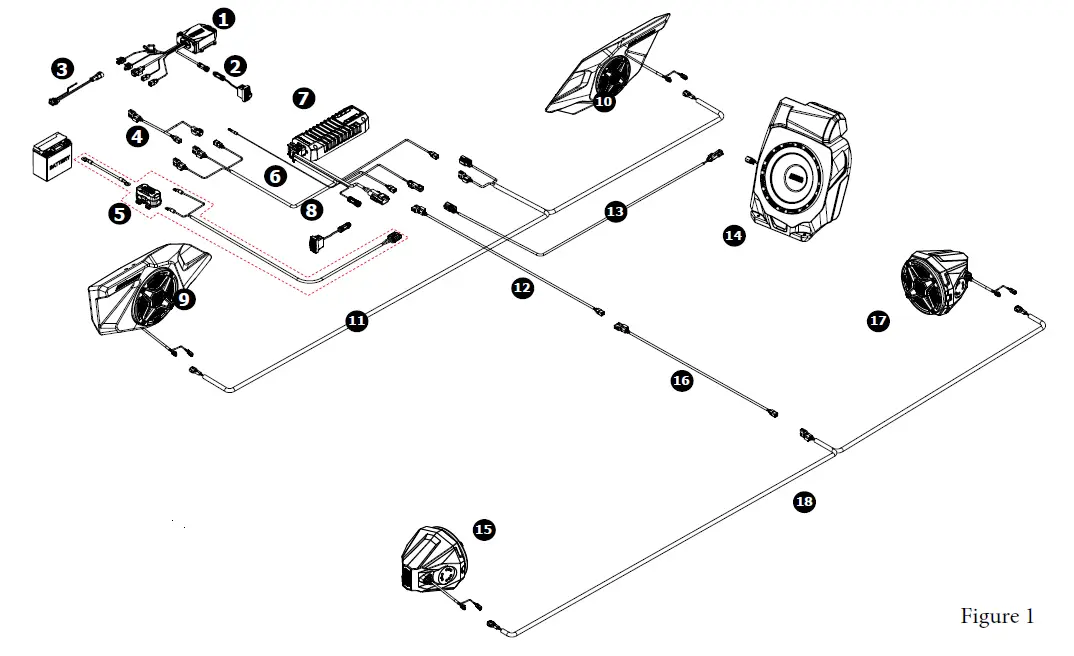
Figure 1 is designed to show the installer a reference overview of the complete 5 speaker wiring diagram. Each installation section will have its own detailed wiring diagram.
| Description | Part # | |
| 1 | Bluetooth Media Receiver |
B-MRB2R |
| 2 | MRB2R Rocker Switch Controller | |
| 3 | Pulse Connector to MRB2R Power Harness | B-H2744 |
| 4 | 4 Pin “Y” Audio Splitter | B-H1403 |
| 5 | Amp Wiring Kit Assembly, 10 ft. | A-H1Q |
| 6 | 800.5 Amplifier 32-Pin Universal Harness | B-H2605 |
| 7 | 800 Watt 5 Channel Amplifier | B-A8005 |
| 8 | Amplifier Rock & Ride Controller for B-A8005 | B-AMPRS |
| 9 | Front Kick Pod Enclosure, Left | B-RZ5-DD65A |
| 10 | Front Kick Pod Enclosure, Right | B-RZ5-PD65A |
| 11 | Driver/Passenger “Y” Speaker Harness | B-H1909 |
| 12 | 4-Pin Extension Harness, 8 ft. | B-H1913 |
| 13 | 2-Pin Audio, Sub Extension Harness | B-H3074 |
| 14 | Loaded Under Dash Sub, 10” 2 ohms | 230-RZ5-UD10V |
| 15 | 6.5” Loaded Cage Pod, Left | A-C65A |
| 16 | 4-Pin Extension Harness, 2 ft. | B-H1912 |
| 17 | 6.5” Loaded Cage Pod, Right | A-C65A |
| 18 | Rear “Y” Speaker Harness, 7 ft. | B-H2195 |
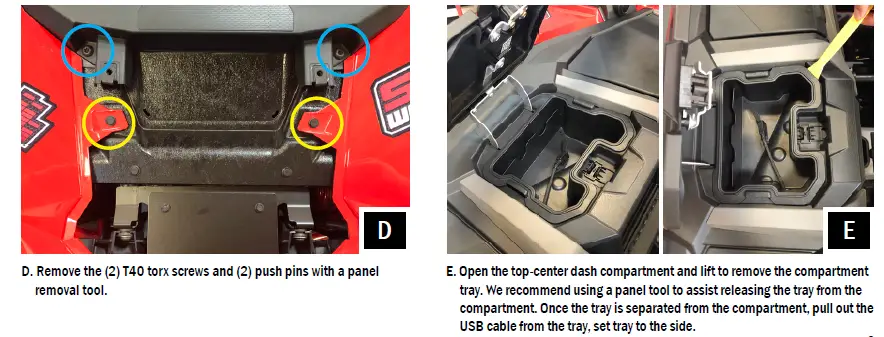
PANELS AND DASH DISASSEMBLY
TOOLS NEEDED FOR INSTALLATION
- 8mm, 10mm Wrench
- T40, T25 Torx Driver
- Panel Removal Tool


AMP PLATE INSTALLATION PARTS LIST
WARRANTY INFORMATION:
All SSV Works Non Electronic parts are covered by a limited lifetime warranty against defects in material or workmanship. All SSV Works Electronics are covered by a limited 1 year warranty against defects in material or workmanship. All SSV Works Speakers are covered by a limited lifetime warranty against defects in material or workmanship. Labor for replacement of defective components is not covered. Contact SSV Works for further warranty information.
TOOLS NEEDED FOR INSTALLATION
- T25, T30 Torx Driver

AMP PLATE INSTALLATION

B-H2605 8005 Amplifier Harness
- INPUT (FRONT) – CONNECT TO MRB2R “FRONT SPEAKER”
- INPUT (REAR) – CONNECTO TO B-H1403 AUDIO SPLITTER
- INPUT (SUB) – CONNECTO TO B-H1403 AUDIO SPLITTER
- OUTPUT (SUB) – CONNECT TO B-H3074 SUB EXTENSION HARNESS
- OUTPUT (FRONT) – CONNECT TO B-H1909 FRONT SPEAKER HARNESS
- OUTPUT (REAR) – CONNECT TO B-H1913 & B-H1912 REAR SPEAKER EXTENSION HARNESS
- EXT SWITCH – CONNECT TO ROCK & RIDE CONTROLLER
- AMP TURN -ON – NO CONNECTION
- TO POWER INPUT


MRB2R PARTS LIST
WARRANTY INFORMATION:
All SSV Works enclosures are covered by a limited lifetime warranty against defects in material or workmanship. All SSV Works Electronics are covered by a limited 1 year warranty against defects in material or workmanship. All SSV Works Speakers are covered by a limited lifetime warranty against defects in material or workmanship. Labor for replacement of defective components is not covered. Contact SSV Works for further warranty information.

MRB2R INSTALLATION and WIRING


MRB2R WIRING DIAGRAM

| Description | Part # | |
| 1 | Bluetooth Media Receiver | B-MRB2R |
| 2 | Pulse Connector to MRB2R Harness | B-H2744 |
| 3 | 4-Pin “Y” Audio Splitter | B-H1403 |
| 4 | MRB2R Rocker Switch | |
| 5 | 800.5 Amplifier 32-Pin Universal Harness | B-H2605 |
| Detail | Description |
| A | Connect MRB2R BT Media Receiver Harness to B-H2744 |
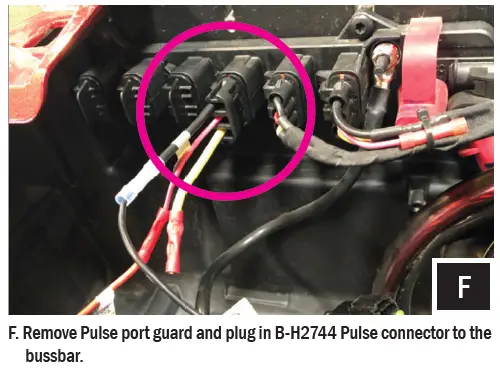
| B | Plug B-H2774 to Pulse Connector on Factory Bussbar |
| C | Connect MRB2R Front Output to B-H2605 Front Input |
| D | Connect MRB2R Rear Output to B-H1403 “Y” Splitter |
| E | Connect Rocker Switch to MRB2R Receiver Harness |
| F | Connect B-H1403 to B-H2605 Rear & Sub Inputs |
UNDER DASH SUBWOOFER ENCLOSURE PARTS LIST
PARTS LIST IMAGES

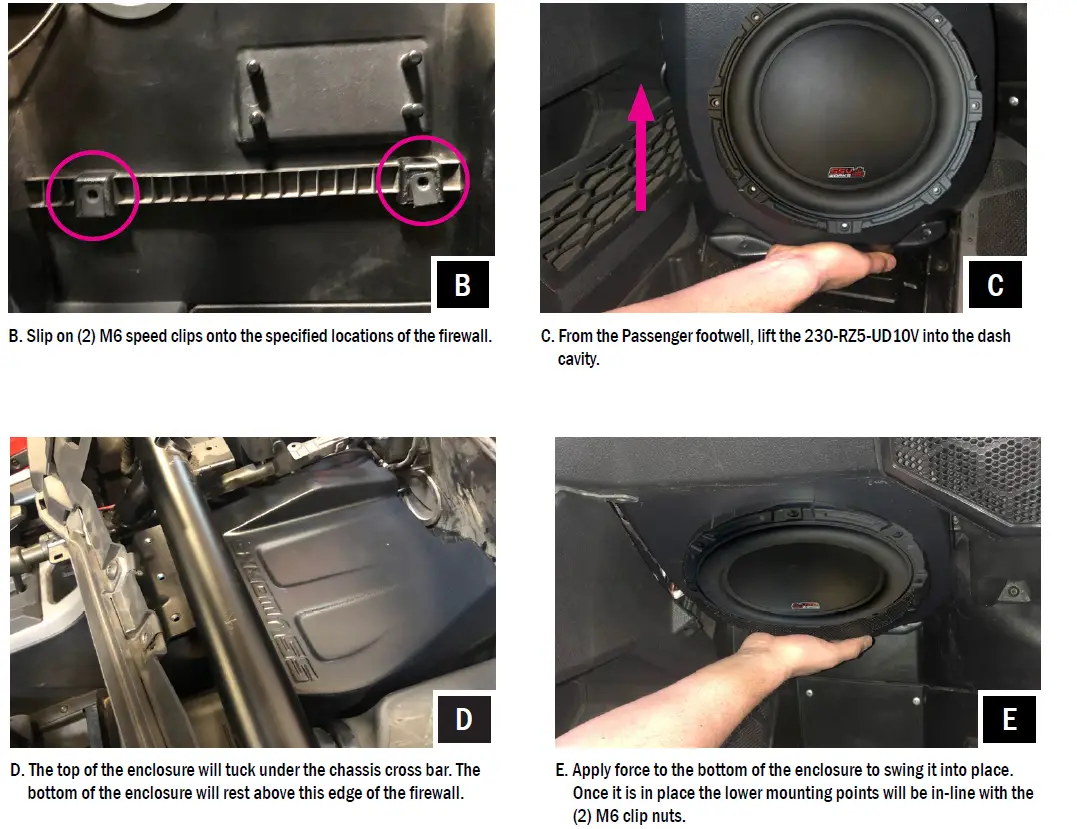
UNDER DASH SUBWOOFER ENCLOSURE ASSEMBLY
TOOLS NEEDED FOR INSTALLATION
- Torx Driver T25 T30 T40
- Torx Driver T25 T30 T40
- Panel removal tools


UNDER DASH SUBWOOFER WIRING DIAGRAM

| Description | Part # | |
| 1 | 800.5 Amplifier 32-Pin Universal Harness | B-H2605 |
| 2 | 2-Pin Audio, Sub Extension Harness | B-H3704 |
| Detail | Description |
| A | Connect Subwoofer Output from B-H2605 to B-H3704 |
| B | Connect B-H3704 to the Subwoofer |
FRONT DOOR PANELS PARTS LIST
PARTS LIST IMAGES

FRONT DOOR PANELS ASSEMBLY
TOOLS NEEDED FOR INSTALLATION
- T25, T30, T40 Torx Driver
- 10mm wrench
Please read and understand these instructions completely before installation to avoid possible injury, or damage to the accessory or vehicle.


FRONT DOOR PODS WIRING DIAGRAM

| Description | Part # | |
| 1 | 800.5 Amplifier 32-Pin Universal Harness | B-H1909 |
| 2 | Front Speaker Harness (48”) | B-H2605 |
| Detail | Description |
| A | Connect Front Output from B-H2605 to B-H1909 |
| B | Connect Speaker Pods connectors to B-H1905 |
REAR CAGE POD PARTS LIST
PARTS LIST IMAGES
REAR CAGE POD INSTALLATION
INSTALLATION NOTES
It is recommended to wrap the bag that the clamps come in around the cage before you slide the clamp onto the cage to prevent scratching.
Placement of the pod depends on what type of roll cage you have (factory or aftermarket) and your preference of where you want the pods to be installed. In these instructions, we have installed them on the outside vertical bars at the back of the roll cage.
TOOLS NEEDED FOR INSTALLATION
- 5mm Allen Key
- 8mm Open End Wrench
REAR SPEAKER PODS WIRING DIAGRAM
| Description | Part # | |
| 1 | 800.5 Amplifier 32-Pin Universal Harness | B-H2605 |
| 2 | 4-Pin Extesnion Harness, 8 ft. | B-H1913 |
| 3 | 4-Pin Extesnion Harness, 2 ft. (for 4 door models) | B-H1912 |
| 4 | Rear “Y” Speaker Harness, 7 ft. | B-H2195 |
| Detail | Description |
| A | Connect B-H2605 to B-H1913 |
| B | Connect B-H1913 to B-H1912 (for 4 door models) |
| C | Connect B-H1913 to B-H2195 (for 4 door models) |
| D | Connect B-H1913 to B-H2195 (for 2 door models) |
CONNECTING POWER & GROUND CABLE TO BATTERY
AMP WIRING DIAGRAM
| Description | Part # | |
| 1 | 800.5 Amplifier 32-Pin Universal Harness | B-H2605 |
| 2 | Amp Power/Ground Harness | B-H1587 |
| 3 | Rock & Ride Controller | B-AMPRS |
| 4 | Fuseholder | |
| 5 | Battery Terminal Cable |
| Detail | Description |
| A | Connect B-H2605 (power/ground) to B-H1587 |
| B | Connect Rock & Ride rocker switch to “Ext. Switch” |
| C | Install fuseholder between B-H1587 & battery terminal
cable. Connect ground ring terminal to chassis ground. |
| D | Connect battery terminal cable to battery positive pole |
THIS CONCLUDES THE INSTALLATION PROCESS. REPLACE THE FACTORY PANELS AND SEATS.
QUESTIONS? PLEASE CONTACT SSV WORKS AT
818-991-1778 OR
EMAIL [email protected]