![]()
Assembly Instructions
HyperGrip® Disposable Plug
April 2022

Do Not Discard, Deliver to Manufacturing.
Contents
HyperGrip Disposable Plug
Disposable HG Plug Kits
| Disposable HG Plug | |
| Disposable HG2 Plug Full Kit | 800-1012659-0XX |
| Disposable HG4 Plug Full Kit | 800-1005739-0XX |
| Disposable HG2 Plug Kit ithout Strain Relief Boot | 800-1012659-1XX |
| Disposable HG4 Plug Kit ithout Strain Relief Boot | 800-1005739-1XX |
Step 1: Slide strain relief boot (Full Kit), and cable clamp (not included*) onto cable as depicted below
Note: Components depicted in images are representative of Disposable HG2 Plug; Assembly of Disposable HG4 Plug follows the same process
Crimp Termination Instructions
Step 2:
Trim and strip cable to length
Trim 18.0-19.0 mm of cable jacket (Disposable HG2)
Trim 19.0-20.0 mm of cable jacket (Disposable HG4)
Step 3:
Strip wire to expose 5.0 mm of conductor (Disposable HG2)
Strip wire to expose 4.0 mm of conductor (Disposable HG4)
Step 4:
Insert conductor into contact crimp barrel
Step 5:
Insert contact into position as shown
Crimp the contact
Step 6:
Insert contact into plug insulator
Step 7:
Push in contact with Insertion Tool #T2080
Step 8 (Optional):
Suitable cable clamp can be installed to provide additional cable retention force and strain relief Cable clamp band width 3 mm (MAX)
Positioned and tighten cable clamp 8 mm from the back of insulator as shown
Step 9 (Optional):
Fill rear insulator cup with appropriate silicone RTV or epoxy
Fill potting compound until the cup is full, or at least half-full
This step is recommended d for Ingress Protection rating IPx4

Step 10 (Full Kit, Optional):
Apply beads of silicone RTV or epoxy all the way around the ridges
This step is recommended for Ingress
Protection rating IPx4

Step 11 (Full Kit):
Slide strain relief boot along the cable
Press strain relief boot onto insulator
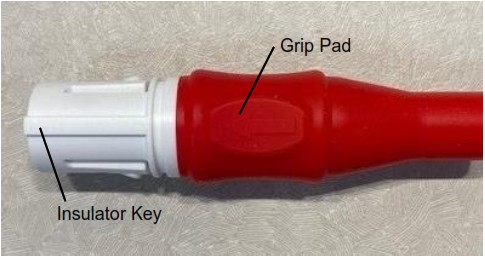
Step 12 (Full Kit):
Align grip pad to insulator key
Step 13:
Install O-ring (recommended for IPx4 sealing when mate to receptacle)
Rest plug assembly in an appropriate position and let potting compound cured before usage 
Worldwide Support
Connectors
Americas
Sales
[email protected]
Technical Support
[email protected]
Europe
Sales
[email protected]
Technical Support
[email protected]
Asia
Sales
[email protected]
Technical Support
[email protected]
Fiber Optics & RF Components
Americas
Sales
[email protected]
Technical Support
[email protected]
Europe
Sales
[email protected]
Technical Support
[email protected]
Asia
Sales
[email protected]
Technical Support
[email protected]
more > smithsinterconnect.com ![]()
Copyright© 2022 Smiths Interconnect | All rights reserved | Version 1.0
All of the information included in this document is believed to be accurate at the time of printing.
The information contained within this document is subject at all times to applicable Export Control regulations and legal requirements.