SIEMENS ET675FNP1E Ceran Hob Instruction Manual

Contents
 Safe installation
Follow these safety instructions when installing the appliance.
- Electrical connection must only be carried out by licensed specialist staff. Incorrect connection will invalidate the warranty.
- The safe operation of this appliance can only be guaranteed if it has been installed to a professional standard in accordance with these installation instructions. The installer shall be liable for any damage resulting from incorrect installation.
Built-under
Do not install refrigerators, dishwashers, non-ventilated ovens or washing machines underneath the appliance.
- Make sure that projecting parts such as the mains housing or the mains cable do not collide, e.g. with a drawer.
Intermediate floor
If the underside of the hob can be touched, an intermediate floor must be fitted.
- Ask your specialist retailer for an intermediate floor as an accessory.
Preparing the units
The worktop must be level, horizontal and stable.
- The fitted units, including wall finishing strips, must be heat-resistant to at least 90 °C.
- Niche cladding within 50 mm of the back wall must not be combustible (e.g. tiles, stone).
- Seal the cut surfaces to make them heat-resistant. This prevents the worktop from swelling as a result of moisture. → Fig. 1

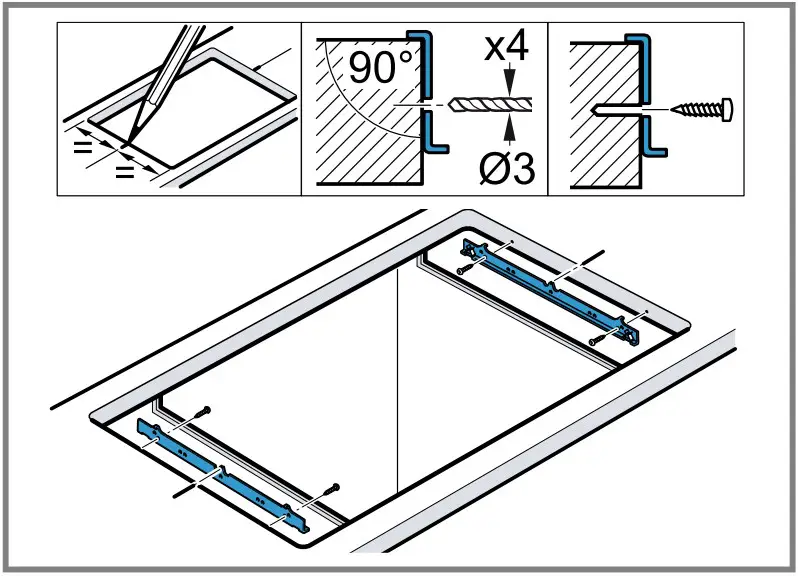
Installing fixing rails
For stone work surfaces, bond the fixing rails in place. → Fig. 2
Electrical connection
To protect the appliance, do not remove it from the polystyrene trays until you press the appliance into the cut-out. Never lay the appliance down flat on its side.
- Check the household wiring before connecting the appliance.
- The appliance fulfils the requirements of protection class I and must only be operated in conjunction with an earth conductor.
- In the permanent electrical installation, a partition must be provided in the phases in accordance with the installation regulations.
- If appears on the appliance’s display, it has not been connected correctly. Disconnect the appliance from the mains and check the connection.
Connecting without a pre-installed cable
Only connect the hob in accordance with the connection diagram.
- If required, install the enclosed copper bridges.
- For a 3-/2-phase connection (3 N~/2 N~), the power cable must correspond to type H05 VV-F or a higher rating.
- Use the current load to determine which wire cross-section you require. A cross-section of < 1.5 mm² is not permitted.
- For a single-phase connection (1 N~), the power cable H05RR-F3G4 (length 1 m) is available from customer service.
Installing the hob
Do not trap the power cable and do not route it over sharp edges.
- If the oven is a built-under type, route the cable along the rear corners of the oven to the mains socket.
- Push the hob in until it locks into place. → Fig. 3

Removing the hob
- Disconnect the appliance from the power supply.
- Push out the hob from below.