![]()
USER’S MANUAL
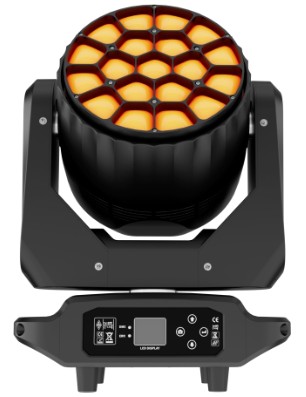
LED Beam+Wash Big Bees Eyes
19x20W RGBW Zoom Lighting
Contents
19x40W LED Beam Wash Big Bees Eyes
![]() CAUTION! Keep this device away from rain and moisture!
CAUTION! Keep this device away from rain and moisture!
FOR YOUR OWN SAFETY, PLEASE READ THIS USER MANUAL CAREFULLY BEFORE YOU INITIAL START – UP!
Maintenance
The manufacturer will not accept liability for any resulting damages caused by the non-observance of this manual or any unauthorized modification to the device.
Please consider that damages caused by manual modifications to the device are not subject to warranty.
During the operation the housing becomes hot). Allow the fixture to cool approximately 20 minutes prior to manipulate with it.
Make sure that the available voltage is not higher than stated on the rear panel.
to completely remove power from unit when not in use or before cleaning or servicing the fixture.
Make sure that the power-cord is never crimped or damaged by sharp edges. Check the device and the power-cord from time to time.
Always disconnect from the mains, when the device is not in use or before cleaning it. Only handle the power-cord by the plug. Never pull out the plug by tugging the power cord.
This device falls under protection class I. Therefore it is essential to connect the yellow/green conductor to earth.
The electric connection, repairs and servicing must be carried out by a qualified employee.
Do not connect this device to a dimmer pack.
Do not switch the fixture on and off in short intervals as this would reduce the fixture’s life.
During the initial start-up some smoke or smell may arise. This is a normal process and does not necessarily mean that the device is defective.
Do not touch the device’s housing bare hands during its operation (housing becomes hot)!
For replacement use fixtures and fuses of same type and rating only.
![]() CAUTION!
CAUTION!
Be careful with your operations.
With a high voltage you can suffer a dangerous electric shock when touching the wires!
Operating determination
Attention: The power CON is a connector without breaking capacity, i.e. the power CON should not be connected or disconnected under load or live!
This device is a moving head for creating decorative effects and was designed for indoor use only.
This device is for professional use only. It is not for household use.
If the device has been exposed to drastic temperature fluctuation (e.g. after transportation), do not switch it on immediately. The arising condensation water might damage your device. Leave the device switched off until it has reached room temperature.
Before switching the fixture OFF, turn the fixture OFF and allow the fixture to cool for a while. Never run the device without fixture!
Do not shake the device. Avoid brute force when installing or operating the device.
Never lift the fixture by holding it at the projector-head, as the mechanics may be damaged.
Always hold the fixture at the transport handles.
When choosing the installation-spot, please make sure that the device is not exposed to extreme heat, moisture or dust. There should not be any cables lying around. You endanger your own and the safety of others!
The minimum distance between light output and the illuminated surface must be more than 8 meters.
Make sure that the area below the installation place is blocked when rigging, derigging or servicing the fixture.
Always fix the fixture with an appropriate safety rope. Fix the safety rope at the correct holes only.
Only operate the fixture after having checked that the housing is firmly closed and all screws are tightly fastened.
The fixture must never be ignited if the objective-lens or any housing-cover is open, as discharge fixtures may explode and emit a high ultraviolet radiation, which may cause burns.
The maximum ambient temperature 45°C must never be exceeded.
Attention Item
- For guarantee the life of product, please do not put it on the wet place and not use it the place over 40 degree.
- Please don’t lay the product on the un-fixable or shakable place.
- Ask for the professional to maintain the product in order to avoid the danger of get an electric shock.
- Power supply should not be changed over +&-10% while the light is using, it will be decreased the life of fixture if the power is too high, but it will be influenced the luminosity if the power is too low.
- After power off, if it is need used again, please cool down over 20 minuter.
- Please look round the manual for ensure the product can be used normally.
Rigging the fixture
A structure intended for installation of the fixture(s) must safely hold weight of the fixture(s) placed on it. The structure has to be certificated to the purpose.
The fixture (fixtures) must be installed in accordance with national and local electrical and construction codes and regulation.
For overhead installation, the fixture must be always secured with a safety wire that can bear at least 10 times the weight of the fixture
When rigging, derigging or servicing the fixture staying in the area below the installation place, on bridges, under high working places and other endangered areas is forbidden.
The operator has to make sure that safety-relating and machine-technical installations are approved by an expert before taking into operation for the first time and after changes before taking into operation another time.
The operator has to make sure that safety-relating and machine-technical installations are approved by a skilled person once a year.
Allow the fixture to cool for ten minutes before handling.
The projector should be installed outside areas where persons may walk by or be seated.
IMPORTANT! OVERHEAD RIGGING REQUIRES EXTENSIVE EXPERIENCE
including calculating working load limits, installation material being used, and periodic safety inspection of all installation material and the projector. If you lack these qualifications, do not attempt the installation yourself, but use a help of professional companies.
CAUTION: Fixtures may cause severe injuries when crashing down! If you have doubts concerning the safety of a possible installation, do not install the fixture!
The fixture has to be installed out of the reach of public.
The fixture must never be fixed swinging freely in the room.
Danger of fire !
When installing the device, make sure there is no highly inflammable material (decoration articles, etc.) in a distance of min. 1 m.
The minimum distance of 8 meters between light output from the moving head and the lit objects must be kept!
CAUTION!
Use 2 appropriate cfixtures to rig the fixture on the truss.
Follow the instructions mentioned at the bottom of the base.
Make sure that the device is fixed properly! Ensure that the structure (truss) to which you are attaching the fixtures is secure.
The fixture can be placed directly on the stage floor or rigged in any orientation on a truss without altering its operation characteristics.
For securing a fixture to the truss, install two safety wires which can hold at least 10 times the weight of the fixture. Use only the safety wires with screw-on carabines.
DMX-512 connection
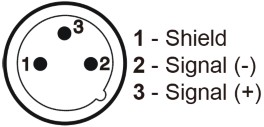
The fixture is equipped with both 3-pin sockets for DMX input and output. The sockets are wired in parallel.
Only use a shielded twisted-pair cable designed for 3-pin XLR-plugs and connectors in order to connect the controller with the fixture or one fixture with another.
| DMX – output XLR mounting-sockets (rear view): |
DMX-input XLR mounting-plugs (rear view): |
 |
Building a serial DMX-chain:

Connect the DMX-output of the first fixture in the DMX-chain with the DMX-input of the next fixture. Always connect one output with the input of the next fixture until all fixtures are connected. Up to 32 fixtures can be connected.
Caution: At the last fixture, the DMX-cable has to be terminated with a terminator.
Solder a 120 Ω resistor between Signal (–) and Signal (+) into a 3-pin (5-pin) XLR-plug and plug it in the DMX-output of the last fixture.
Technical Specifications
| Voltage: AC90V ~ 240V / 50 ~ 60Hz | Control mode: DMX512/Master-Slave/Auto/Sound/CTO |
| Output Power: 500W | Pan/Tilt: 540°/270° |
| Light source: LED 19x20W RGBW color mixing | Dimmer: 0-100% Linear dimmer |
| Color temperature: 2800K-8500K | Product Size: 47x35x22 cm |
| Zoom angle: 4~45 degrees | Product weight: 13 kg |
| Channel: 23CH/25CH/101CH | Package weight: 14.5 kg |
Maintenance and cleaning
It is absolutely essential that the fixture is kept clean and that dust, dirt and smoke-fluid residues must not build up on or within the fixture. Otherwise, the fixture‘s light-output will be significantly reduced. Regular cleaning will not only ensure the maximum light-output, but will also allow the fixture to function reliably throughout its life.
A soft lint-free cloth moistened with any good glass cleaning fluid is recommended, under no circumstances should alcohol or solvents be used!
DANGER !
Disconnect from the mains before starting any maintenance work
The front objective lens will require weekly cleaning as smoke-fluid tends to building up residues, reducing the light-output very quickly. The cooling-fans should be cleaned monthly.
The interior of the fixture should be cleaned at least annually using a vacuum-cleaner or an air-jet.
Remove dust and dirt from the fans and cooling vents using a soft brush and vacuum-cleaner.
Important! Check the air filters periodically and clean before they become clogged!
Clean two air filters placed in the fixture´s covers and two in the fixture base. Use a vacuum cleaner, compressed air or you can wash them and put back dry.
Replacing the fuse.
Before replacing the fuse, unplug mains lead.
- Remove the fuse holder on the rear panel of the base with a fitting screwdriver from the housing(anti-clockwise).
- Remove the old fuse from the fuse holder.
- Install the new fuse in the fuse holder (only the same type and rating).
- Replace the fuse holder in the housing and fix it.
Checking plastic parts of the fixture.
The plastic parts of the fixture should be checked for damages and beginning cracks at least every two months.
In addition, the plastic part of the front lens has to be checked mechanically (by means of movement by the plastic part) if it is firmly fastened to the fixture. If hint of a crack is found on some plastic part, do not use the fixture until the damaged part will be replaced.
Cracks or another damages of the plastic parts can be caused by the fixture transportation or manipulation and also ageing process may influence plastic materials.
This checking is necessary for both fixed installations and preparing fixtures for renting. Any free moving parts inside of the fixture head, cracked plastic or any plastic part of front lens not sitting properly in place need to be immediately replaced.
Control menu

– [←] used to move back to the previous screen
– [↑] used to move up on the previous page.
– [↓] used to move down on the next page.
– [ENTER] used to save adjusted values, to leave menu or to perform desired action.
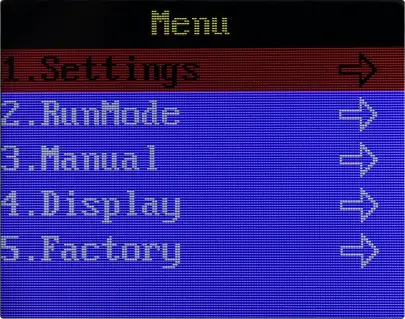
Turn on the fixture, press the MENU button to enter the menu mode, use the UP/DOWN button to find the menu, when the preset menu is displayed on the display, press the ENTER button to confirm, use the UP/DOWN button to select the submenu, press the ENTER button to save the setting or Automatically return to the previous menu. Press the MENU button to return, or wait for 30 seconds to automatically exit the menu mode.
Control menu map
| menu | Sublevel menu | Three menu / parameters |
| 1. Settings | 1. DMX Address | 001-512 |
| 2. Encoder | YES / NO | |
| 3. Pan Revert | YES / NO | |
| 4. Tilt Revert | YES / NO | |
| 2. Run Mode | 1. Run Mode | DMX AUTO 1 AUTO 2 SOUND |
| 2. Channel | 23 CH 25 CH 101 CH |
|
| 3. Manual | 01. X | 001 – 255 |
| 02. X Fine | 001 – 255 | |
| 03.Y | 001 – 255 | |
| 04.Y fine | 001 – 255 | |
| 05. XY Speed | 001 – 255 | |
| 06. Focus | 001 – 255 | |
| 07. Rotate | 001 – 255 | |
| 08. Dimmer | 001 – 255 | |
| 09. Strobe | 001 – 255 | |
| 10. Red | 001 – 255 | |
| 11. Green | 001 – 255 | |
| 12. Blue | 001 – 255 | |
| 13. White | 001 – 255 | |
| 14. Color Temp | 001 – 255 | |
| 15. Dey | 001 – 255 | |
| 16. Fade | 001 – 255 | |
| 17. Move | 001 – 255 | |
| 18. Pattern | 001 – 255 | |
| 19. Dynamic | 001 – 255 | |
| 20. Speed | 001 – 255 | |
| 21. Red | 001 – 255 | |
| 22. Green | 001 – 255 | |
| 23. Blue | 001 – 255 | |
| 24. White | 001 – 255 | |
| 25. Reset | 001 – 255 | |
| 5. Display | 1. Language | EN / 中文 |
| 2. Reverse | YES / NO | |
| 3. Backlight | YES / NO | |
| 4. Version | 056Y | |
| 6. Factory | Factory |
Manual control
This interface is used to control the current lamp.
Press OK to enter the edit status. Press Up and Down to change the channel value. Press OK again to save the change value, exit the edit, press Exit not to save the change value, and exit the edit directly.
- address: Click to enter the address code setting;
- Settings: Click to enter the System Settings;
- Manual: Click to enter the manual mode;
- calibration: Click the input password to enter the system calibration mode;
- Reset: Click to enter the system reset mode;
- Note: Click in to view the system information;
DMX address
Select the Settings-DMXAddr, press the OK button to confirm, the current DMX address will be displayed on the display. Use the↑↓ button to select the address 001~512, and press the OK button to save. Press the ← button to return to the previous menu or wait 30 seconds to automatically exit the menu mode.
DMX last state
Select the last state of DMX, press the OK button to confirm, the current mode will be displayed on the display, select by the ↑↓ button: standby (the fixture will enter standby mode when the DMX signal stops), hold (the fixture will keep the last when the DMX signal stops the machine) State) or manual (after selecting this mode, the machine will automatically read the parameters in the “manual mode” mode for operation), press the OK button to save. Press the ← button to return to the previous menu or wait 30 seconds to automatically exit the menu mode.
Observe the DMX channel value
Select to observe the DMX channel value, press the OK button to confirm, the current channel and its value will be displayed on the screen. Use the ↑↓ button to view other channel values.
Press the ← button to return to the previous menu or wait 30 seconds to automatically exit the menu mode.
Auto mode and Sound control mode
Enter the Settings mode, select Auto or Sound, press the OK button to confirm, the current mode will be displayed on the display, press the OK button to run mode. wait 30 seconds to automatically exit the menu mode.
Pan and Tilt movement reverse
Select Set – Invert Pan or Invert Tilt press the OK button to confirm, the current mode will be displayed on the display, and use the ↑↓ button to select: Yes or No , press the OK button to save. Press the ← button to return to the previous menu or wait 30 seconds to automatically exit the menu mode.
DMX Channel
DMX Channel Summary-23 Channels Mode
| Channel | Value | Function | |
| CH1 | Pan | 0-255 | 0-540 degrees |
| CH2 | Pan fine | 0-255 | 16 bit pan |
| CH3 | Tilt | 0-255 | 0-205 degrees |
| CH4 | Tilt fine | 0-255 | 16 bit tilt |
| CH5 | P/T Speed | 0-255 | Pan and tilt Speed from fast to slow |
| CH6 | Zoom | 0-255 | Angle is modulated by small to large linearly |
| CH7 | Rotate | 0-127 | 0~60 Degrees |
| 128-191 | Counterclockwise from fast to slow unrotation | ||
| 200-255 | Turn clockwise from slow to fast CVT | ||
| CH8 | Total Dim | 0-255 | Linear dimming occurs from dark to light |
| CH9 | Strobe | 0-3 | Light up |
| 4-200 | Strobe speeds from slow to fast | ||
| 201-215 | Low speed random flash | ||
| 216-234 | Medium speed random flash | ||
| 235-255 | High speed random flash | ||
| CH10 | R Dim | 0-255 | Red |
| CH11 | G Dim | 0-255 | Green |
| CH12 | B Dim | 0-255 | Blue |
| CH13 | W Dim | 0-255 | White |
| CH14 | Color temp | 0-255 | Linear color temperature regulation |
| CH15 | Built-in Color | 0-255 | Built-in color gradient |
| CH16 | Static effect | 0-255 | 5 Number of one effect |
| CH17 | Dynamic effect | 0-255 | 5 Number of one effect |
| CH18 | Dynamic effect | 0-127 | The positive direction effect is changed from fast to slow |
| 128-255 | The reverse direction effect varies from slow to fast | ||
| CH19 | Background R | 0-255 | Linear dimming is performed from dark to light |
| CH20 | Background G | 0-255 | Linear dimming is performed from dark to light |
| CH21 | Background B | 0-255 | Linear dimming is performed from dark to light |
| CH22 | Background W | 0-255 | Linear dimming is performed from dark to light |
| CH23 | Reset | 0-249 | No function |
| 250-255 | System reset after 5s | ||
DMX Channel Summary-25 Channels Mode
| Channel | Value | Function | |
| CH1 | Pan | 0-255 | 0-540 degrees |
| CH2 | Pan fine | 0-255 | 16 bit pan |
| CH3 | Tilt | 0-255 | 0-205 degrees |
| CH4 | Tilt fine | 0-255 | 16 bit tilt |
| CH5 | PR Speed | 0-255 | Pan and tilt Speed from fast to slow |
| CH6 | Zoom | 0-255 | Angle is modulated by small to large linearly |
| 0-7 | No function | ||
| 8-127 | 0 – 60 degrees | ||
| CH7 | Rotate | ||
| 128-191 | Stepless turning from fast to slow | ||
| 192-255 | Stepless inversion from slow to fast | ||
| CH8 | Total Dim | 0-255 | Linear dimming occurs from dark to light |
| 0-3 | Light up | ||
| 4-200 | Strobe speeds from slow to fast | ||
| CH9 | Strobe | 201-215 | Low speed random flash |
| 216-234 | Medium speed random flash | ||
| 235-255 | High speed random flash | ||
| CH10 | R Dim | 0-255 | Red |
| CH11 | G Dim | 0-255 | Green |
| CH12 | B Dim | 0-255 | Blue |
| CH13 | w Dim | 0-255 | White |
| CH14 | Color temp | 0-255 | Linear color temperature regulation |
| CH15 | Built-in Color | 0-255 | Built-in color gradient |
| CH16 | Effect Fade | 0-255 | CH 19 effect |
| CH17 | Static effect | 0-255 | 5 Number of one effect |
| CH18 | Effect Angel | 0-255 | Dynamic effect translation (CH19) |
| CH19 | Dynamic effect | 0-255 | 5 Number of one effect |
| CH2O | Effect Speed | 0-255 | From slow to fast (with 15 channels) |
| CH21 | R Dim | 0-255 | Red |
| CH22 | G Dim | 0-255 | Green |
| CH23 | B Dim | 0-255 | Blue |
| CH24 | W Dim | 0-255 | White |
| CH25 | Reset | 250-255 | Reset 5S effective |
This channel mode is effect mode, it is recommended to start
CH11-CH12-CH22-CH23-CH29-CH30-CH33-CH34,Ex:

DMX Channel Summary-101 Channels Mode
| Channel | Value | Function | |
| CHI | Pan | 0-255 | 0-540 degrees |
| CH2 | Pan fine | 0-255 | 16 bit pan |
| C113 | Tilt | 0-255 | 0-205 degrees |
| CH4 | Tilt fine | 0-255 | 16 bit tilt |
| CH5 | P/T Speed | 0-255 | Pan and tilt Speed from fast to slow |
| CII6 | Zoom | 0-255 | Angie Is modulated by small to large linearly |
| CH7 | Rotate | 0-127 | 0-60 Degrees |
| 128-191 | Counterclockwise from fast to slow unrelation | ||
| 200-85 | Tin clockwise from slow to fast CVT | ||
| CHB | Total Dim | 0-255 | Linear dimming occurs from dark to light |
| CH9 | Strobe | 0-3 | Light up |
| 4-200 | Strobe speeds from slow to fast | ||
| 201-215 | Low speed random flash | ||
| 216-234 | Medium speed random flash | ||
| 235-255 | High speed random flash | ||
| CH10 | RDim | 0-255 | Red |
| CM11 | G Dim | 0-255 | Green |
| CH12 | B Dim | 0-255 | Blue |
| CH13 | W Dim | 0-255 | White |
| CH14 | Color temp | 0-255 | Linear color temperature regulation |
| CH15 | Bultt-In Color | 0-255 | BuIlt-In color gradient |
| CH16 | Effect Fade | 0-255 | CH 19 effect |
| CHI7 | Effect Angel | 0-295 | Dynamic effect translation (CH19) |
| CH19 | Static effect | 0-255 | CH10-13 and CH21-24 |
| One | Dynamic effect | 0-255 | 5 Number of one effect |
| C1120 | Dynamic effect speed | 0-127 | The positive direction effect Is changed from fast to slow |
| 128-255 | The reverse direction effect varies from slow to fast | ||
| C1121 | Background R | 0-255 | Linear dimming is performed from dark to fight |
| CH22 | Background G | 0-255 | Linear dimming is performed from dark to light |
| CH23 | Background B | 0-255 | Linear dimming is performed from dark to light |
| CH24 | Background W | 0-255 | linear dimming is performed from dark to light |
| CH2S | Reset | 0-199 | No function |
| 200-205 | System reset after 5s | ||
| 206-255 | No function | ||
| CH26 | R 1 | 0-255 | Red 1 |
| CH27 | 61 | 0-255 | Green 1 |
| CH28 | B 1 | 0-255 | Blue 1 |
| CH29 | W1 | 0-255 | White 1 |
| CH30 | R 2 | 0-255 | Red 2 |
| CH31 | G 2 | 0-255 | Green 2 |
| CH32 | B 2 | 0-255 | Blue 2 |
| CH33 | W 2 | 0-255 | White 2 |
| CH34 | R 3 | 0-255 | Red 3 |
| CH35 | G 3 | 0-255 | Green 3 |
| CH36 | B 3 | 0-255 | Blue 3 |
| CH37 | W 3 | 0-255 | White 3 |
| CH38 | 114 | 0-255 | Red 4 |
| CH39 | 64 | 0-255 | Green 4 |
| CH40 | B 4 | 0-255 | Blue 4 |
| CH41 | W 4 | 0-255 | White 4 |
| CH42 | R 5 | 0-255 | Red 5 |
| CH43 | G 5 | 0-255 | Green 5 |
| CH44 | B 5 | 0-255 | Blue 5 |
| CH45 | W 5 | 0-255 | White 5 |
| CR46 | R6 | 0-255 | Red 6 |
| CH47 | G 6 | 0-255 | Green 6 |
| CH48 | B 6 | 0-255 | Blue 6 |
| CH49 | W 6 | 0-255 | White 6 |
| CH50 | R 7 | 0-255 | Red 7 |
| CH51 | G 7 | 0-255 | Green 7 |
| CH52 | B 7 | 0-255 | Blue 7 |
| CH53 | W 7 | 0-255 | White 7 |
| CH54 | R 8 | 0-255 | Red 1 |
| CH55 | G 8 | 0-255 | Green 1 |
| CH56 | B 8 | 0-255 | Blue 1 |
| CH57 | W 8 | 0-255 | White 1 |
| CH58 | R 9 | 0-255 | Red 2 |
| CH59 | G 9 | 0-255 | Green 2 |
| CH60 | B 9 | 0-255 | Blue 2 |
| CH61 | W 9 | 0-255 | White 2 |
| CH62 | R 10 | 0-255 | Red 3 |
| CH63 | G 10 | 0-255 | Green 3 |
| CH64 | B 10 | 0-255 | Blue 3 |
| CH65 | W 10 | 0-255 | White 3 |
| CH66 | R 11 | 0-255 | Red 4 |
| CH67 | G 11 | 0-255 | Green 4 |
| CH68 | B 11 | 0-255 | Blue 4 |
| CH69 | W 11 | 0-255 | White 4 |
| CH70 | R 12 | 0-255 | Red 5 |
| CH71 | G 12 | 0-255 | Green 5 |
| CH72 | B 12 | 0-255 | Blue 5 |
| CH73 | W 12 | 0-255 | White 5 |
| CH74 | R 13 | 0-255 | Red 6 |
| CH75 | G 13 | 0-255 | Green 6 |
| CH76 | B 13 | 0-255 | Blue 6 |
| CH77 | W 13 | 0-255 | White 6 |
| CH78 | R 14 | 0-255 | Red 7 |
| CH79 | G 14 | 0-255 | Green 7 |
| CH80 | B 14 | 0-255 | Blue 7 |
| CH81 | W 14 | 0-255 | |
| CH82 | R 15 | 0-255 | Red 1 |
| CH83 | G 15 | 0-255 | Green 1 |
| CH84 | B 15 | 0-255 | Blue 1 |
| CH85 | W 15 | 0-255 | White 1 |
| CH86 | R 16 | 0-255 | Red 2 |
| CH87 | G 16 | 0-255 | Green 2 |
| CH88 | B 16 | 0-255 | Blue 2 |
| CH89 | W 16 | 0-255 | White 2 |
| CH90 | R 17 | 0-255 | Red 3 |
| CH91 | G 17 | 0-255 | Green 3 |
| CH92 | B 17 | 0-255 | Blue 3 |
| CH93 | W 17 | 0-255 | White 3 |
| CH94 | R 18 | 0-255 | Red 4 |
| CH95 | G 18 | 0-255 | Green 4 |
| CH96 | B 18 | 0-255 | Blue 4 |
| CH97 | W 18 | 0-255 | White 4 |
| CH98 | R 19 | 0-255 | Red 5 |
| CH99 | G 19 | 0-255 | Green 5 |
| CH100 | B 19 | 0-255 | Blue 5 |
| CH101 | W 19 | 0-255 | White 5 |
Fault handling
A. The fixture does not work, there is no light, and the fan does not run
- Check the power contact.
- Check the voltage.
B. Control of uncontrolled stations
- Check whether the DMX signal connector and signal cable are connected correctly.
- Check whether the address code setting is correct.
- If the DMX signal transmission is intermittent, check whether the XLR socket and the signal cable are well connected.
- Try it with other controllers.
- Check if the distance between the DMX signal line and the high-voltage line is too close, otherwise it will damage or interfere with the signal circuit.
C. A channel fails
- The stepper motor or motor lead may be damaged.
- The drive circuit of the motor may be damaged.
Accessories list
Quick lock x 2
Power cable x 1
Dmx512 cable x 1
Manual x 1