SEELESS SLW-RAPL-500 Wireless Access Point Plaster Mounting Platform Installation Guide
- ROUGH-IN INSTALLATION Adjust the SeeLess black perforated aluminum brackets, to either 1/2“, 5/8”, or 3/4″ line. Caddy bars are recommended for easy mounting between studs (*not supplied by SeeLess). Verify studs are leveled, so that the platform is leveled with the drywall. Flat-headed screws are recommended (Pre-drill SeeLess brackets for rounded screws). *Don’t over screw when using a power drill to avoid cracking the gypsum.
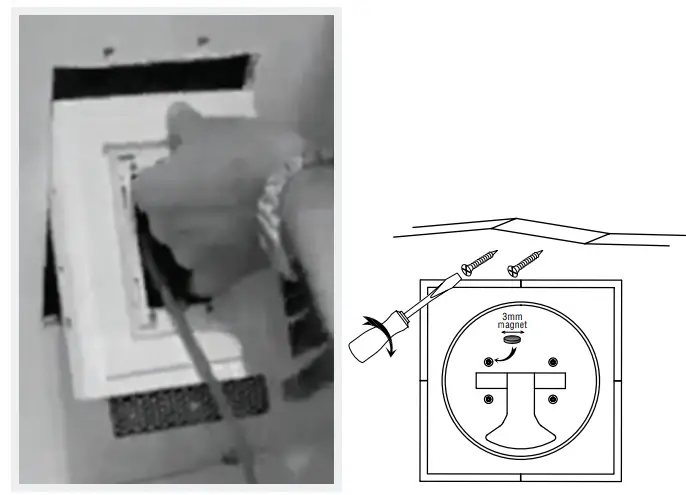
- Screw thes two plates together: the Araknis metal backplate for dropped celling and the Araknis plastic mounting bracket.
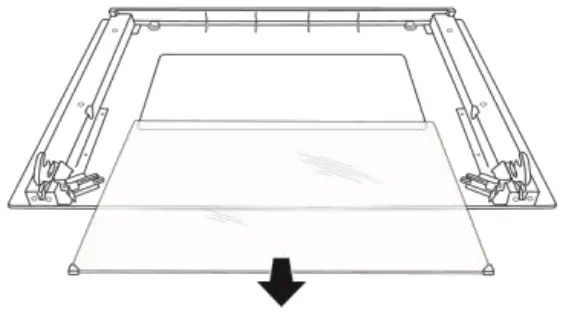
- Adjust the SeeLess black perforated aluminum brackets, to either 1/2“, 5/8”, or 3/4″ line. Insert SeeLess platform at an angle.
- Level the drywall with the lower line of the joint on the front of the gypsum platform.
Secure SeeLessplatform using flat headed drywall screws.
- Cover the inside of the platform with paper or tape to protect the center opening. Apply the fiberglass tape on
all four joints around the platform. Patch with drywall compound. - Sand surface smooth. Apply one coat of primer and wait for it to dry. Apply two coats of paint (it is recommended that you paint inside of the opening)
- Install the device.
- SeeLess suction cups are availble to remove the device
Contents
ROUGH-IN INSTALLATION
*Telescopic (retractable) caddy brackets and drywall screws are not included.
When mounting a SeeLess Platform:
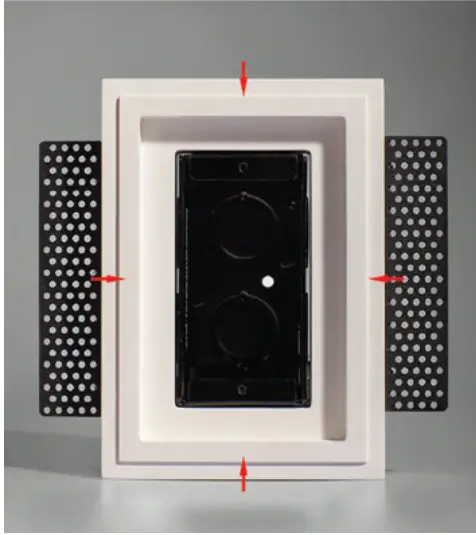
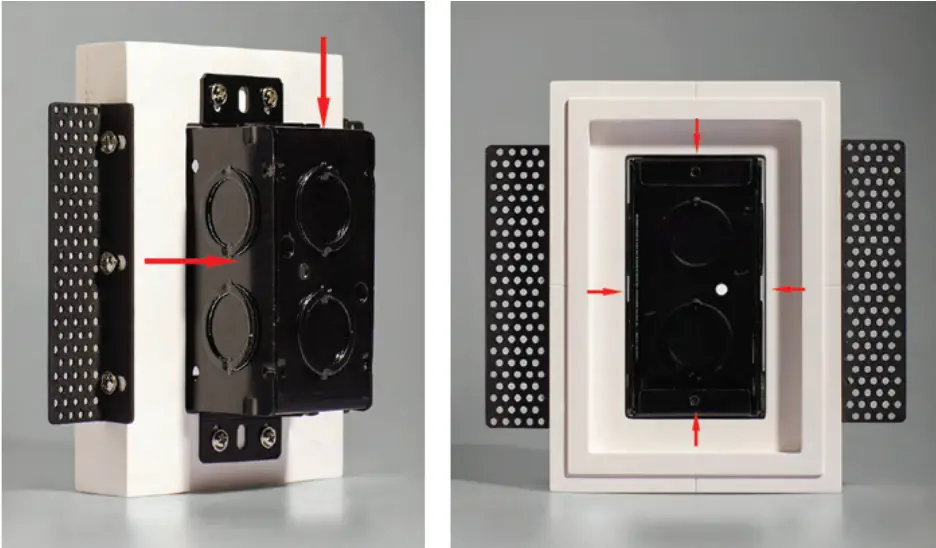
- Make sure the electrical box is centered to your gypsum platform before installing drywall. The box can be loosened and moved to center it.
- Measure your desired distance between the two studs.
- Caddy bars are recommended for easy mounting between studs.
- Verify studs are level by using a straightedge across the platform. Furr out each side, if necessary, so that the platform is leveledwith the drywall.
- Check the thickness of drywall to be installed and adjust the SeeLess black perforated aluminum brackets, to either 1/2“, 5/8”, or 3/4″ line (holes are perforated to the standard market perforation size)
- Check the level and height of the plaster platform. Screw caddy brackets to each stud atthe appropriate height.
- Line up and screw the black perforated brackets on the See Less platform to the caddy crossbars. *Don’t over screw when using a power drill to avoid cracking the gypsum. We recommend using two flat-headed screws.
- If you are using rounded screws, predrilling the brackets is recommended.
- Put straightedge across studs and flush out the outer edge of the plaster box to it, then checkthe level.
- Gypsum has center lines marked on each side of the platform to help with laser marker alignment.
- For knockout and wiring, press on the soft pre-punched 1/2” and 3/4″ knockouts on the junction box. Re-check the electrical box toensure it is centered with the gypsum platform after wiring.
*For post-install instructions refer to Post Install Drywall Instructions document.
POST INSTALL DRYWALL INSTRUCTIONS
Drywall screws are not included
When mounting a See Less Platform:
- Cut in drywall around the platform.
- Level the drywall with the lower line of the joint on the front of the gypsum platform.
- Make sure that the laser center markers are evenly centered on all sides along the drywall.
- Cover the inside of the platform with paper or tape to protect the center opening.
- Apply the fiberglass tape on all four joints around the platform.
- We recommend using the Fast Set Lite 20 (or 40 depending on available time).
- The recommended joint compound to use is the Green Dot topping by Westpac Materials.
- Once the first layer of the mud dries, sand-down with 120 grit sandpaper. When the second layer of mud dries, we recommend using 200-grit sandpaper. Then, when the third layer of mud dries, use 220 grit sandpaper.
- Apply one coat of primer and wait for it to dry.
- Apply two coats of paint. (it is recommended that you paint inside of the opening)
ROUGH-IN INSTALLATION
*Telescopic (retractable) caddy brackets and drywall screws are not included.
When mounting a SeeLess Platform:
- Make sure the electrical box is centered to your gypsum platform before installing drywall. The box can be loosened and moved to center it.
- Measure your desired distance between the two studs.
- Caddy bars are recommended for easy mounting between studs
- Verify studs are level by using a straightedge across the platform. Furr out each side, if necessary, so that the platform is leveled with the drywall.
- Check the thickness of drywall to be installed and adjust the SeeLess black perforated aluminum brackets, to either 1/2“, 5/8”, or 3/4″ line (holes are perforated to the standard market perforation size)
- Check the level and height of the plaster platform. Screw caddy brackets to each stud at the appropriate height.
- Line up and screw the black perforated brackets on the SeeLess platform to the caddy crossbars. *Don’t over screw when using a power drill to avoid cracking the gypsum. We recommend using two flat-headed screws
- If you are using rounded screws, predrilling the brackets is recommended.
- Put straightedge across studs and flush out the outer edge of the plaster box to it, then check the level
- Gypsum has center lines marked on each side of the platform to help with laser marker alignment.
- For knockout and wiring, press on the soft pre-punched 1/2” and 3/4″ knockouts on the junction box. Re-check the electrical box to ensure it is centered with the gypsum platform after wiring.
When mounting a SeeLess Platform:
- . Cut in drywall around the platform
- Level the drywall with the lower line of the joint on the front of the gypsum platform.
- Make sure that the laser center markers are evenly centered on all sides along the drywall.
- Cover the inside of the platform with paper or tape to protect the center opening.
- Apply the fiberglass tape on all four joints around the platform.

- We recommend using the Fast Set Lite 20 (or 40 depending on available time).
- The recommended joint compound to use is the Green Dot topping by Westpac Materials.

- Once the first layer of the mud dries, sand-down with 120 grit sandpaper. When the second layer of mud dries, we recommend using 200-grit sandpaper. Then, when the third layer of mud dries, use 220 grit sandpaper.
- Apply one coat of primer and wait for it to dry.
- Apply two coats of paint. (it is recommended that you paint inside of the opening)
Costumer Support
1 866 442 5377
5222 Venice Boulevard,
Los Angeles, CA 90019
www.SeeLess.com