![]() 1/2 ” Thermostatic Trim Installation Instruction
1/2 ” Thermostatic Trim Installation Instruction
For: One-Way TH-9010
Two-Way TH9210/9212
Three-Way TH-9310/9313
Contents
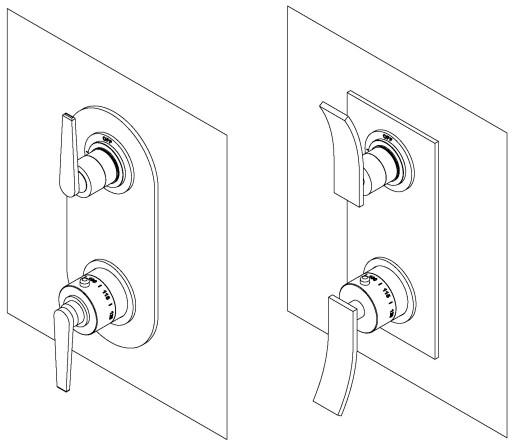
TH-9010 Thermostatic Trim
 KEEP THIS INSTRUCTION BOOKLET FOR FUTURE REFERENCE
Important: Santec reserves the right to request additional documents before servicing warranty requests.
SANTEC has the right to make necessary design changes when applicable.
*Illustration may not depict actual product s
1/2” THERMOSTATIC VALVE AND TRIM
 * Please specify the finish when ordering the part.
| Part Description | Part # | |
| 1 | Complete Thermostatic Valve | TH-9010/9210/9212/9310/9313 |
| 2 | Temperature Restrictor | TH-7000-3 |
| 3 | Mud Guard | TH-9000-1 |
| 4 | Plate | PH9794, PH9795 |
| 5 | Diverter Threaded Sleeve | PM-1179-2 |
| 6 | Rubber O-Ring for Div. Threaded Sleeve | PM-502 |
| 7 | Broach For Diverter Handle | SA255-2 |
| 8 | Rubber O-Ring for Diverter Dial | PM-553 |
| 9 | Diverter Dial | PH9700/9700-1/9701/9800 |
| 10 | Rubber O-Ring for Diverter Lock Nut | PM-552 |
| 11 | Diverter Lock Nut | P00018-2 |
| 12 | Thermostatic Threaded Sleeve | -VARIES- |
| 13 | On/Off Handle Assembly | P00019 |
| 14 | Thermostatic Lock Nut | P00018 |
| 15 | Rubber O-Ring for Thermostatic Lock Nut | PM-554 |
| 16 | Teflon Washer | PM-831 |
| 17 | Thermostatic Dial | PH9731 |
| 18 | Stem Screw with O-Ring | PM-5-4X-351-3 |
| 19 | Thermostatic Handle | -VARIES- |
| 20 | Set Screw | PM-027 |
| 21 | Allen Key | PM-033 |

INSTALLATION INSTRUCTIONS
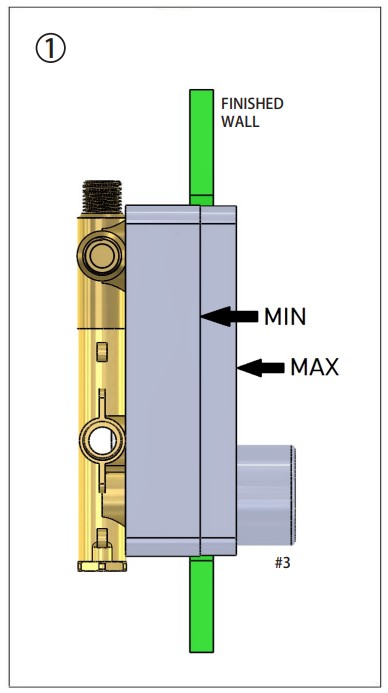 − Rough in the valve, lining the surface of the wall to the #3 Mudguard Min/ Max line.
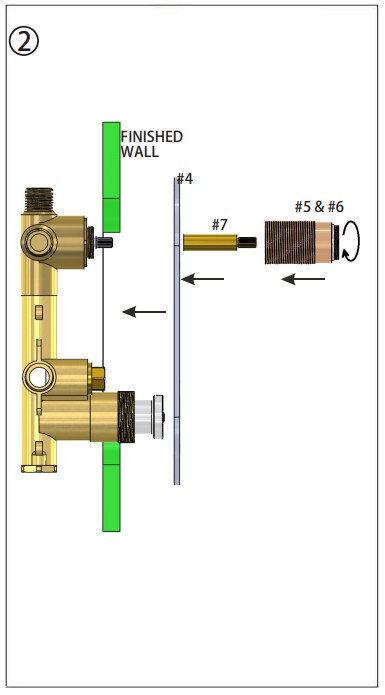 − Place #4 plate up against wall over valve.
− Insert the # broach for diverter handle onto the male broach of the diverter valve.
− Screw the # diverter threaded sleeve onto the diverter valve until it stops. #6 o-ring should be installed on top of the sleeve. − Install #9 diverter dial (make sure the OFF position is in the 12 o’clock position). Make sure the #8 rubber o-ring is present.
− Hand tighten #11 diverter lock nut to #5 diverter threaded sleeve. Make sure #10 rubber o-ring is present, and make #11 diverter lock nut flushed against #9 diverter dial as much as possible (there may be a little gap in between due to the o-ring).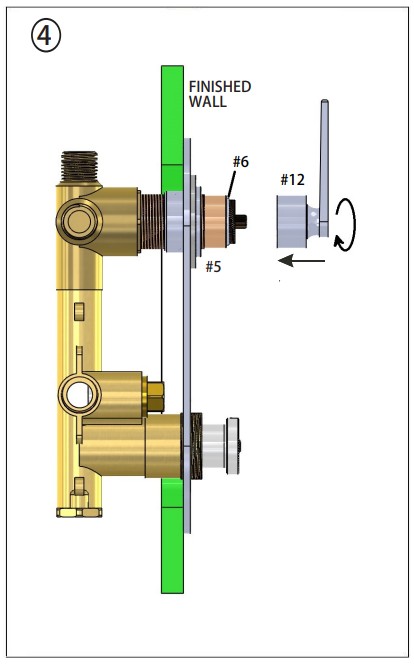 − Make sure the #6 rubber o-ring is present. It should be located between the base and threads of the diverter threaded sleeve.
− Hand tighten #12 ON/OFF handle assembly to #5 diverter threaded sleeve until it stops. Make sure lever is pointing to 12 o’clock position. − Screw on #13 thermostatic threaded sleeve onto thermostatic valve. Tighten all the way. The top of #13 threaded sleeve should be aligned to the bottom of #2 temperature restrictor.
 − Hand tighten #15 thermostatic lock nut to #13 thermostatic threaded sleeve. Make sure the #14 rubber o-ring is present, and make the #15 lock nut flushed against plate as much as possible (there may be a little gap in between due to the o-ring).
 − Insert #16 teflon washer to bottom of #17 thermostatic dial.
− Insert #17 dial with the 100°text or push button pointing to the 12 o’clock position.
− Secure with #18 screw with o-ring. DO NOT OVER TIGHTEN.
− Assemble #19 thermostatic handle onto #17 dial and tighten with #20 set screw using #21 allen wrench. Make sure the lever is pointing to 6 o’clock position. – The installation of the 1/2″ Thermostatic Trim is finished.
1/2” THERMOSTATIC DIAL & VOLUME DIVERTER EXTENSION KIT (P00200)
If the valve is roughed too far into the wall, please use the extension kit provided in the clear plastic bag. To install this kit, refer to the instructions on the next few pages.
| ITEM NO. | PART NUMBER | DESCRIPTION | QTY. |
| 1 | P00055-1 | Threaded Sleeve Extension | 1 |
| 2 | SA255-1* | Broach for TH-7000 Extension Kit | 1 |
| 3 | PM-1215 | O-Ring for SA255-1 | 1 |
| 4 | TH-7000-2* | Plastic Temperature Restrictor for TH-7000 Extension Kit | 1 |
| 5 | PM-1216 | O-ring for TH-7000-2 | 1 |
| 6 | PM-5-4X-351-5* | Screw for TH-7000 Extension Kit | 1 |
| 7 | P00064 | Diverter Sleeve Extension | 1 |
| 8 | SA256* | Diverter Broach for Extension Kit | 1 |
*-REPLACES-
TH-7000-3 FOR
TH-7000-2
PM-5-4X-351-3 FOR
PM-5-4X-351-5
SA255-2 FOR SA256
EXTENSION KIT INSTALLATION INSTRUCTIONS
 − Remove the temperature restrictor
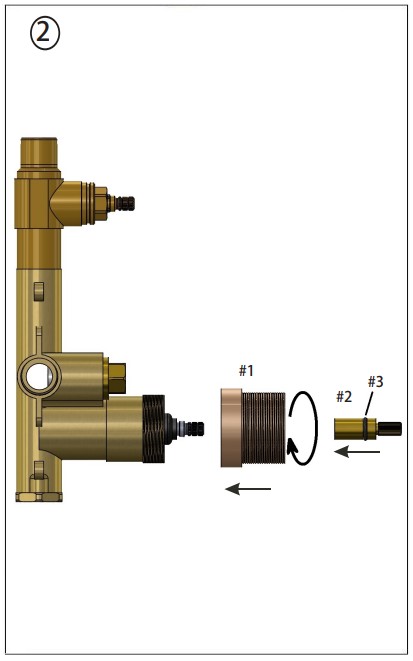 − Screw on #1 threaded sleeve extension onto thermostatic valve. Tighten all the way.
− Insert #2 broach for extension kit onto the cartridge. An #3 o-ring should already be installed along the groove of the broach extension. − Insert the #4 temperature restrictor for extension kit onto the cartridge. There should be a #5 o-ring installed inside the extended temperature restrictor.
 − Screw on #7 diverter sleeve extension onto diverter valve. Tighten all the way.
 − The thermostatic valve with the attached extensions is ready for installation. Refer back to step 1 on page 2 to begin installation.
 – On step 2 on page 2, swap the #7 broach for diverter handle to #8 diverter broach for extension kit. Resume to the next steps.
 – On step 8 on page 5, swap the #18 screw with o-ring to #6 screw for extension kit. Resume to the next steps to complete installation.
MAINTANENCE
 General characteristic
– Santec thermostatic valve is suitable for most water heater systems provided it is installed correctly
– Low pressure storage heaters are not recommended for this application
Note: Cartridge and #2 Temperature Restrictor have RED markings indicating the 100° mark should be aligned at the 12 o’clock position.
Cartridge Cleaning
After years of use, impurities and lime scale can restrict the water flow. To clean the cartridge, please follow these instructions:
- Remove the handle screw, handle trim, trim plate screws, and trim plate.
- Shut off the water line by turning the check valve shut off mechanism clockwise. Make sure that the both hot and cold sides are closed.
- Remove the cartridge using a 30mm wrench.
- Wash the filter under running water or soak it with vinegar or a descaling agent.
- Reassemble the cartridge making sure that the red lines on the cartridge are aligned.
- Open the check valve shut-off mechanism, turn on the water, and check water flow.
- If the water flow is normal, reassemble the trims.
![]() Rev 06/2022
Rev 06/2022