![]() Dash Cam
Dash Cam
![]() USE MANUAL
USE MANUAL
Contents
Product Specification
| DDR | Built-in 64M |
| FLASH | 8M SPI nor flash |
| Display screen | 4.0 inch IPS HD screen |
| LCD resolution | 1080P |
| External port | MINI USB 5V/2A power adapter port |
| Max support 32G Class10 TF card (Include) | |
| 2.5mm digital 720P rear view lens port | |
| Speaker | Monophonic 15*10mm speaker |
| MIC | 4015 Standard Omnidirectional Microphone |
Features
| Front camera | 6-glass/F2.0aperture/170°wide angle |
| Inside camera (optional) | VGA 120° |
| GPS tracker | NO |
| AV OUT | NO |
| Rear camera | 6M cable/2.5mm port |
| Photo | Support |
| Lens rotates | Adjust manually |
| WDR | Support |
| HDR | Support |
| Reversing visual | Support |
| Video format | AVI |
| Image format | JPG |
| Compression format | H.264 |
| Battery | 320mAh polymer lithium battery |
| Language | Support multi-language |
| G-sensor | Support |
| Motion detection | Support |
| Delay shutdown | Support |
| Loop recording | Support, Do not leak seconds |
| Sound record | Support |
| Fill light for night | Support(Open manually) |
| Parking monitoring | Support |
| Front camera | 1080P (30f/s) |
| In-car camera resolution | 1080P |
| Camera resolution | Max support 3M |
| Working Environment | |
| Operating temperature | -40°C~70°C |
| Operating humidity | 15-65%RH |
| Storage temperature | -40°C~70°C |
Installation
- How to install the front camera?
( Please install camera after turning off the car engine.)
1.1. Install the driving recorder on the glass near the rear-view mirror
1.2. Connect the power cord to the machine and plug the cord at the intersection of the ceiling and the glass
1.3. Go down the power cord along the seam of the A-pillar
1.4. Run the power cord along the door seam to the bottom of the storage box
1.5. Run the power cord along the bottom of the storage box towards the cigarette lighter and insert the cigarette lighter plug into the cigarette lighter hole. Here are some suggestions for installing the dashcam.
1.1. It should be installed near the rear-view mirror of the car, but not obstructing the driver’s view.
1.2. Make sure that the lens is within the range of the windshield wipers, so that the video can monitor road conditions clearly when it rains.
1.3. Please not touch the lens with your fingers, to prevent fingerprints from affecting the clarity of the video.
1.4. If you need to remove the suction cup holder from the windshield, be careful as it may damage the adhesive and cause the dashcam to fall off. - How to install the rear camera?
(Note: please ensure that the view of the rear camera is normal before installing your rear camera. The length of the rear camera cable is 18ft, supporting car and SUV for five seats. )
There are two installation methods,
2.1. The rear camera is installed above the inner of the rear windshield.
( It can be installed by yourself, the reversing visual function cannot be achieved, and it can only record rear videos) 2.2. The rear camera is installed above the license plate frame by a professional or yourself. And connect the camera to the reversing light power supply, which can achieve the reversing visual function. (The red power wire on the rear camera can be connected to the reversing light ower supply.)
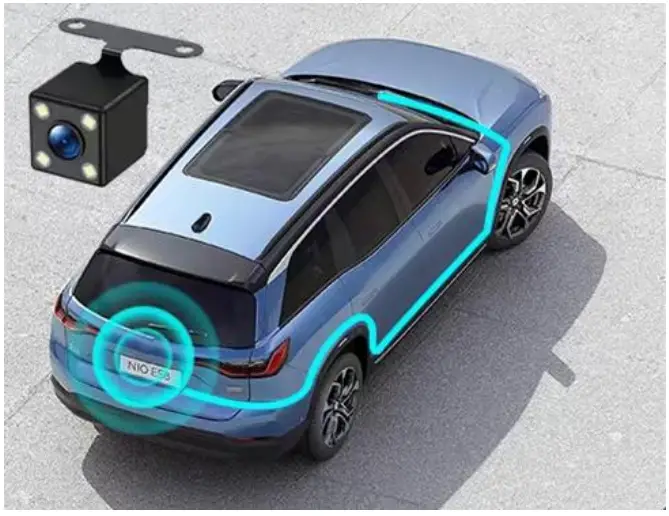
Product Details


Q and A
- How to change front inside rear dash camera views?
In video and photo modes, short-pressing [◄], the dash cam can only display 1 or 2 cameras on the screen, Front, Front+Cabin, Front+Rear, Cabin, and Rear are the choices. - How to turn on/off the Sound record?
In video and photo modes, short-pressing [►] to turn on/off the sound record. - How to lock the video and stop video recording?
In video mode, short-pressing [M] to quick lock video, the lock file will not be overwritten. Short-pressing [OK] to stop video recording. - How to change video, photo and playback modes?
[M] Button, video, photo playback mode change (long press)/ Menu (short press) - To change mode, long press [M] to enter Video mode, then short press [M] to enter video menu settings as follows:
Video Menu 1 Resolution 1296P/1080P/720P Recommend 1080P 2 Loop recording Off/1 /2 /3 / 5 minutes 3 High dynamic range On/ Off Improved image quality. Better visual effect 4 Exposure compensation +2.0 to -2.0 5 Motion detection On/ Off In standby mode, it will automatically record while an objective moves 6 Record audio On/ Off Turn on/off sound record 7 Date stamp On/ Off 8 G-sensor Off / High (2G) /
Medium(4G) / Low
(8G) sensitivityWhen a car occurs collision/accident, it will lock the current video and can’t be
covered. Recommend to set the sensitivity to 4/8G9 Park mode On/ Off Parking monitor, unattended surveillance 10 Date/Time Adjustment Years /Months
/Date/Hours
/Minutes /Seconds11 Auto power off Off/ 1 / 3 minutes 12 Screen saver Off/ 3 / 5 / 10
minutes13
14Buttons sound On/ Off Language Support 15 Frequency 50HZ/60HZ Choose the Light source frequency 16 Format OK/ Cancel Format TF card 18 Default settings OK/ Cancel 19 Version Machine software 5.1. To change mode, long press [M] to enter Photo mode, then short press [M] to enter Photo menu settings as follows:
Photo Menu 1 Resolution 5M/ 8M/ 10M/ 12M/ 3M/ 2MHD/ 1.3M 2 Sequence On/ Off 3 Continuous On/ Off 4 Quality Fine/ Normal/ Economy 5 Sharpness Strong/ Normal/ Soft 6 White balance Auto/ Daylight/ Cloudy/ Tungsten / Fluorescent 7 ISO Auto/100/200 8 Exposure
Compensation+2.0 +5/3 +4/3 +1.0 +2/3 +1/3 +0.0 -1/3 -2/3 -1.0 -4/3 -2.0 9 Anti- shacking On/ Off 10 Quick review Off/ 2 seconds/ 5 seconds 11 Date stamp Off/ Date/ Date/Time 5.2. To change mode, long press [M] to enter Playback mode, then short press [M] to enter Playback menu settings as follows:
Playback Menu 1 Delete Delete current/ Delete all 2 Protect Lock current/ Unlock current/ Lock all/ Unlock all - How to prevent the SD card from frequently getting full and needing to be formatted?
6.1. When driving normally, please turn off parking monitoring and motion detection. They can occupy storage space and may cause automatic shutdown or freezing of the device. Please turn them on when parking, and configure a voltage reduction line or mobile power supply to retain the electricity.
6.2. Set the G-sensor to 4/8G with low sensitivity. Otherwise, under 2G high sensitivity, There will lock the video just a brake.
6.3. Remember not to press the [M] to lock the video recording during normal video recording.
6.4. Turn on loop recording to automatically overwrite old videos.
6.5. Regularly format the videos to get more storage space. - How to download the video and image file to computer?
Please remove the SD Card and use an adapter to USB to copy the videos
to your computer. - How can I install the hardwire kit?
After you install the hardwire kit, you needn’t to plug the lighter car charger power cable.
Please insert the hardwire kit interface into the power interface of dash cam. And the other end of the hardwire kit is connected to the car battery. - What is the use of the red line on the rear camera?
The red power wire on the rear camera can be connected to the reversing light power supply for the reversing visual function. - How to use the button to set the function, such as Date/Time setting?
In video or photo mode, short press the [ M] twice to enter the setup menu. Press [►] to choose the date/time, short press the [ OK] to enter date/time menu. Press [◄] and [►] to adjust time details. Finally, press the [M] to exit.
[Please note]
Please set the correct time firstly, in order to effectively record the time of traffic accident for evidence. - What type of vehicles is the dash cam suitable for?
The length of the rear camera cable is 18ft, supporting car and SUV for five seats. -
What other functions do the buttons have?
[ ] Power button, short press to turn on/off screen, long press to switch on/off the device.[►] and [◄], short press to select function at the Menu interface.[OK] Confirm button, short press to confirm in the menu interface, and short press to turn on/off video record in the video mode.
[Please note]If a rear camera is installed and Front+Cabin mode is selected, when the “R” gear is engaged, it will automatically display the complete image of the car’s reversing vision. It will not affect the front car video recording, and will automatically switch back to the front car image after canceling the “R” gear. (The red power wire on the rear camera needs to connect the reversing light power supply.)
Features Introduction
- Use the automatic recording function
Start the car engine, the recorder automatically starts to open the recording function.
Close the car engine. The recorder automatically saves the contents of the log and shuts down, recorded video segments are stored on the TFcard. When the TF card is full, the recorder will overwrite the oldest recorded image preferentially. (Overwrite must turn on the Loop Recording.) [Please note] Overwrite must turn on the Loop Recording, loop recording can be set to 1/2/3/5 minutes in the menu. - Use motion detection
In standby mode, enter the menu screen and open the motion detection mode. When the lens is sensitive to the peripheral area of a moving object, the state machine into the camera, recording 30 seconds after the system stops recording.
[Please note] When driving normally, please turn off parking monitoring and motion detection. They can occupy storage space and may cause automatic shutdown or freezing of the device. Please turn them on when parking, and configure a voltage reduction line or mobile power supply to retain the electricity. - G-sensor
With the built-in gravity sensor (G-sensor), if serious vehicle collision, the recorder will lock the first 5 seconds and 10 seconds after the image date when the accident occurred while the bottom left of the display screen displays a lock icon. Locked images will be saved as a special file, the file will not be overwritten cycle.
[Please note] Gravity sensor (G-Sensor) adjustment support needs to set sensitivity at the setup menu, recommend to set the sensitivity to 4/8G. - Key lock the video
The lock file will not be overwritten. In the video mode, short press [M] to lock the entire video image. - File playback
In the playback mode, press the [ OK] to playback. To exit playback mode, press the [M] button again. - Reversing visual function
First, you must connect the DVR with the car charger, the rear-view camera connect the reversing lights. Insert the car charger, the machine will automatically start recording the status. Screen switch R position in the recording mode automatically switches to the rear-view camera, displaying the reverse image. After reversing the visual machine automatically return to video mode. [Please note] Please test if rear camera is normal before installation. The red power wire on the rear camera can be connected to the reversing light power supply. - Parking monitor(To achieve unattended surveillance video)
To achieve this function, the dash cam must remain electricity (requires connection of hardwire kit, sold separately), and open the motion detection and parking monitoring function in the menu.
When the dash cam detects a collision while parked, it will automatically turn on and then record a lock video for 30 seconds, and automatically shut down.
[Please note] This function is only used when park stopping. Please turn off the motion detection and stop the monitoring function during normal driving.
| FAQ | |
| The machine appears “file error’ message | Format TF card. The general problem is TF card |
| The screen appears with horizontal stripes interference | Please select the correct power supply frequency 50HZ(PAL) |
| How to properly turn on the 24-hour parking monitoring function | While normal driving, please do not open. It easily leads to automatic shutdown or crash. Please open park mode when parking. This function requires connecting hardwire kit |
| Night shooting screen is not clear enough | Recorder shooting depends on the outside strong light source (such as streetlights or car light) |
| The machine always reverts to the default date and time | You can use car charger or mobile power supply to add power |
| Why during recording, the machine automatically shut down suddenly | Please turn off the parking monitoring function. Ambient temperature exceeds 70°C will cause automatic shutdown |
| [Warm note] | Most of the problems from the SD card |
The information provided in this manual is for reference only. Please prevail in kind (some special features depend on different models). All rights reserved.
![]()