![]() 2A34KMINU ASTRA PLUS GNSS Receiver
2A34KMINU ASTRA PLUS GNSS Receiver
User Manual
Contents
2A34KMINU ASTRA PLUS GNSS Receiver
Before You Start
Dear customers,
Thank you for purchasing our product. Before starting your work, please carefully read the following:
- This user guide is for your product only. If the actual situation does not match with the situation in the user guide, the actual situation shall prevail.
- Improper use of the product can lead to death or injury to persons, damage to property and/or malfunction of the product. For safety and instructions on how to use this product, please carefully read the precautions for safe operation, disclaimers and instructions in the user guide and at all times comply with the same.
Remember that YOU are the key to safety. - The information in this user guide is subject to change without notice. We reserve the right to change or improve the device as well the content in the user guide without any obligation to notify you. For any questions, please contact us.
1.1 Precautions for Safe Operation
Precautions in this part are intended to minimize the risk of personal injury and/or damage to property, and all indicate ATTENTION! BECOME ALERT! YOUR SAFETY IS INVOLVED!
Precautions can be divided into the following types according to the degree of loss or injury in case of negligence or omission:
 Warning Warning |
Indicates a potentially hazardous situation that, if not avoided, could result in SERIOUS INJURY OR EVEN DEATH. |
| Indicates a potentially hazardous situation that, if not avoided, may result in INJURY OR PROPERTY DAMAGE OR IRRETRIEVABLE DATA LOSS. |
1.1.1 Warning
- Please do not disassemble the device. Otherwise, fire or electric shock may occur. Only RinoNav authorized distributors can disassemble or rebuild the device.
- Please do not cover the charger when charging. Otherwise, fire may occur.
- Please do not use wet charger, defective power cable, socket or plug, and power cable not specified by RinoNav. Otherwise, fire or electric shock may occur.
- Please do not put the device close to burning gas or liquid, and do not put it in the fire or high temperature condition. Otherwise explosion may occur.
- Please avoid short circuit of the battery. Otherwise, fire may occur.
- Please avoid disturbance of severe electrostatic discharge. Otherwise, the device may have some degradation of performance like switching on/off automatically, etc.
1.1.2 Caution
- Please put the device firmly on the pole.
- To avoid accidental damage, please only use original supplied parts. Otherwise, damage to the device may occur.
- When transporting, please try your best to lighten liberation on the device.
- Please do not touch the device with wet hand. Otherwise, electric shock may occur.
- Please do not arbitrarily stand or seat on the carrying case, or turn over it. Otherwise, the device may be damaged.
1.2 Disclaimer
It is your responsibility to exercise common sense and navigational judgment while using the GNSS receiver.
We assume no responsibility or liability for any damages to property (including direct or indirect damage), personal injuries or death caused by the following conditions:
- Damage caused by both physical and mental conditions of the operator, including alcohol, drugs, drug anesthesia, dizziness, weakness, nausea and other physical or mental conditions.
- Personal injuries or property loss caused by the operator’s subjective intention, and any compensation related to moral damage followed by such condition.
- Damage caused by failure to assemble or operate the GNSS receiver in accordance with the proper guidance in this guide.
- Damage caused by refitting or replacing the original accessories or parts with that not produced by RinoNav so as to make the GNSS receiver operate badly.
- Damage caused by use of products not produced by RinoNav or imitation of our products.
- Damages caused by the operator’s operation error or subjective judgment error.
- Damage caused by collision, capsizing, fire, explosion, lightning, storm, tornado, heavy rain, flood, tsunami, land subsidence, ice subsidence, avalanche, hailstorm, mudslide, landslide, earthquake, etc.
- Damage caused by using unauthorized charger.
- Losses caused by illegal operations (not compliant with the local regulation and legislation requirements).
- Damage or losses resulting from installation or operation not in accordance with the precautions and instructions in this user guide.
- A change of data, loss of data, etc.
- Wrong transportation.
- Use of non-original parts.
- Usage not explained in the user guide.
- Any purpose other than the intended purpose.
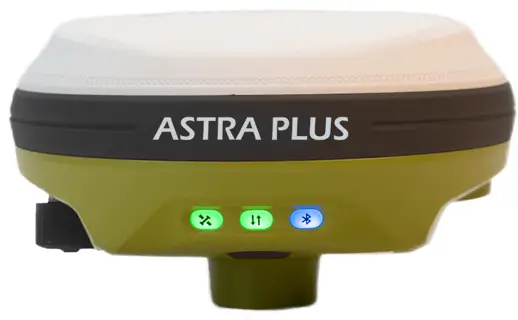
MNIU at a Glance
The MINU main body is designed to support various survey & lofting tasks with better heat dispersion and light weight 220g. When it’s fully charged, it can continuously work for 18 hours.
2.1 Appearance
The MINU main body is as follows:

2.2 Indicator Light
Through the color of the indicator light, you can know the following:
| Indicator Light | Status | Description |
 |
Red | No receiving satellites. |
| Green | Fixed solution. | |
| Flashing green | Satellite data normal. | |
 |
Red | Not connected. |
| Green | Connected. | |
| Flashing green | Data in transit. | |
 |
Red | Battery level less than 30%. |
| Flashing Red | Battery level less than 10%. | |
| Green | Fully charged. | |
| Flashing Green | In charging. |
2.3 Power Button
Through the power button, you can achieve the following:
- Check the battery level: Double-click the power button to check the status of the battery.
- One light turns green: 30% battery
- Two lights turn green: 60% battery
- All lights turn green: 100% battery .
- Power light turns red: 10% battery .
- Power on: long press the button for 3 seconds and release it. All indicator lights will be on.
- Power off: long press the button for 3 seconds and release it.All indicator lights will be off.
2.4 Type-C port
Type-C port is used to charge the receiver and transmit the data.
Quick Start
3.1 Establish Communication
It is recommended to establish communication between the MINU and app Reolink (apply to Android System), do the following steps:
- Install the app RinoLink (apply to Android System) in the device and use the activation code to activate it.

- Tap Device on the bottom of the page and select Communication.

- In the Communication page, do the following:
Note: Tap ![]() will clean the paired devices , then click Search to pair with new device.
will clean the paired devices , then click Search to pair with new device.
- Device Manufacturer: Default setting – RinoNav
- Set Device Type: MINU
- Set Communication Mode: Bluetooth
- Tap Search. When the instrument shows, tap Stop and choose the corresponding device serial number “MINUXXXXXXXXXX” in Search Devices part.
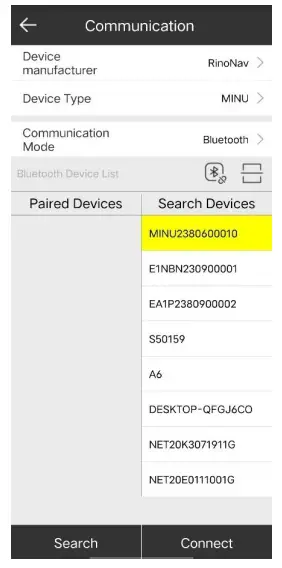
- Tap Connect, enter PIN (0000 or 1234) in the dialog and click OK.
 When the communication is successfully established, the icon on the top turns green
  .
.
3.2 Get the fixed solution
To establish stable connection with satellites, it is recommended to get the fixed solution, do the following steps:
- Tap Device on the bottom of the page and select Rover.

- In the Rover page, select Phone Internet and do the following:
1. Set the Work mode: Rover
2. Set the Data Link: Phone Internet
3. Set the Connect Mode: NTRIP

- Set the CORS Settings.
Tap and click Add in the CORS server manager page to set new Server Address.
- Tap Get Access Point and select the Mountpoint.

- Open Auto connect to network and When we get the fixed solution, the icons
3.3 Start the task
- Tap Survey and choose Point Survey

- Tap
 and set the basic information of Topo Point. Then click OK.
- Tap
 to check the Points Database.
- Tap
 and select Import/Export to
Basic Operations
4.1 Charge the Battery
The device is equipped with Type-C charger. It takes about 4 hours to fully charge the battery:
Flashing Green: connected to the charger and is charging.
Green: connected to the charger and fully charged.
To charge the battery, do the following:
- Open the cover of type-C.
- Connect the charger to the MINU with the type-C cable.
- Connect the charger to the power supply.
4.2 Do General Stakeout
It is used to physically mark the location of points on the ground.
To do general stakeout in the app RinoLink, do the following:
- Tap main menu Survey→Point Stakeout to enter the Stake Point page.
- Select the target point and click OK.
- Find the target stakeout point according to the primp.
Changes or modifications not expressly approved by the party responsible for compliance could void your authority to operate the equipment.

Copyright ©
. 2023. All rights reserved.
No part of this document may be reproduced or transmitted in any
form or by any means without prior written consent of RinoNav.
Notice
The purchased products, services and features are stipulated by
the contract made between RinoNav and the customer.
All or part of the products, services and features described in this
document may not be within the purchase scope or the usage scope.
The information in this document is subject to change without notice.
Every effort has been made in the preparation of this
document to ensure accuracy of the contents,
but all statements, information, and recommendations in this
document do not constitute a warranty of any kind, express or implied.
Certificate
![]()