Contents
Reimo 11004 Bike n Surf Bett
Product Information
Product Name: Bike n Surf Bett
Vehicle Assignment:
| Brand | Model | Production Period |
|---|---|---|
| Volkswagen | T5, T6, T6.1 Kombi, Kastenwagen | 2003 – |
Technical Specifications:
- Mass of the bed: 56 kg
Product Usage Instructions
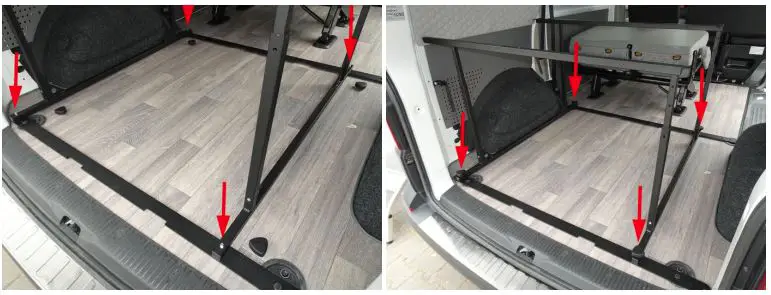
Vehicle Preparation
Remove screws of the 4 fixation points.
Note: Please first screw all connections loosely. When all components are connected, tighten all screws.
Screwing on Flat Profiles
- [Insert instructions here]
- [Insert instructions here]
Preparing and Attaching Fixation to Sidewall
- [Insert instructions here]
- [Insert instructions here]
- [Insert instructions here]
- [Insert instructions here]
- [Insert instructions here]
- [Insert instructions here]
Positioning and Fixation of Frame in the Vehicle
- [Insert instructions here]
- [Insert instructions here]
- [Insert instructions here]
- [Insert instructions here]
Installing and Screwing on of Slatted Frame
- [Insert instructions here]
- [Insert instructions here]
[Insert next section title]
- [Insert instructions here]
Installing and Screwing on of Slatted Frame
- [Insert instructions here]
Vehicle assignment
Overview of the relevant technical data of the base vehicle.
- Brand
Volkswagen - Model
T5, T6, T6.1 Kombi, Kastenwagen - Production period
2003 - Length [mm]
4900
Tip
The two upper hight positions allow the additional use of the VW- 2 seater bench in the 2. row.of seats:
Technical data
- Mass of the bed [kg]: 56
- Increase of the vehicle mass [kg]: 56
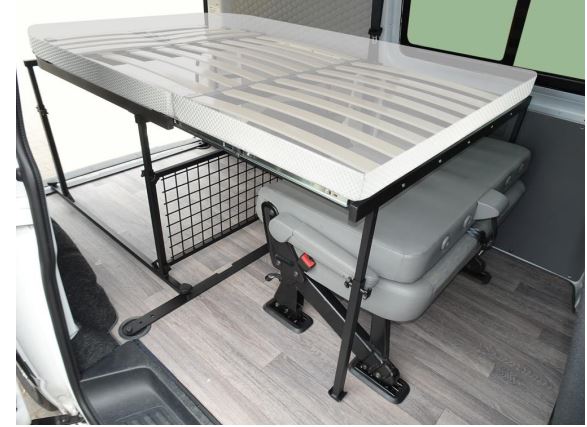
Overview of the main components
| number | Quantity | Description |
| 1 | 1 | mattress with folding part |
| 2 | 1 | slatted frame with sliding part |
| 3 | 2 | flat profile for fixation on floor |
| 4 | 2 | lower part of framework |
| 5 | 1 | upper rear part of framework |
| 6 | 1 | upper front part of framework |
| 7 | 2 | connection to vehicle‘s sidewall |
| 8 | 1 | protective grill for luggage securing |
| 9 | 1 | upper part of sliding part support |
| 10 | 2 | support leg for sliding part |
| 11 | 1 | set of screws |
Pos. 11 Schraubenset (nicht vormontiert):
Required tools
- Bit serrated socket size 10
- Wrench size 17 mm
- 2 x wrench size 10 mm
- Drill Ø 9mm
- Hex wrench 4 mm
Recommended accessory
| Item number | Quantity | Description |
| 11006 | 1 | kitchen module „Cooky“ |
| 110082 | 1 | cupboard |
| 11009 | 1 | table set |
| 711490 | 1 | compressor – cooling box 18 litre |
| 19231 | 1 | curtain set, translucent |
Attention:
All pictures show the installation in left hand drive vehicle. Installation in RHD-vehicle is to be mirrored.
Preparation of vehicle
Remove screws of 4 fixation points
Attention:
Pls first screw all connections loosely. When all components are connectetd, tighten all screws.
Screwing on flat profiles
- Inserting carriage bolt in flat profiles: right side: in inner square hole, left side: in outer square hole
- Then, screw flat profiles in threads of fixing points with screw M 10 x 50. (screw positions see pictures)
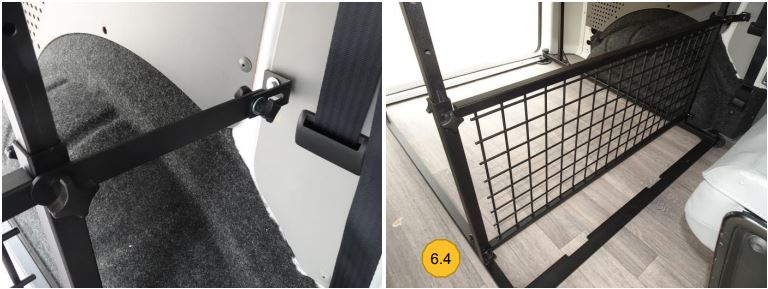
Preparing and attaching of fixation to the sidewall
- Drilling out 9 mm of dowel hole in the rear
- Drilling out 9 mm of dowel hole in the front
- Inserting rivet nut with screw, nut and washer in drilling
- then, hold tightly the screw with 10 mm-wrench while pushing it into the hole, then
- lock the nut clockwise until the rivet nut is well fixed. Then release the nut and remove the screw.
- Alternatively: inserting the rivet nut with special tool.
- Front fixation: use M 8-nut as spacer
- hinten bolted rear fixation
- (C-Holm) bolted front fixation
Assembling the main frame outside of vehicle
superior part of frame with the brackets with slot holes to the front, projecting ends to the left
Positionning and fixation of frame in the vehicle
 pin on the frame onto the 4 threads of the carriage bolts
Bolting the main frame in desired hight

- insert the hand screws from the backside into the frame
- connecting the rear sidewall fixation with the frame
- connecting the front sidewall fixation and safety grill with the frame
- fastening the grill with short hand screws at the bottom
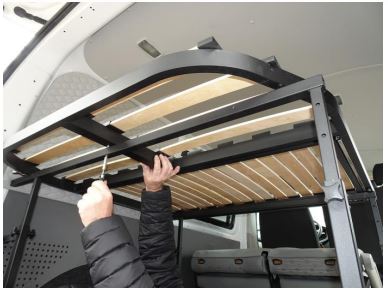
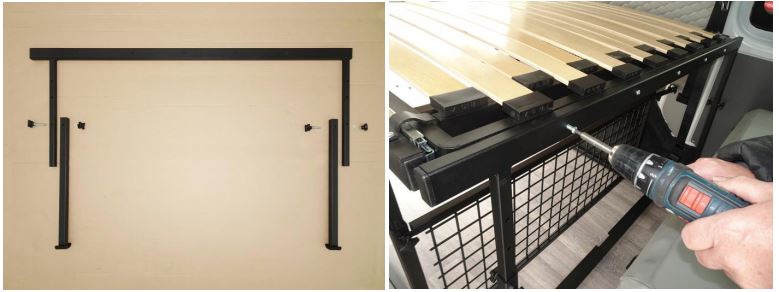
Installing and screwing on of slatted frame

- positioning the slatted frame on the lower frame (sliding part to the front)
- crewing on the slatted frame with 4 screws M6 through the slot holes
- Screw connection of the slatted frame in the rear through the lower frame with 1 screw M6
Assembling the base for sliding part and connecting it with the slatted sliding part
- connecting the support legs with superior frame of support in matching hight
- Screwing of pre-assembled support with 5 screws M6 to the sliding part. Makes the assembly easier: Pressing the support to the sidewall while inserting and screwing the first screw.
Attention:
When all components are connectetd, tighten all screws.
Positionning and unfolding the matress
Your Bike n‘ Surf-bed is now fully installed. We wish you a good night’s sleep! Your Reimo team.

Tip
After the first installation the bed can be built in and built out without any tools in a few minutes.