QUICK 870D Hot Plate

Contents
Thank you!
Thank you for purchasing our products. Please keep the instruction manual properly for future reference.
Safety Instructions
 CAUTION
- During the installation and use of this product, all electrical safety regulations of the country and regions must be strictly observed.
- The power supply must be disconnected when disassembling the product. Do not operate with power on.
- If the product does not work properly, please contact the supplier or our company, and do not disassemble or change the product in any way. We are not responsible for any problems caused by unauthorized maintenance or modification.
WARNING
- The product should be used away from places where there is magnetic interference.
- Don’t install the product in a place where the surface is easy to shake or be impacted, as it may damage the product.
- When the hot plate is in use, the surrounding temperature is extremely high, so be careful not to burn yourself.
- Don’t install the product in places where it may be exposed to rain or moisture.
- Don’t use in flammable and explosive environments.
- Please place the hot plate on a table covered with fire-resistant and heat-resistant rubber mats to avoid fire.
Overview
This hot plate adopts resistance heater and aluminum heat-conducting plate with high heat conduction efficiency. It is widely used in electronic manufacturing, machining, experiment, scientific research, education and other industries. If the hot plate is applied to the auxiliary preheating of electronic circuits with large heat capacity, and then solder the circuits with an soldering station, it can make up for the lack of heat of the soldering station.
Product Characteristics
- Three-channel temperature design, fast temperature switching.
- The temperature distribution of aluminum plate is uniform.
- External K-type sensor interface, convenient to test the actual temperature of the heating product.
- Sensor closed loop PID control, TFT liquid crystal display, accurate temperature and sectional preheating temperature setting.
- Digital temperature calibration, convenient and fast.
- Data communication interface, automatic linkage control.
Product Specifications
| Model | 870D |
| Power Consumption | 800W |
| Heating Zone Area | 180mmx200mm |
| Heater Material | Aluminum plate |
| Temperature Sensor | K-Type Thermocouple |
| Preheat Temperature Range | 50~350℃ |
| Temperature Stability | ±1℃ |
| Voltage | AC 220V |
| Thermometer Measuring Range | Room temperature ~600℃ |
| Thermometer Accuracy | ±5℃ |
| Ambient Temperature | 0~40℃ |
| Dimensions(L*W*H) | 293*357*66.5mm |
| Weight | About 5.1kg |
Product Specifications
Dimensions
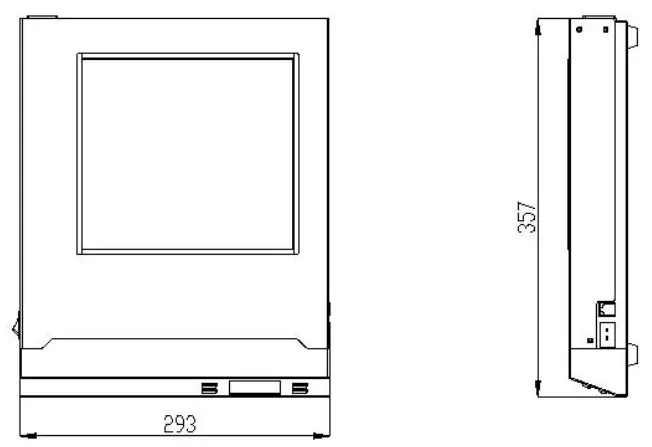

Unit:mm
Part Descriptions
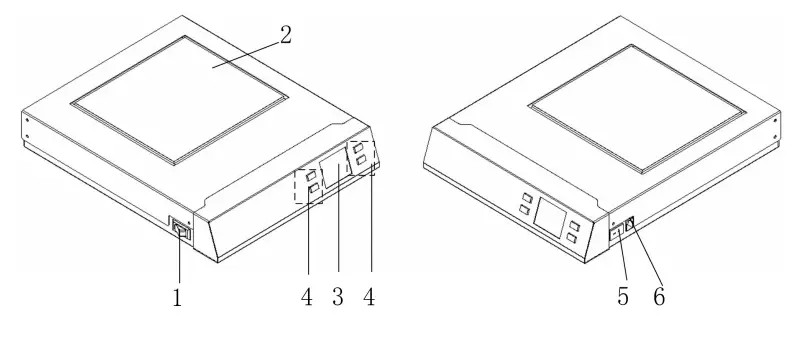
| NO. | Part Descriptions |
| 1 | Power Switch |
| 2 | Preheating Area |
| 3 | Display |
| 4 | Key |
| 5 | Externally Connected K-type Test Sensor |
| 6 | RS485 Communication Interface |
Key Descriptions
| Key | Function Descriptions |
 |
|
 |
|
| + and - key | Enter the temperature calibration interface |
| + |
|
| – |
|
Function Descriptions of the Main Interface

| Symbols | Descriptions | Symbols | Descriptions |
 |
Display channel |  |
Buzzer off |
 |
Long red light indicates the heating state;
The red and black lights flash alternately, indicating that the set temperature is reached; The blue light indicates the cooling state. |
 |
Current temperature setting value |
 |
Buzzer on |  |
Press to turn off temperature control |
 |
Display the test value of the external temperature sensor |  |
No external temperature sensor |
| T1/T2 | Temperature zone 1 and temperature zone 2 |  |
Count down |
Operation Methods
- Insert the power plug into the power socket consistent with the label value.
- Turn on the power switch and the hot plate will start to heat up.
- To change the set temperature, adjust the keys on the panel.
- After a few minutes, the temperature will reach the set value and stabilize sat the set value.
- After work, please turn off the power supply. The preheating plate will no longer be heated, and its temperature will slowly drop to room temperature.
Menu Setting
Temperature Setting
The default temporary channel at startup is CH0. Click to switch to CH1, and click successively to switch to CH2 or CH3. The temperatures of CH1-CH3are200 ℃、300 ℃ and temperature zone. To change the set temperature and display the set temperature value , + or – key can be used to change the temperature value. The temperature range is 50 – 500 ℃.
Temperature Rise
Short press + key, the temperature will rise by 1 ℃. Long press + key, the temperature will rise rapidly. When the required temperature is reached, release + key.
Temperature Drop
Short press – key, the temperature will drop by 1 ℃. Long press – key, the temperature will drop rapidly. When the required temperature is reached, release-key.
Parameter Setting
Long press key to enter the setting interface.
Channel Settings
- Press key to select the channel bar, and continue to press key to select the parameter bar.
- Press + or – key in the channel bar to select CH1; In the parameter bar, set the temperature and press key to save.
- In CH3, select the temperature zone and press key to enter the temperature zone setting interface to realize the function of segmented temperature control. Two temperature ranges can be set, in which the temperature and time can be adjusted.
The range of temperature 1 is 50 ℃ – 200 ℃, the range of temperature 2is 200-350 ℃, and the range of time 1 and 2 is 000 – 600 seconds. When temperature 1 reaches the set temperature, the countdown starts (time1issetaccording to requirements).
When the countdown ends, it will enter temperature2. When temperature 2 reaches the set temperature, the countdown starts (time2issetaccording to requirements). When the countdown ends, it will return to temperature1and remains there. If you want to continue the above functions, press key in the main interface to turn off and turn on again. - Press key to go back level by level until you return to the main interface.

Address Setting
- Press + or – in the main menu bar to switch to “Address”.
- Press key to select the parameter and the parameter will turn blue; press + or- key to set the communication address, and the communication address rangeis001to 255.
- Press key to save and return to the main menu.

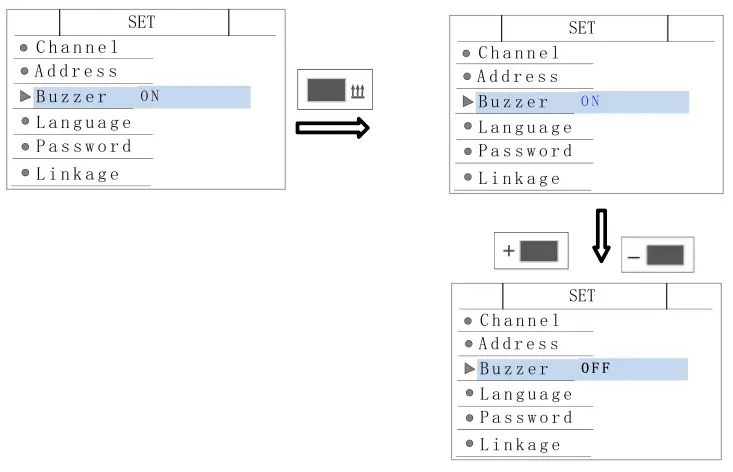
Key Tone Setting
- Press + or – on the main menu bar to switch to “Key Tone”.
- Press key to select the parameter, and the parameter will turn blue; press + or- key to turn the key tone ON or OFF.
- Press key to save and return to the main menu.
Language Setting
- Press + or – key on the main menu bar to switch to “Language”.
- Press key to select the parameter, and the parameter will turn blue; press + or- key to select “Chinese” or “English”.
- Press key to save and return to the main menu.

Password Setting
- Press + or – key in the main menu bar to switch to “Password”.
- Press key to input the old password (Default 000000) and then enter the new password input interface. Press + or – key to change the value and press key to confirm each value entered.
- After the new password is input successfully, the setting interface will display” Set Successfully”, and then directly go back to the channel menu.
- The new password takes effect after shutdown and restart or back to the main interface.

Linkage Setting
- Press + or – key on the main menu bar to switch to “Linkage”.
- Double press key to select “M1” (Mode 1) and M1 will turn blue. Then press key to confirm.
M1: No linkage mode. - Press – key to select “M2” (Mode 2), and press key to turn M2 blue. Then press key to confirm.
M2: External equipment can control the hot plate. - Continue to press – key to select “M3” (Mode 3). Press key, and the value of mode 3 will turn blue. Select the appropriate temperature through pressing+/- key.
M3: The hot plate can control external equipment. The temperature range is 50- 350℃. - Press to return to the main interface.


Temperature Calibration
Note:
- Only when the displayed temperature is consistent with the set temperature can the temperature calibration be performed.
- Long press + and – key for 2S to enter the temperature calibration interface.
Example:
- a) The product needs to be preheated at 100℃, so we set the temperature to100℃.

- b) Due to the material of the hot plate and environmental factors, when the
temperature is set to 100℃, the temperature above the hot plate is measured to 95 ℃ with a thermometer. In the temperature measurement calibration interface, enter the value 95, and press to exit.

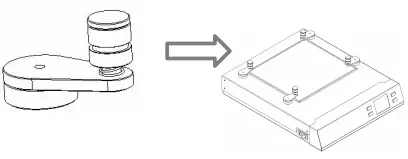
Accessory Descriptions
| Parts | Characteristics | Descriptions |
| Special-shaped Support | 1) Height
adjustable; 2) Easy to use. |

1) Place the special-shaped support above the preheating plate. 2) Rotate the column base of the special-shaped support to adjust the height of the special-shaped support. 3) Loosen the positioning knob on the PCB fixing bracket, and move the fixing bracket. Then tighten the positioning knob after fixing the PCB. |
| Simple Support | 1) Small and flexible;
2) Take up no space; 3) Easy to use; Strong magnet attraction; Securely fastened. |
1) According to the size of PCB, select the appropriate placement position, and directly place the simple support on the hot plate. 2) Place the PCB at the adjustment spring of the simple support and clamp it to fix the PCB. |
| Reflow Hood | 1) Economical and practical;
2) Energy saving, consumption reduction; 3) Stable performance. |

Directly placing the reflux hood on the preheating plate can be used as a small reflow oven |
Warranty Card
- The warranty period of this product is calculated from the date of purchase. During the warranty period, if the product breaks down during normal use, show the original warranty card and enjoy free service in the authorized repair company (or our company). Please keep the purchase certificate and this warranty card and show it before maintenance.
- During the warranty period, the following repairs need to be paid:
a.Unable to offer valid warranty card or certificate;
b.The purchase date, sales company and other items are not completely filled in or the warranty card is altered;
c.Damage caused by failure to follow the use methods and precautions in the manual;
d.Damage caused by disassembly, rep air and modification of products without authorization of the manufacturer;
e.Replacement of vulnerable and consumable parts. - All items of the warranty card shall be completely filled in by the agent or user to obtain a 12-month warranty period.
- Please keep this warranty card properly. It will not be re-offered after.
Customer Support
QUICK INTELLIGENT EQUIPMENT CO., LTD. ADD: NO.11, FengXiang Road, Wujin
High-Tech Industrial Development
Zone, Jiangsu, China
TEL: 86-519-86225678
FAX: 86-519-86558599
POSTCODE: 213167
WEBSITE: www.quick-global.com

