Contents
PANDUIT FCS9N-12-10R Opti Com Fiber Optic Splice Cassettes

Product Information
| Part Number | Description | Quantity |
|---|---|---|
| FCS9N-12-10R | OPTICOMTM SPLICE CASSETTE BASE | 1 |
| FCS9N-12-10P | OPTI-COMTM SPLICE CASSETTE COVER | 1 |
| FCS9N-12-LAR | CASSETTE PERFORMANCE LABEL | 1 |
| FCS9N-12-LAP | #6-32 X 1/4 FLAT HEAD PHILLIPS SCREW | 3 |
| FCSZO-12-10R | SPLICE CHIP | 1 |
| FCSZO-12-10P | SPLICE CHIP ADHESIVE TAPE | 1 |
| FCS9N-12-03P | PLT1.5I-M CABLE TIE | 2 |
| FCS9N-12-SAP | SPLICE PROTECTOR FOR FIBER | DEPENDENT ON P/N |
| FCSZO-12-03P |
WARNING: UNMATED CONNECTORS MAY EMIT INVISIBLE LASER RADIATION.
MAINTAIN DUST CAPS ON UNMATED CONNECTORS.
CAUTION: Fiber optic cable is sensitive to excess pulling, bending, and crushing forces.
Consult the manufacturer’s cable specifications sheet for specific cable to use.
For Technical Support: www.panduit.com/resources/install_maintain.asp
Product Usage Instructions
Step 1: Remove Cover
Remove the 3 screws and cover from the Opti-ComTM Fiber Optic Splice Cassette.
Step 2: Install Splice Chip
Using the splice chip adhesive tape, install the splice chip onto the cassette. The splice chip can be placed in the center or in an alternative position.
Step 3: Install Fiber
Insert the fiber into the rear of the splice chip.
Step 4: Install Cable Ties
Place the fiber cable through both sides of the heat shrink. Use cable ties to secure the cables. Heat shrink the cables together using appropriate heat shrinking techniques. It is possible to stack two heat shrinks per slot, allowing for a total of 24 cables.
Step 5: Attach Heat Shrinked Cables to Connectors
Attach the heat shrinked cables to the connectors.
Step 6: Re-install Cover
Re-install the cover onto the Opti-ComTM Fiber Optic Splice Cassette using the 3 screws.
For Instructions in Local Languages and Technical Support:
Website: www.panduit.com/resources/install_maintain.asp
E-mail: [email protected]
Phone: 866-405-6654
| PART NUMBER | DESCRIPTION |
| FCS9N-12-10R | OPTI-COMTM OS2 SPLICE CASSETTE, DUPLEX LC, PRELOADED WITH 12-FIBER RIBBON PIGTAIL |
| FCS9N-12-10P | OPTI-COMTM OS2 SPLICE CASSETTE, DUPLEX LC, PRELOADED WITH 12 PIGTAILS |
| FCS9N-12-LAR | OPTI-COMTM OS2 SPLICE CASSETTE, DUPLEX LC/APC, PRELOADED WTH 12-FIBER RIBBON PIGTAIL |
| FCS9N-12-LAP | OPTI-COMTM OS2 SPLICE CASSETTE, DUPLEX LC/APC, PRELOADED WITH 12 PIGTAILS |
| FCSZO-12-10R | OPTI-COMTM OM4 SPLICE CASSETTE, DUPLEX LC, PRELOADED WITH 12-FIBER RIBBON PIGTAIL |
| FCSZO-12-10P | OPTI-COMTM OM4 SPLICE CASSETTE, DUPLEX LC, PRELOADED WITH 12 PIGTAILS |
| FCS9N-12-03P | OPTI-COMTM OS2 SPLICE CASSETTE, DUPLEX SC, PRELOADED WITH 12 PIGTAILS |
| FCS9N-12-SAP | OPTI-COMTM OS2 SPLICE CASSETTE, DUPLEX SC/APC, PRELOADED WITH 12 PIGTAILS |
| FCSZO-12-03P | OPTI-COMTM OM4 SPLICE CASSETTE, DUPLEX SC, PRELOADED WITH 12 PIGTAILS |
| COMPONENTS | |
| DESCRIPTION | QUANTITY |
| OPTICOMTM SPLICE CASSETTE BASE | 1 |
| OPTI-COMTM SPLICE CASSETTE COVER | 1 |
| CASSETTE PERFORMANCE LABEL | 1 |
| #6-32 X 1/4″ FLAT HEAD PHILLIPS SCREW | 3 |
| SPLICE CHIP | 1 |
| SPLICE CHIP ADHESIVE TAPE | 1 |
| PLT1.5I-M CABLE TIE | 2 |
| SPLICE PROTECTOR FOR FIBER | DEPENDENT ON P/N |
WARNING: UNMATED CONNECTORS MAY EMIT INVISIBLE LASER RADIATION. MAINTAIN DUST CAPS ON UNMATED CONNECTORS.
CAUTION: Fiber optic cable is sensitive to excess pulling, bending, and crushing forces. Consult the manufacturer’s cable specifications sheet for specific cable to use.
Remove 3 screws and cover. Install splice chip using splice chip adhesive tape.
 Showing alternative placement for splice chip
 Install fiber into rear of splice chip.
 Install cable ties over fiber cable.
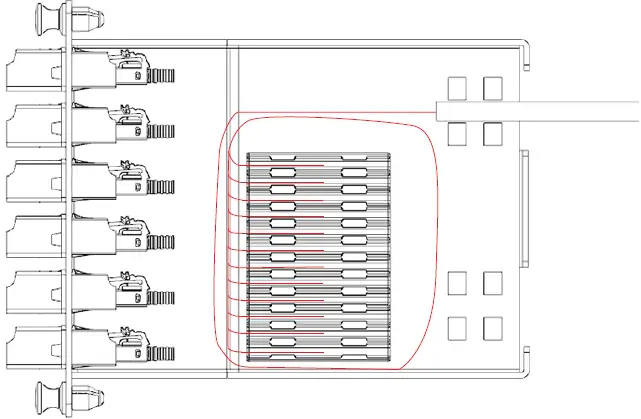
 Bring cable in through both sides of heat shrink. Heat shrink cables together using best practices for heat shrinking. Heat shrink may be stacked two per slot for a total of 24 cables.
 Attach heat shrinked cables to connectors,

Re-install cover and 3 screws.
