Contents
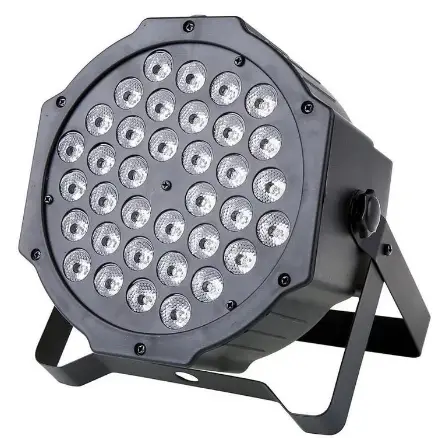
 OPPSK 04-HYT LED Stage Par Lights for Lighting
Before You Begin
What In the Box
- 2 × 60LEDs Stage light
- 4 x Bracket
- 4 x Screw
- 2 × IR Remote Controller
- 1 x User Manual
Unpacking Instructions
Carefully unpack the product immediately and check the container to make sure all the parts are in the package and are in good condition.
Caution
There are no user serviceable parts inside the fixture. Do not open the housing or attempt any repairs yourself. In the unlikely situation, your unit may require service, please contact us:[email protected]
Disclaimer
OPPSK believes that the information contained inthis manual is accurate in all respects. However, OPPSK assumes no responsibility and specifically disclaims any and all liability to any party for any loss, damage or disruption caused by any errors or omissions in this document, whether such errors or omissions result from negligence, accident or any other cause. OPPSK reserves the right to revise the content of this document without any obligation to notify any person or company of such revision, however, OPPSK has no obligation to make, and does not commit to make, any such revisions.
Safety Notes
- Please keep this User Manual for future consultation.
- Unpack and check carefully there is no transportation damage before using the fixture.
- Before operating, ensure that the voltage and frequency of power supply match the power requirements of the fixture.
- It’s important to ground the yellow/green conductor to earth in order to avoid electric shock.
- Disconnect main power before servicing and maintenance.
- Use safety chain when fixes this fixture. Don’t handle the fixture by taking its head only, but always by taking its base.
- Maximum ambient temperature is Ta : 104 F/40°C. Don’t operate it where the temperature is higher than this.
- In the event of serious operating problem, stop usingthe fixture immediately. Never try to repair the fixture by yourself. Repairs carried out by unskilled people can lead to damage or malfunction. Please contact the nearest authorized technical assistance center. Always use the same type spare parts.
- Do not connect the device to any dimmer pack.
- Do not touch any wire during operation and there might be a hazard of electric shock.
- To prevent or reduce the risk of electrical shock or fire, do not expose the fixture to rain or moisture.
- The housing must be replaced if they are visibly damaged.
- Do not look directly at the LED light beam while the fixture is on.
Introduction
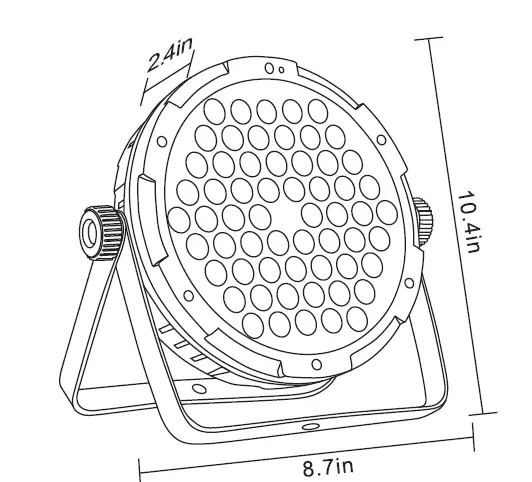
Product Overview & Size
Setup
AC Power
The 90W Stage Light has an auto-ranging power supply and it can work with an input voltage range of110 to 240 VAC, 50/60 Hz. To determine the product’s power requirements (circuit breaker, power outlet, and wiring), use the current value listed on the label affixed to the product’s back panel, or refer to theproduct’s specifications chart. The listed currentrating indicates the product’s average current draw under normal conditions.
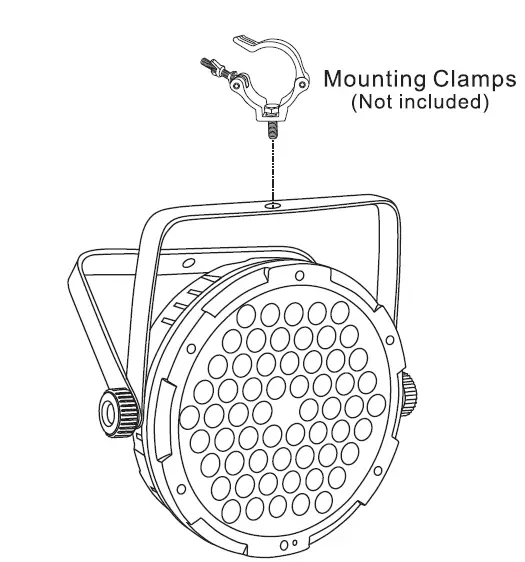
Mounting
Before mounting the product, read and follow the safety recommendations indicated in the Safety Introductions.
Orientation
The 90W Stage Light may be mounted in any position; however, make sure adequate ventilation is provided around the product.
Operation
Control Panel Operation
To access the control panel functions, use the four buttons located underneath the disnlav
| Button | Function |
| <MENU> | Select an operation mode or back
out of the current menu option |
| <UP> | Scroll up the list of option or select
a higher value |
| <DOWN> | Scroll down the list of option or
select a lower value |
| <ENTER> | Activate a menu option or a
selected value |
Svstem Menu
| Menu | Options | Functions |
| d001-d512 | 3CH | 3 Channel Mode |
| 7CH | 7 Channel Mode | |
| CL01-32 | Static Color 1-32 | |
| CC01-9 | Jump Mode (speed 1-9) | |
| EE01-9 | Auto Mode (speed 1-9) | |
| FF01-9 | Fade Mode (speed 1-9) | |
|
Co01-32 |
Choose the color of strobe | |
| St01-9 | Strobe Speed 1-9 | |
|
Sou1-3 |
Sound Mode 1-3 | |
| Sen1-9 | Sound Sensitivity 1-9 | |
| r000-255 | Red Dimming | |
| g000-255 | Green Dimming | |
| b000-255 | Blue Dimming |
DMX Mode 1: 3CH
| CH1 | Red Dimming | 0-255 | 0-100% |
| CH2 | Green Dimming | 0-255 | 0-100% |
| CH3 | Blue Dimming | 0-255 | 0-100% |
DMX Mode 2: 7CH
| CH1 | Master Dimming | 0-255 | 0-100% |
| CH2 | Red Dimming | 0-255 | 0-100% |
| CH3 | Green Dimming | 0-255 | 0-100% |
| CH4 | Blue Dimming | 0-255 | 0-100% |
| CH5 | Strobe | 0-10 | No Function |
| 10-255 | Strobe speed (slow->fast) | ||
|
CH6 |
Mode |
0-9 | Manual Dimming, CH1-5 valid |
| 10-50 | Color Selection | ||
| 51-100 | Jump Mode | ||
| 101-150 | Fade Mode | ||
| 151-200 | Auto Mode | ||
| 201-220 | Sound Control Jump Mode | ||
| 221-240 | Sound Control Strobe Mode | ||
| 241-255 | Sound Control | ||
| CH? | Speed | 0-255 | Speed (slow->fast) |
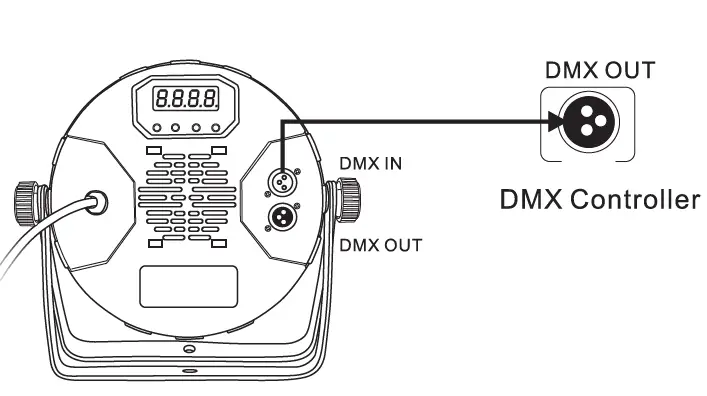
DMX Connection
Set the product in DMX mode / d001 to control with a DMX controller.
- Connect the product to a suitable power outlet
- Connect a DMX cable from the DMX output of the DMX controller to the DMX input socket on the product.
IR-C Remote Operation
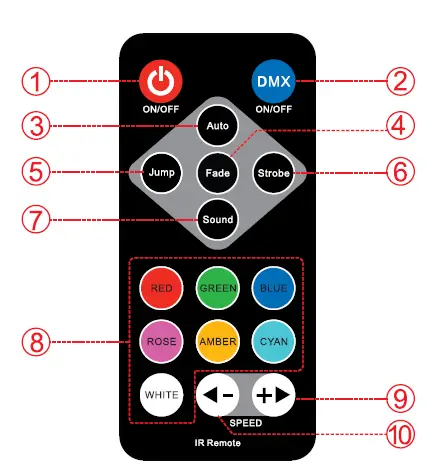
- G)Power OFF (Press any key to turn on the light)
- DMX Mode
- @Auto Mode
- @Fade Mode
- @Jump Mode
- Strobe Mode
- Sound Activated Mode
- Static Color
- Brightness/ Speed+
- Brightness/ Speed
TECHNICAL SPECIFICATIONS
- Power: 90W
- Voltage: AC110-240V, 50/60Hz
- LED: 60Pcs*1.5W RGB 3in 1
- Color: RGB
- Beam Angle: 25°
- Dimmer: 0-100% linear dimming
- Channel: 3/7CH
- Package Size: 9.8×5.5×10.4 inch / 25x14x26.5cm
- Weight: 2.3kg / 5.07lbs