NINGBO AW-OPS11W-I7P Series Industrial OPS
Computer Instruction Manual

Contents
Safety Notice
Please read the following instructions carefully before using this product to ensure your safety.
Improper use may cause serious personal injury or property damage. Do not attempt to repair this product by yourself.
Improper use may cause serious personal injury or property damage. Do not attempt to repair this product by yourself.

Remark:
Personal injury or product damage may be caused if precautions are ignored.
The power supply selected for the product determines the altitude of the product.
Please check the installation instructions before connecting the power supply.
This product is used with large display or whiteboard all-in-one display, so it is not equipped with power adapter.
If consumers need to use this product alone, please purchase a power adapter that has obtained certification and meets the standard requirements to power the product.
Using a substandard power adapter may damage the product or reduce its service life.
Product Introduction
External view

This picture is for reference only, please refer to the actual product
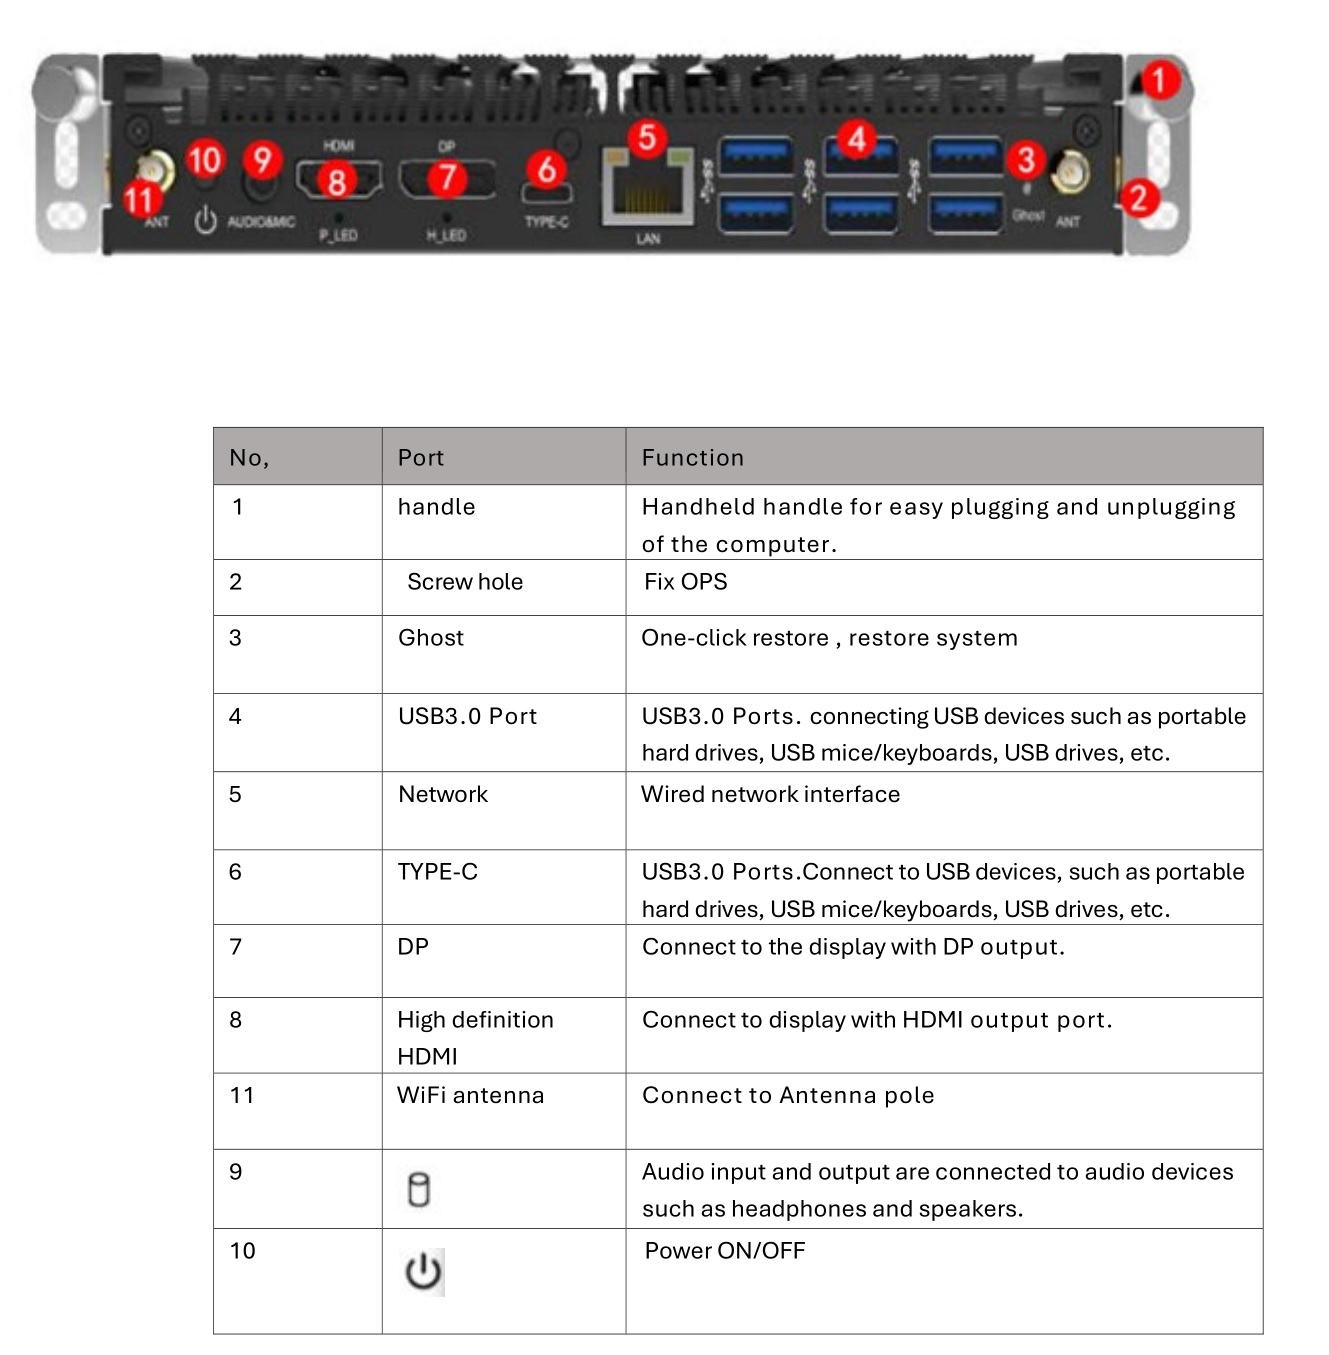
I/O port and panel
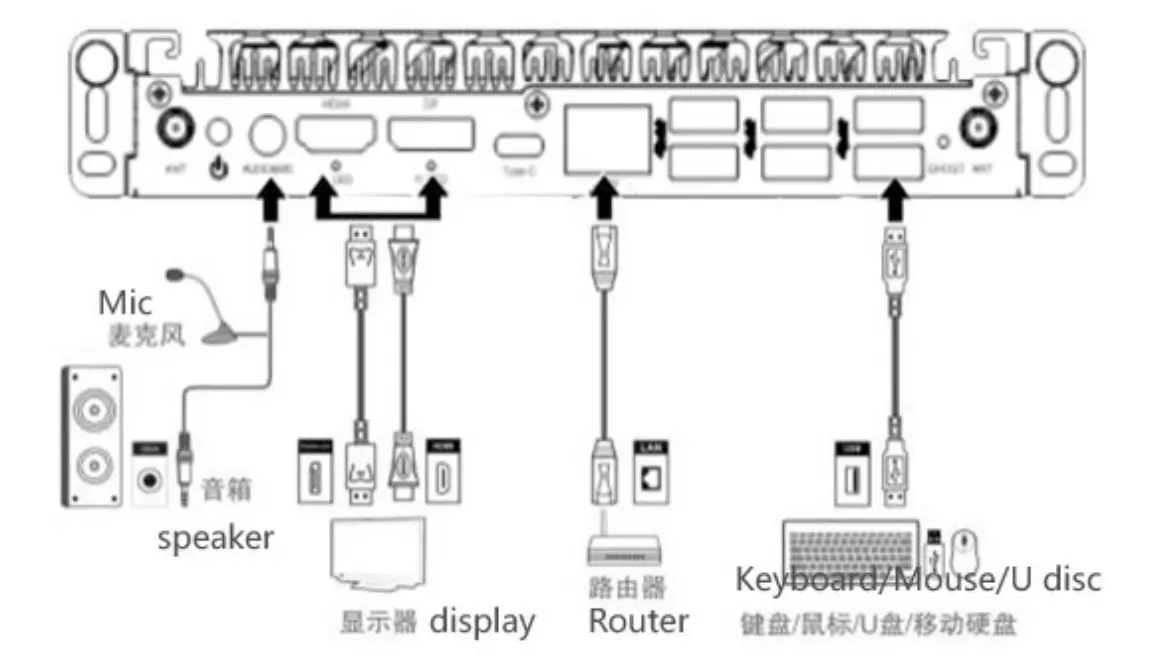
Product connection
The following diagram shows the connection diagram of all ports on a pluggable computer to external devices. You can choose the port to connect to external devices according to your needs.
Installing OPS PC
Warning
Prohibit the following operations on pluggable computers, otherwise it will affect the use of the product and
even cause damage to the product!
even cause damage to the product!
It is strictly prohibited to plug or unplug a pluggable computer with electricity. Please make sure to disconnect the power of the large screen or whiteboard all-in-one machine before plugging or unplugging a pluggable computer.
Step 1 (optional) : Unscrew the screws and remove the baffle from the large screen or whiteboard all-in-one machine.
Remark: This step is optional and is suitable for installing a pluggable computer on machines with a back panel.
Remark: This step is optional and is suitable for installing a pluggable computer on machines with a back panel.

Step 2: Push the pluggable computer horizontally into the dedicated interface card slot as shown in the diagram.

Step 3: Ensure that the distance between the rear pluggable computer and the installation wall for heat dissipation is not less than 20.0mm (as shown in the figure below, taking installation on a large screen as an example).

One Click Restore Operation
At present, there are slight differences in the restoration schemes used by different models of pluggable computers. Please pay attention to distinguishing when restoring.
Do not power off during system backup or restore.
Do not power off during system backup or restore.
Hardware restoration
Step1 The hardware restoration function can be achieved in the following three situations:。
- After powering on the large display or whiteboard all-in-one display, press the power button and use tools such as ballpoint pens to press the button on the large screen or all-in-one machine “PC Restore” Key.
- Large display or whiteboard all-in-one display Power On, OPS PC Power off Press the power
on/off key , while pressing the “GHOST” Key of OPS PC for 3s. - Large display or whiteboard all-in-one display Power On, under windows system restore OPS PC, While press “F12” Key of Keyboard.

External Keyboard Diagram

After the above interface appears, release it.
After the pluggable computer restarts and enters the system, the restoration is successful.
After the pluggable computer restarts and enters the system, the restoration is successful.
System backup
Backup method: You need to use a PE USB flash drive to delete the original backup system into the PE, and then use the original operation as the backup system. (The system has been backed up on all OPS PC delivered before delivery. You are not advised to back up the system again except in special circumstances.)
Note: If an error occurs during the system restoration or backup process, the hardware restoration function is damaged and the system needs to be manually reinstalled.
Bios Common Functions
You need to run the BIOS setup program in the following situations:
An error message appears on the screen during the system self-test, and you are asked to enter the BIOS setup program.
You want to change the factory defaults based on customer characteristics.
Remark: Because the BIOS version of the motherboard is constantly upgraded, the BIOS description in this manual is for reference only. We do not guarantee that the relevant content of this operating instruction is consistent with the information you have obtained.
Enter BIOS set up program
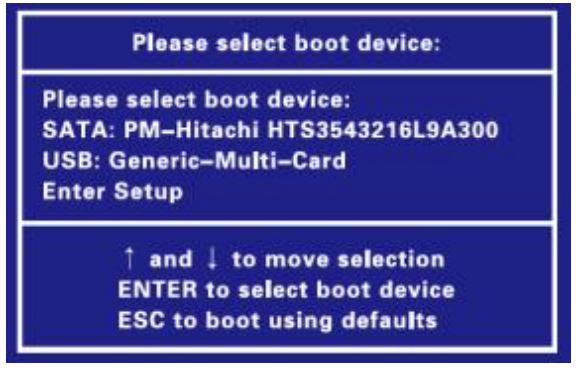
Start up PC, You can see this information in the self-check screen:
Start up PC, You can see this information in the self-check screen:
Press <DEL> to enter Setup, <F11>to popup menu
Press the <DEL> key to enter the BIOS setup program. If the prompt disappears before you respond and you still want to enter the setup program, restart the system by shutting down the computer and restarting it, or simultaneously press <Ctrl> + <Alt> + <Del> to restart the system.
Press the <DEL> key to enter the BIOS setup program. If the prompt disappears before you respond and you still want to enter the setup program, restart the system by shutting down the computer and restarting it, or simultaneously press <Ctrl> + <Alt> + <Del> to restart the system.
Starting sequence Shortcut Settings menu
After turning on the power or restarting the system, you can see the following information in the self-test screen: Press <DEL> to enter Setup, <F11>to popup menu
At this time, press F11 to display the menu as shown in the following figure. Directly press the up and down arrow keys to temporarily specify the device to be booted without entering the BIOS setting.
Exit the BIOS setup program
Choose “BIOS Setup Program > Exit” and choose “Save Changes and Exit” to save the changes and exit the BIOS setup program.
Discard Changes and Exit This log is generated when you select Discard Changes and exit the BIOS configuration program.
Choose “BIOS Setup Program > Exit” and choose “Save Changes and Exit” to save the changes and exit the BIOS setup program.
Discard Changes and Exit This log is generated when you select Discard Changes and exit the BIOS configuration program.
FAQ

EU Conformity Statement
Electromagnetic Compatibility (EMC) Directive 2014/30/EU.
Low Voltage (LVD) Directive 2014/35/EU
Restrictions of Hazardous Substances (RoHS) Directive 2011/65/EU and its amending Directive (EU) 2015/863.
For more information see: www.recyclethis.info
Warning: Operation of this equipment in a residential environment could cause radio interference
Declaration of Conformity
Hereby, we declare that the product is compliance with Radio Equipment Directive (RED) 2014/53/EU. The full text of the EU declaration of conformity is available at the internet address as shown on the packing box.
This product can be used across EU member states.
Hereby, we declare that the product is compliance with Radio Equipment Directive (RED) 2014/53/EU. The full text of the EU declaration of conformity is available at the internet address as shown on the packing box.
This product can be used across EU member states.
The frequency, mode and the maximum transmitted power in EU are listed below:
– 2400-2483.5MHz: < 20 dBm (EIRP)
– 5150-5250MHz: < 23 dBm (EIRP)
– 5250-5350MHz: < 23 dBm (EIRP)
– 5470-5725MHz: < 30 dBm (EIRP)
– 5150-5250MHz: < 23 dBm (EIRP)
– 5250-5350MHz: < 23 dBm (EIRP)
– 5470-5725MHz: < 30 dBm (EIRP)
The device is restricted to indoor use only when operating in the 5150 to 5350MHz frequency range. (for 5G product only)
Radiation Exposure Statement
This equipment complies with CE radiation exposure limits set forth for an uncontrolled environment.
This equipment should be installed and operated with minimum distance 20cm between the radiator & body.
Radiation Exposure Statement
This equipment complies with CE radiation exposure limits set forth for an uncontrolled environment.
This equipment should be installed and operated with minimum distance 20cm between the radiator & body.
FCC Statement
This device complies with Part 15 of the FCC Rules. Operation is subject to the following two conditions: (1) this device may not cause harmful interference, and (2) this device must accept any interference received, including interference that may cause undesired operation.
NOTE: This equipment has been tested and found to comply with the limits for a Class B digital device, pursuant to part 15 of the FCC Rules. These limits are designed to provide reasonable protection against harmful interference in a residential installation. This equipment generates, uses and can radiate radio frequency energy and, if not installed and used in accordance with the instructions, may cause harmful interference to radio communications. However, there is no guarantee that interference will not occur in a particular installation. If this equipment does cause harmful interference to radio or television reception, which can be determined by turning the equipment off and on, the user is encouraged to try to correct the interference by one or more of the following measures:
- Reorient or relocate the receiving antenna.
- Increase the separation between the equipment and receiver.
- Connect the equipment into an outlet on a circuit different from that to which the receiver is connected.
- Consult the dealer or an experienced radio/TV technician for help.
Changes or modifications not expressly approved by the party responsible for compliance could void the user’s authority to operate the equipment.
This equipment complies with FCC radiation exposure limits set forth for an uncontrolled environment. This equipment should be installed and operated with a minimum distance of 20cm between the radiator & your body. This transmitter must not be co-located or operating in conjunction with any other antenna or transmitter
This equipment complies with FCC radiation exposure limits set forth for an uncontrolled environment. This equipment should be installed and operated with a minimum distance of 20cm between the radiator & your body. This transmitter must not be co-located or operating in conjunction with any other antenna or transmitter