![]()

User guide
Contents
SpaceSaver
Cable railing system
01
Overview
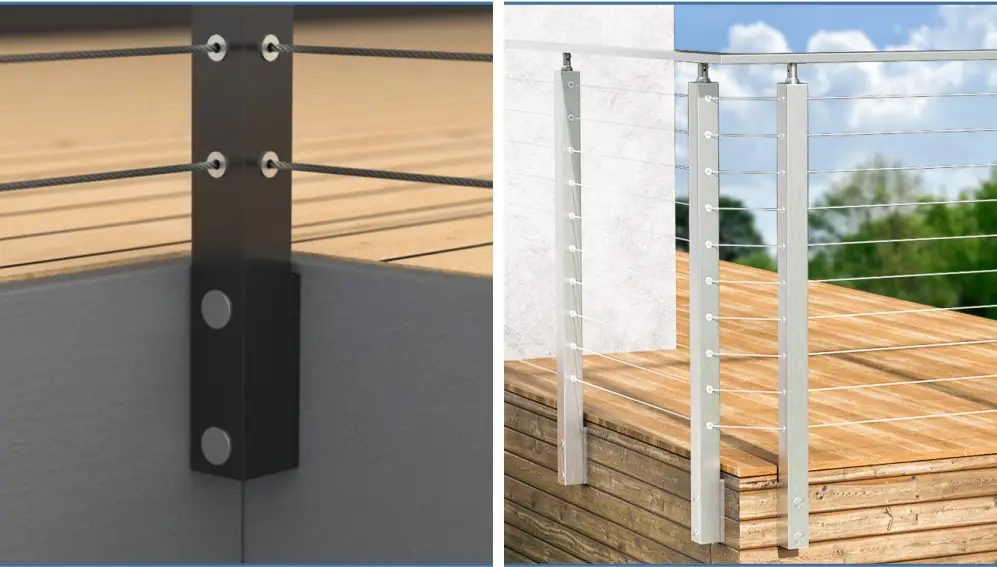
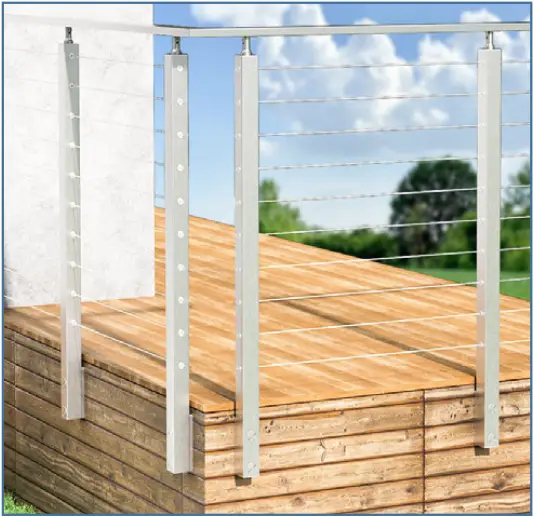
Muzata-SpaceSaver system is designed with side mount posts to save more room for you. The stair treads will be at least 4″ wider if you use side mount posts instead of top mount posts. Your deck will be neater, with the post feet hidden outside the deck.


02
Components
02-1 Posts
Post selection

|
Position |
36” brushed | 36” black | 42” brushed | 42” black |
| (1) | PF02 LH4S | PF02 BH4S | PF02 LH4L | |
|
(2) |
PF02 LH4S | PF02 BH4S | PF02 LH4L | PF02 BH4L |
| (3) | PF02 LH4S | PF02 BH4S | PF02 LH4L |
PF02 BH4L |
|
(4) |
PF02 LC4S | PF02 BC4S | PF02 LC4L | PF02 BC4L |
| (5) | PF01 LA4S | PF01 BA4S | PF01 LA4L |
PF01 BA4L |
|
(6) |
PF01 LA4S | PF01 BA4S | PF01 LA4L | PF01 BA4L |
| (7) | PF01 LL4S | PF01 BL4S | PF01 LL4L |
PF01 BL4L |
|
(8) |
PF01 LL4S | PF01 BL4S | PF01 LL4L | PF01 BL4L |
| (9) | PF02 LH4S | PF02 BH4S | PF02 LH4L |
PF02 BH4L |
|
(10) |
PF02 LH4S | PF02 BH4S | PF02 LH4L | PF02 BH4L |
| (11) | PF02 LH4S | PF02 BH4S | PF02 LH4L |
PF02 BH4L |
- PF02 – Side mounted posts with a flat top, only used for the horizontal installation
- PF01 – Side mounted posts with an adjustable angle top, works for both level and angle section (depends on the hole type)
Hole types
Our pre-drilled posts are designed with several hole types to work for different positions. Hole type selection is also related to the terminal type you decide to use.

Level holes (H)- holes on two opposite planes for terminals and cables to go through in a horizontal direction.

Angle holes (A) & (L)- holes on two opposite planes for terminals and cables to go through on an angle direction around 30°. Holes on one side are higher than on the other side. And distinguish between using in right hand (A) and left hand (L).

Neighbor holes(C) – holes on two adjacent planes for one post corner solution (internal corner).

No hole(N) – there are no pre-drilled holes. You can drill it yourself for any hole type.
02-2 Handrails

In this system, we recommend HT10 rectangle handrail. There are four color for your choice.
- HT10 SL4 – T304 Stainless steel with brushed finishing
- HT10 BP4 – T304 Stainless steel with black powder coated
- HT10 BFA– Aluminum with black fluoropolymer coated
- HT10 WFA– Aluminum with walnut wood grain
- HT10 RFA– Aluminum with red oak wood grain
|
Color |
Handrail | End cap | Corner connector | Straight connector | Pivot connector |
| Brushed | HT10 SL4 | HA09 SL4 | HA02 | HA01 |
HA23 HA24 |
|
Black(stainless steel) |
HT10 BP4 | HA09 BP4 | HA02 | HA01 | HA23 HA24 |
| Black(Aluminium) | HT10 BFA | HA10 PB1 | HA02 | HA01 |
HA23 HA24 |
|
Walnut wood grain |
HT10 WFA | HA10 PB1 | HA02 | HA01 | HA23 HA24 |
| Red oak wood grain | HT10 RFA | HA10 PW1 | HA02 | HA01 |
HA23 HA24 |


02-3 Wire ropes
We suggest to use WR01/WR02 in this system.

WR01
WR01 – T304 stainless steel wire rope 1/8″

WR02
WR02 – T316 stainless steel wire rope 1/8″

WR17
Black vinyl coated T304 stainless steel wire rope 1/8″ thru 3/16″. For both indoor and outdoor projects.

WR19
Blackened T316 stainless steel wire rope 1/8″. Only for indoor projects.
Notes
- We have two ways of packing. Wire rope in reel would be easier to control after you open it while wire rope in roll is cheaper.
- The cable in roll is recommended to open in a bucket, which could help to control the cable as it expands.
- 1/8″ are recommended for code compliance in most states.
- We also have wire ropes with 5/32″ or 3/16″ size, vinyl-coated cables, blacken cables for your choice. Please search “muzata WP1″ to find more. And remember that you should use terminals of the same size to go with wire ropes. For example, 1/8″ cable should go with 1/8” terminals.
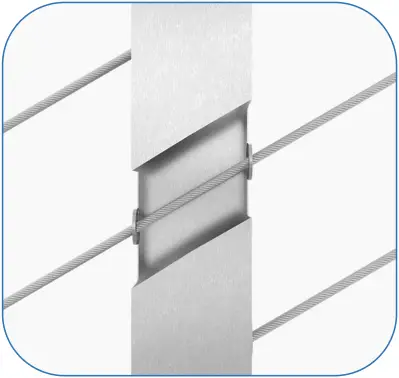
02-4 Cable terminals
Cable terminals will fix the cable on posts and fasten the cable to get enough tension as safeguards. In this system, we recommend the CR36 and CR07 to get a neat look at the railing. Please check the following images to see where and how they are used for.
Natural
CR36

CB05

Black
CR36

CB05

Tensioner
CR36 – Invisible tensioner for both metal and wood posts.
CR37 CB05 CB07- Invisible tensioner for metal posts.
Natural


Black

Fix end terminal
CR95: Invisible terminal for both metal and wood posts
CR96: Invisible terminal for both metal and wood posts
Natural

Black

Angle washer
CR60 – Angle washers for stair railing around 30°
Natural


Black


Adhesive sleeve
CR75 /CR65/CR66 – To cover the level holes
CR67 – To cover the angle holes
Natural
CR72

Black
CR72

Protector sleeve
CR72 – Pressure bearing for metal posts
Natural
CR07

Inner terminal
CR07-Invisible terminals for corner posts and one-side drilled end posts
CB17-Patent swageless invisible terminals for corner posts and one-side drilled end posts
Notes
Concrete wall – if you need to install terminals on concrete/brick/stone walls.
Please use our expansion tensioner CB25 (1/8″) / CB26(3/16″)


(1) CR36+CR67 (2) CR75+CR75


(3) CR95+CR67+CR36+CR67 (4) CR07+CR67+CR07+CR75

(5) CR67+CR67 (6) CR36+CR60+CR74


(7) CR36+CR60+CR74 (8) CR67+CR67


(9) CR72+CR72 (10) CR95+CR67+CR36+CR67

(11) CR07
02-5 Tools

Cable cutter CT15
For cable cutting

Custom socket wrench CT16
For terminals tensioning

Adjustable wrench
For installing lag screws on post foot on post foot

Allen wrench
For terminals tensioning and cable fixing. Attached.

Electric miter saw
For cutting handrails

Philips driver
For installing handrails

Hydraulic crimper CT01
Crimping the terminals with cable
02-6 Optional components

Cable railing Deck gate DG01
Custom-made deck gates are designed to work with cable railing for consistent appearance.

Wall mounted handrail kits
02-7 How to find the products?

(1) Click on the model number with link (blue) on this file to open the web page
(2) Search “muzata + model number”, like muzata CR36
03
Installation
Things to Know Before You Get Started
- Please consult your local office for building codes and make sure you know all the requirements of the codes. Some states might have special rules of their own. You should choose carefully to comply with them. We can’t promise everything to comply with all the codes of every state.
- It is recommended to do some planning work and estimate a budget. Please contact us if you need help with that. You might want to buy a few more materials than expected since some materials could be used by operation mistakes. Especially swage terminals and wire ropes.
- It is suggested to be 2 person project.
- Please be careful when operating electric tools power drill, cutting machine) and ask for help if you are not familiar with these tools.
- Products made of T304 stainless steel are not recommended for projects within 10 miles of sea. They will also get rusty easier than expected when being near salt water or in highly humid conditions.
03-1 Posts installation
03-1-1 General steps

Draw guidelines
- Draw guidelines along the paths you want. The lines will keep your posts aligned.
- Mark positions for posts, check the following notes for post distance.

Drill guide holes
- Mark the hole positions.
- Drill guide holes with a 1/4″ drill bit for the depth of screw length.

Install with lag screws
- Put the base board under the post foot.
- Install lag screws with the attached nut setter and a adjustable wrench
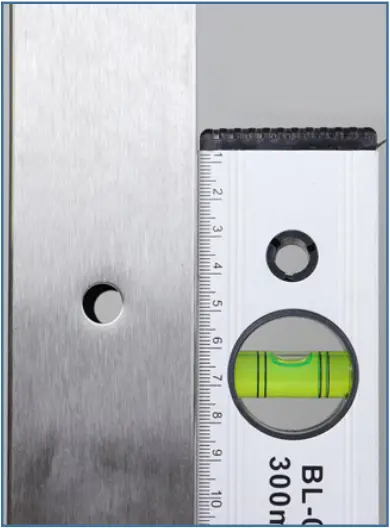
Level check
Check with a level tool. Make sure the post is vertical to the ground.

Cover the holes
Cover the holes with attached adhesive wafers
03-1-2 Corner solution
- We suggest using one-post at inner corner and two posts at exterior corner, which looks better and easier to install.
- All two-post corner solution will work too. Please contact us if you have questions about that.
Notes


- The base board is used to increase the distance between the post and floors incase the floors stands out of the side wall. We also have 1″ (PA13) and 2″(PA14) base boards.
- Remember to install all the structural posts first before installing intermediate posts.
- Make sure your posts are aligned if they are in the same line.
- The guide holes will make it easier for lag screws to go in.
- For concrete/brick/stone surface, please replace the lag screws with expansion bolts.
- We recommend the max span of two structural posts to be 4 feet. If there is a stabilizer post between them, the max span can be up to 7 feet.
- There is a 4-inch sphere test for cable railing in some states. So there should be intermediate posts between structural posts to reduce the deflection. 3-4 feet post space is recommended.
- If you are going to drill holes by yourself, please make sure to comply with the codes. 3″ space between cable lines is recommended for most states.
03-2 Handrails installation
03-2-1 General steps

Cut the handrail
Measure and cut the handrails for the length you need with an electric miter saw.

Install
Install the handrails to the bracket of posts.
03-2-2 Linear connection

Connect
Connect two handrails with a straight connector

Install
Install the joint on a post for supporting
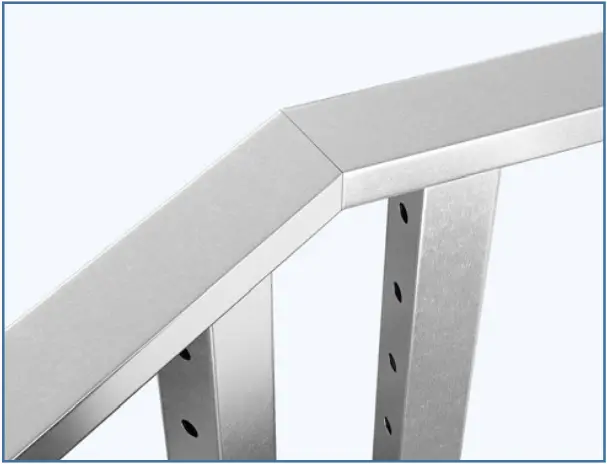
03-2-3 90° Corner
Option 1: Miter cutting

Cut the handrail into 45°end

Connect the two handrails with a corner connector

Install them on posts with screws
Option 2: Cover kit

Place the corner bracket first then put the inner corner connector into handrails

Install them on posts with the screws attached

Place the cover. The cover will also help to cover the ugly miter cutting.
03-2-4 Random angle corner

(1) Cut the handrail end into the angle you want

(2) Put the pivot connector HA24 in

(3) Fix the connector and handrails with screws
(4) Install them on posts
03-2-5 Random angle on vertical plane

(1) Cut the handrail end into the angle you want

(2) Put the pivot connector HA23 in

(3) Fix the connector and handrails with screws

(4) Install them on posts
Notes
- You can make a connector for random angles with a straight connector if pivot connectors are not available.
- You should try your best to place a post under each joint. If it is not possible in some cases, at least there should be posts nearby.
03-3 Cable infilling installation
03-3-1 General steps

Install the cable
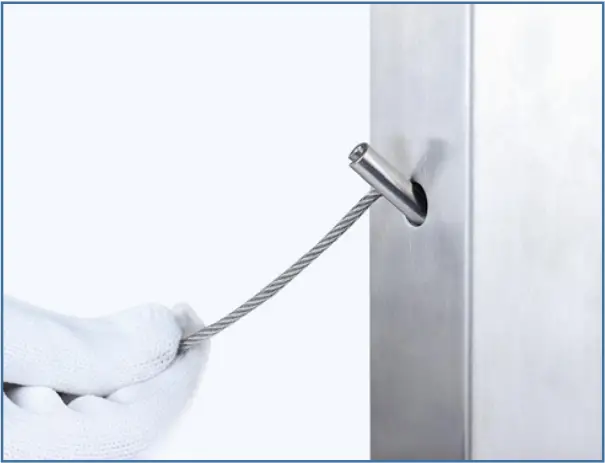
Install the cable end into fix end terminal CR07 or CR95, Crimp the terminal tight enough to fix the cable with hydraulic crimper CT01. Crimp twice to make sure the cable won’t slip out while tightening. Remember to put the adhesive sleeves in before that.
Install fix end terminal
Install CR07(CR95) into the post

Measure the cable
Draw the cable to the other end and let it go through the post hole. Pull the cable tightly and mark point A.

Trim and cut
Subtract the trim length (about 2 inch) and mark point B. Cut on point B to get the correct length. The trim length is based on general conditions. Sometimes you might need to adjust it according to your project.

Install tensioner
Place the other cable end into the tensioner CR36. Crimp the terminal as the previous step. Then install the tensioner to the post. Remember to put the adhesive sleeves in before that.

Tensioning
Tighten the cable to proper tension with CT16 and an Allen wrench.

Cover the holes
Cover the holes with adhesive sleeves
0-3-2 Corner solution
Single post

Option 1
When it’s inside 90 degree cornor, swe crews recommend to use a pre-drilled corner post with 2 inner terminals.

Option 2
An adjacent pre-drilled post screws to go with 2 wheel protector sleeves to bear force and let the cable go through the corner
Two posts

The cable go through the corner, you will need two wheel protector sleeves
The cable end on one post and start with another one, you will need two terminals
Notes

1. Please follow the sequence to tighten the cables as shown in the left image.
2. For swage tensioners, please preserve some tensioning range in case the cable gets loose due to temperature change in years.
3. Remember to expand the tensioner before measuring to make sure there is enough room for the tensioner to shrink while tightening.
4. When using wheel protector sleeves to bear force and let the cable go through the corner. Remember that the cable should not go through corners less than 90°. And it is not recommended to let the cable go through more than one corner continuously since it will be difficult to tighten the cable. Install infilling on stairs is pretty much the same as level sections. Only you have to add an angle washer for each terminal that is not multi-angle.
5. Install infilling on stairs is pretty much the same as level sections. Only you have to add an angle washer for each terminal that is not multi-angle.

6. If your local building code requires 4″ sphere test, The tension is recommended to be around 200 lbs to pass the test. You can buy a tension gauge from online or local store.
Reach us
If you are a beginner or not sure about how to do it. Please feel free to contact us. Our experts can do all the planning, designing and budget work for you without extra charging. Then you can follow the shopping list to buy all the materials in 3 minutes

Visit the Muzata Store
Muzata 60Pack 1/8″ Swage Lag Screws Left & Right Cable Railing Hardware Kit Handed Thread for Wood Post T316 Stainless Steel Stair Deck WoodBudget System 30 Pairs CK17

- Click on “Muzata”
- WoodBudget System — This swage lag screw kit belongs to Muzata WoodBudget system, a pre-designed budget-saving cable railing system for wood frames. We have planned everything you need for building a cable railing project, including posts, handrails, cables, terminals, and tools. Please scroll down to “product description” for more details or download the user guide PDF for complete information about the system.
- Anti-twist — This cable railing kit set is specially designed to be left&right, which will rotate wire rope in the same direction, resolving the problem of twisting the wire rope. This package can make 30 cable runs.
- Marine-grade — This cable railing hardware is made of T316 stainless steel, which has excellent resistance to rust and seawater and is ideal for indoor and outdoor, even coastal applications.
[Muzata’s Guarantee]: If you find any quality problems, please feel free to contact us. we’ll provide
![]()

Muzata mainly engaged in home DIY decoration, garden design materials, home construction tools including deck cable railing kit, LED Aluminum Channel ,outdoor string light cable, Stainless steel wire rope able. Muzata only offers the highest quality and most affordable product and put customer satisfaction in our first place!
- “Ask a question” and get a reply within 24 hours
OR
Call the number and get a call back within 24 hours
Detailed Seller Information
Business Name:XIAMEN HENGSILI MAOYI YOUXIAN GONGS!
Business Address:
Lianfaxintiandi
Huli Qu
Xiamen
Fujian
361000
CN
___________________________
Congratulations !
You’re done
___________________________