MOUNTUP MU6013A Triple Monitor
Mount Instruction Manual

Safety Caution
BEFORE ASSEMBLY
- Layout all components and hardware. Check all parts are included and undamaged.
- Should anybody intends to install or use this mount, please read and understand this manual carefully.
- If you do not understand these instructions or have any doubt about the safety instructions, assembly or use of this product, please contact our customer service
WARNING
- This product contains small items that could be a choking hazard if swallowed.
- KEEP AWAY FROM CHILDREN UNDER 3 YEARS OLD. ADULT SUPERVISION IS REQUIRED.
- Improper installation, such as using the product for monitors over its load capacity or for any purpose not explicitly specified, may cause damage or serious injury. We would not be liable for any damage or injury caused by improper mounting or inappropriate use.
CAUTION AND MAINTENANCE
- Never allow children to climb, stand, hang, or play on any part of monitor or stand.
- This product is intended for indoor use only. Using this product outdoors could lead to product failure and personal injury.
- Check that the bracket is secure and safe to use at regular intervals (at least every three months).

ASSEMBLY STEPS
STEP 1: Apply Pads to the Base Bottom
Apply the pads (E) onto the bottom of lower pole (3A) to avoid desk scratches.

STEP 2: Clamp Installation or Grommet Base Installation
OPTION A : Clamp Installation
- Connect the base of lower pole (3A) and the L plate (06) by using the screws (A).
- Tighten the screw (B).
- Connect the clamp (07) and the L plate (06) by using the screws (A).

Fix the decorative cover (04) to the base of lower pole (3A) and fix the bracket on the table by tightening the clamp (07).

OPTION B: Grommet Base Installation
Detach the bolt (7-3) from the clamp (07).
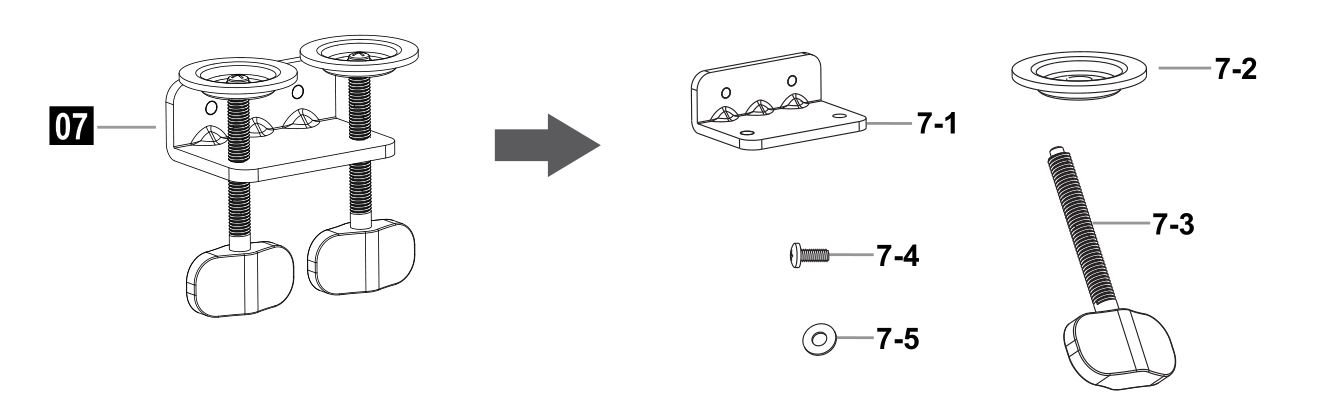
Use the bolt (7-3) through the hole on support plate (05) to fix the lower pole (3A) and the table board together. Install the decorative cover (04) to base finally.

STEP 3: Pole Installation
Assemble the lower pole (3A) and the upper pole (3B) together. Secure the pole assembly with the preassembled screw (I) and Allen key (D3).

STEP 4: Arm Installation
Install the cable clip (G), fixator (H) and arm (1A) to the pole as shown below. Then fasten the bolts with Allen key (D1, D2).

STEP 5: Attach Monitor
OPTION A: Flat Back Monitor
Attach the VESA plate (02) to back of monitor and secure it with screws and waswhers by using Allen key (D1).

OPTION B: For Recessed / Curved Back Monitor
Attach the VESA plate (02) to back of monitor and secure it with screws, waswhers and spacers byusing Allen key (D1).
Put 4 spacers between VESA plate and monitor.
Install 4 long screws through VESA plate, spacers to monitor via mounting holes.
Put 4 spacers between VESA plate and monitor.
Install 4 long screws through VESA plate, spacers to monitor via mounting holes.

STEP 6: Hang Monitor
Slide the monitor onto the head of arm (1A), then install the security bolts (F).
Make sure the security bolts (F) is installed before you rotate the monitor.
Make sure the security bolts (F) is installed before you rotate the monitor.

refer to below illuminations to adjust tilting angle of your monitor

STEP 7: Tension Adjustment
For intended functioning of the mount, you will need to adjust the tension of arm in accordance with your monitor weight by 6mm Allen key (D2).

STEP 8: Cable Management
Run cables through the cable cover.

Adjust as Desired
Adjust monitor position and rotation. Store Allen keys in cable clip for future use.


Note: To ensure stability, the tightness of the rotating axis has been preset, so it would be kind of difficult to rotate the VESA plate.
Suggestion: Please attach the monitor first, then hold the two sides of it with both hands, and rotate vigorously. If that doesn’t work out, please do not hesitate to ask for our help.
Product Dimensions
