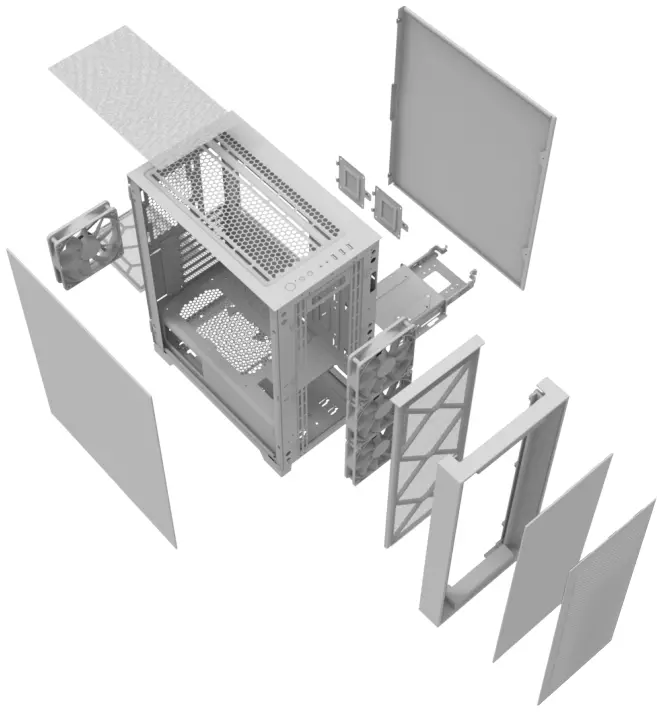
MONTECH Air 1000 Premium White ATX Mid-Tower Casing Instruction Manual


Contents
SPECIFICATIONS
| Product Name | Air 1000 series | |
| Available Color/ fait | Black/White | |
| Dimensions (L*W*H)/ RI | 416*220*490mm | |
| Motherboard Support/ Intl | ATX/Micro ATX/Mini ID | |
| Expansion Slots/PCI 19I3E4e | 7 | |
| Drive Bays/ SAM | 3.5″1-IDD or2.5″550 | 2 |
| 2.5″550 | 4 | |
| I/OPort | USB2.0*1, USB3.0*2, mic, headset, LED button | |
| Pre-installed Fan(s) nililni | Lite | 120 mm*3(High Airflow Fan) |
| Silent | 120 mm13(Silent Fan) | |
| Premium | 140 mm*3 , 120 mm*1(ARGB Fan) | |
| Fan Supportt | Front | 120mm*3/140mm*3 |
| Rear | 120mm *1 | |
| Inside | 120mm * 2 | |
| Top | 120 /140mm*2 | |
| Radiator Support | Front | 120/140/240/280/360mm |
| Rear | 120mm | |
| Top | 120/140/240mm | |
| Clearances IRWMNSSI | VGA/ NA ,t–g | 340mm |
| CPU Cooler/ Stii | 165mm | |
| Dust Filters MUM | Front Top, Bottom/ 111 • ± • T | |
| Power Supply Support CRASHRIM | Bottom mount ATX/ Tim • ATX | |
FOR SILENT VERISON
The top pannel for silent version is sealed to provide the best silent performance.

SPECIFICATONS (SILENT)
Therefore, the silent version does not support any fan or radiator on the top.
| Fan Supportt/ INA 1–M | Front | 120mnn*3/140mm*3 |
| Rear | 120mm *1 | |
| Inside | 120mm * 2 | |
| Radiator Support/ 7.1(;4″1-g | Front | 120/140/240/280/360mm |
| Rear | 120mm |
FOR “AIR 1000 PREMIUM VERSION” ONLY LIGHTING CONTROLLER
| A | SATA(For Power Supply) |
| B | 3 Pin(For Motherboard) |
| C | 3 Pin *4(For ARGB Fan) |
| D | 2 Pin(For LED Button) |

RGB Control Guide
- Short press the led button to change the RGB mode.
- Press the led button for 3 seconds to turn off the lighting.
- For motherboard control, please press the led button for five seconds after you entered the motherboard software
Caution ag, : For motherboard sync, it can only work with 5V3PIN. It will NOT work with old motherboard 4-pin RGB or Standard RGB+12V.
Fan S Radiator Support

| Fan Supportt/ MI.,–3.z_It’ | ||
| Front | 120 mm *3 /140mm *3 | |
| Rear | 120mm *1 | |
| Inside | 120mm * 2 | |
| Top | 120 / 140mm * | 2 |

| Radiator Support/ 7IC,4`1R | |
| Front | 120/140/240/280/360mm |
| Rear | 120mm |
| Top | 120/140/240 mm |
*360 Radiator Thickness:30mm
REMOVING OF THE SIDE WINDOW
After opening the glass door, take out the glass vertically upwards.


REMOVING THE FRONT PANEL
The front panel of the AIR 1000 features snap-on metal pin assembly can be easily taken off by pulling out with both hands.

Removing The Side Panel
Removing The Side Filters


Motherboard Compatibly
| A | Mini-ITX |
| B | Micro-ATX |
| C | ATX |

INSTALLATION OF SSD ON THE PANEL AND BRACKET / HOD CAGE POSITION & POWER SUPPLY SUPPORT

*180mm (200 mm if HDD cage removed)

| 1 | SSD *4 |
| 2 | SSD * 2 or HDD * 2 |
| 3 | PSU 160mm |
Pull out the hard drive holder, lock the screws at the screw holes, and then return the hard drive holder to the original position.


Graphics Card Compatibility

CPA Cooling compatibility

Accessory BAG
 |
Motherboard standoff tool
|
3 |  |
Cable tie | |
 |
Motherboard screw Srey 2.5″ SSD |
33 |  |
Velcro | |
 |
Power supply screw | 6 |  |
Buzze | |
 |
3.5″ HDD disk screw | 8 |
![]() MONTECH
MONTECH
15F.No.136, Ln.39,Sec.1,Wenhua 3rd Rd., Linkou Dist.,
New Taipei City 244 , Taiwan (R.O.C,).
TEL:+886 2-26091081
Email:[email protected]
Webrhttps://montechpc.com/