![]() Installation Guide
Installation Guide
PIVOTING PAPER HOLDER
Style varies by model
Contents
MY4808BN Pivoting Paper Holder
PRESS & MARK
DESIGNED FOR EASY INSTALLATION™

Please Contact Moen First
For Installation Help, Missing or Replacement Parts
(USA)
1-800-BUY-MOEN (1-800-289-6636)
Mon – Fri 8:00 AM to 7:00 PM, Eastern
Sat. 9:00 AM to 3:00 PM Eastern
WWW.MOEN.COM
(Canada)
1-800-465-6130
Mon – Fri 7:30 AM to 8:00 PM, Eastern
WWW.MOEN.CA
HELPFUL TOOLS
For safety and ease of installation, Moen recommends the use of these helpful tools.


Parts List
| A. Dry Wall Anchor (x4) B. Wood Screw (x4) C. Mounting Plate (x2) D. Ink Plate (x2) E. Pivoting Post |
F. Post G. Set Screw (x2) H. HexWrench I. Level J. Red Pin |
Confirm all parts are present

Determine if either of the Ink Stamp indicators line up with a stud. If a new location is desired, see Step A1 on Page 6.
For Wood stud, proceed to Step 7A.
For Hollow wall, proceed to Step 7B .
Note: Both Wood stud & Hollow wall steps may be necessary depending on stud availability.
 Drill 1/16″ holes at the ink marked stamp locations.

- Remove film backing from adhesive on included Level (I).
- Center level (I), adhesive side down, on top of the bar of Pivoting Post (E). Press evenly to adhere.
 Remove covers from Ink Stamp (C).
Assemble Pivoting Post (E) to the Post (F). Ensure the bar of Pivoting Post is parallel to the ground and set screws are at a 90° angle to the bar.
Place Mounting Plate (E) over holes in the wall.
Note: Arrow on Mounting Plate should be pointing upright and visible.

- Insert Wood Screws (B) through Mounting Plate (C).
- Secure Wood Screws (B) with a screwdriver. If Hollow wall steps are necessary, go to Step 7B. If both sets of markers are lined up with studs, go to Step 14.
 Drill 5/16″ holes at the marked ink stamp locations.
INS10624 – 12/16

- Choose location for installation. Gently place the assembled product against the wall, ensuring bar is level. Before you compress the Ink Stamps, ensure the set screw holes are facing downward.
- Important: Ensure Pivoting Post (E) and Post (F) are at a 90° angle.

- Press and mark by pushing both Posts (E & F) firmly and evenly against the wall, hold for a few seconds leaving behind indicators showing you exactly where to drill.
- Set assembled product aside.

- Push in the center between the Dry Wall Anchor (A) ends.
- Fold the ends of Dry Wall Anchors (A) together.

Insert the Dry Wall Anchor (A) into each hole in the wall.
Note: Refer to illustration above to ensure correct orientation.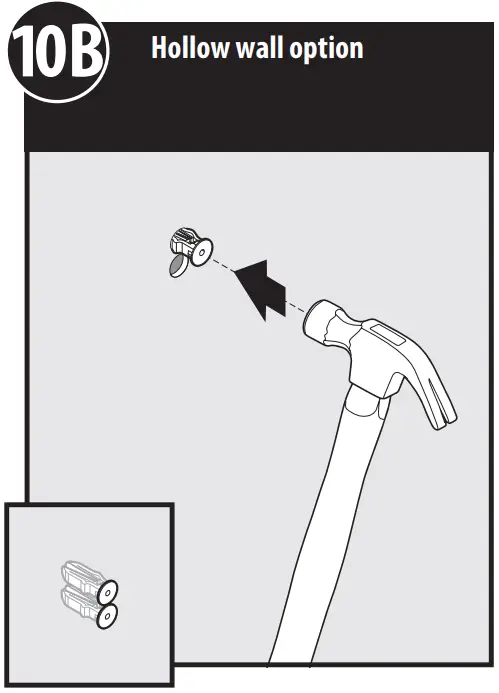 Lightly tap Dry Wall Anchors (A) with a hammer until flush.

To actuate Dry Wall Anchors (A) Lightly tap Red Pin (J) with hammer until lower portion of Pin is engaged with the Dry Wall Anchors (A) leaving upper portion exposed.

Place Mounting Plate (C) over Dry Wall Anchors (A).
Note: Arrow on Mounting Plate should be upright and visible.

- Insert Wood Screws (B) through Mounting Plate (C).
- Secure Wood Screws (B) with a screwdriver. Go to Step 14.

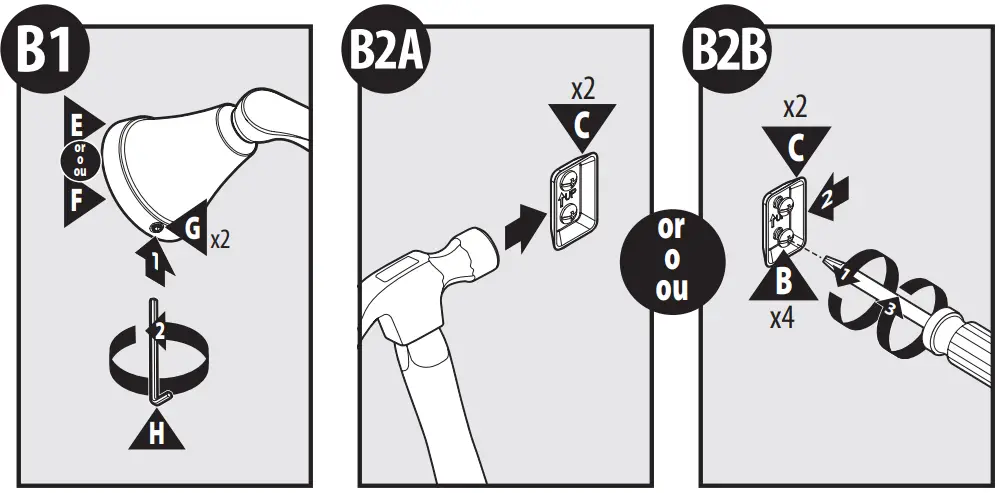
- For both Posts (E & F), insert Hex Wrench (H) into Set Screw hole of Post (E & F).
- Using Hex Wrench (H), loosen Set Screws (G).
- Remove Ink Stamp (D).

- Attach Posts (E & F) onto Mounting Bracket (C).
- Push the bottom of Posts (E & F) flush against the wall.
- Using Hex Wrench (H), tighten Set Screws (G). Installation complete.
Re-marking Instructions
 Apply one drop of rubbing alcohol (isopropyl alcohol) to each Ink Stamp reservoir.

Apply cap, let stand for 30 sec. Ink Stamp is re-charged and ready to press and mark
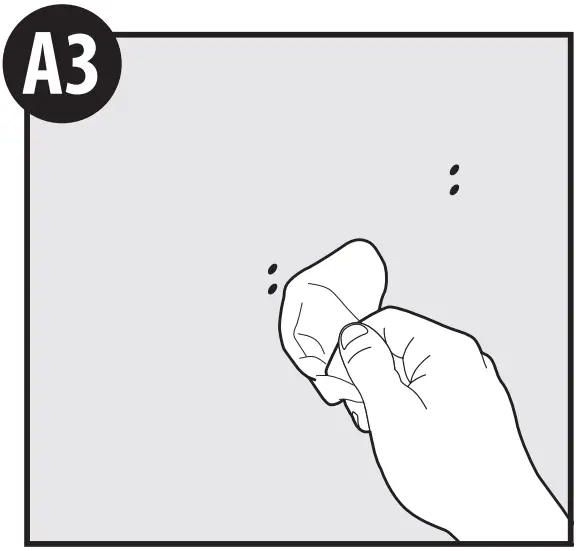 Using a damp cloth, gently wash away unintended ink stamp indications from wall. Reference Step 2 on Page 3 for marking.
Trouble Shooting
| If both posts don’t mount to backets | Remove a post and bar from the wall | Lightly use a hammer to tap the brackets farther away from each other. See step 15. | or | Loosen the bracket screws, push the bracket away from the other, re-tighten the screw. See step 15. |
| If bar is too loose on the posts | Remove a post and bar from the wall | Lightly use a hammer to tap the brackets closer together. See step 15. | or | Loosen the bracket screws, push the bracket closer to the other, re-tighten the screws. See step 15. |
![]()