Contents
Mitsubishi MRCH1 TH6000R01 Remote Controller Thermostat User Manual

MRCH1 Remote Controller

CAUTION: EQUIPMENT DAMAGE HAZARD. Please refer to the equipment Operating Manual for recommended operating temperatures.
About your remote controller
Your new remote controller is pre-programmed and ready to go. All you have to do is set the time and day. Then check the settings below and change if needed:
Quick reference to controls

Quick reference to display screen

Note: Options may vary depending on your equipment.
Set the time and day

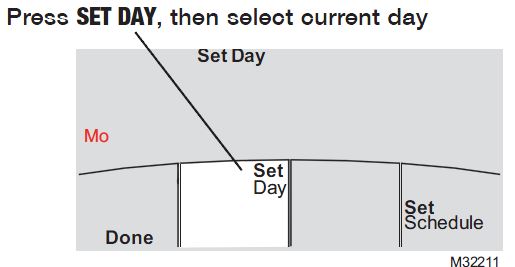
- Press SET CLOCK/DAY/SCHEDULE, then press
 or
or to set clock.
 - Press SET DAY, then press or to select the day of week.
- Press DONE to save.
Note: If the SET CLOCK/DAY/SCHEDULE option is not displayed, press DONE or CANCEL.
Note: If the display flashes “Set Clock,” the remote controller will follow your settings for the weekday “occupied1” (or “Wake”) time period until you reset the time and day.
Select the fan setting
Press FAN to select Auto or selectable fan speed.
In “Auto” fan mode the equipment deter-mines the optimal fan speed to meet the set temperature.

When system switch is “Off”, press FAN to circulate air. The fan will run at the user’s selected fan speed.

Note: Selectable fan speed options may vary depending on your equipment.
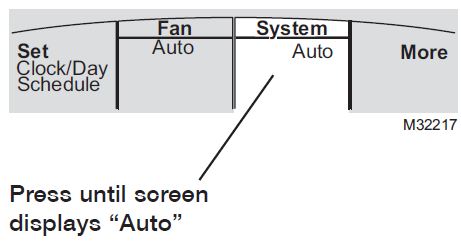
Select the system setting
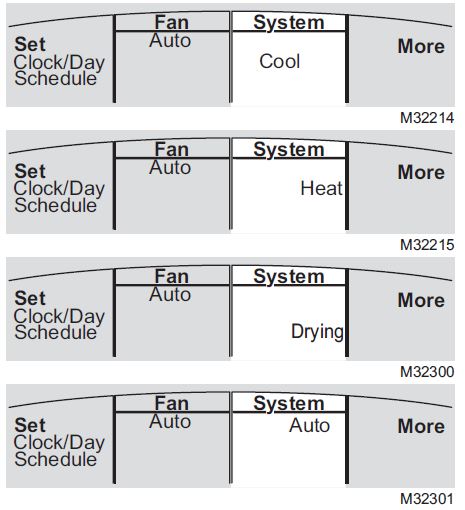
Press SYSTEM to select:
- Cool: Remote controller controls only in the cooling mode.
- Heat: Remote controller controls only in the heating mode.
- Drying: Remote controller directs indoor unit to remove moisture out of the air. May result in temperatures below your cool setting
- Auto: Remote controller automatically selects heating or cooling depending on the indoor temperature.
- Off: Indoor unit is off.
Note: Options may vary depending on your equipment.
Multi-zone configurations
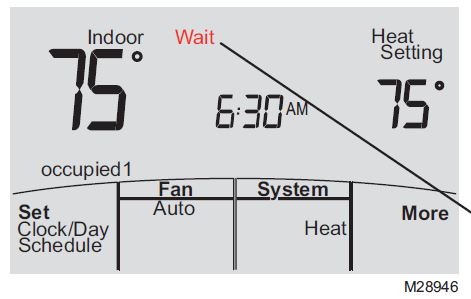
In multi-zone configurations, each zone is typically set to the same mode (Cool, Heat, or Drying).
If zones are set to different modes, the first indoor unit to call for heat or cool will take priority. Other zones go into standby, and “Wait” will be displayed on the screen.
Drying mode (if configured)

Drying mode removes moisture from the air and works differently depending on the type of equipment installed. The tem-perature setting might or might not be displayed.
The indoor unit will determine the Drying mode temperature setting. The setting will be either:
- the cool temperature setting, or
- 3°F (2°C) below room temperature.
Commercial program default settings
This remote controller is pre-set to use energy-saving program settings. We recommend these settings, since they can reduce your heating/cooling expenses. (See page 12 to adjust times and temperatures of each time period.)

occupied 2 and unoccupied 2 periods may be programmed as needed, depending on installed configuration.
Residential program default settings
This remote controller is pre-programmed to use commercial energy saving program settings. For use in a home, change the program to match your schedule. (See page 12 to adjust times and temperatures of each time period.)
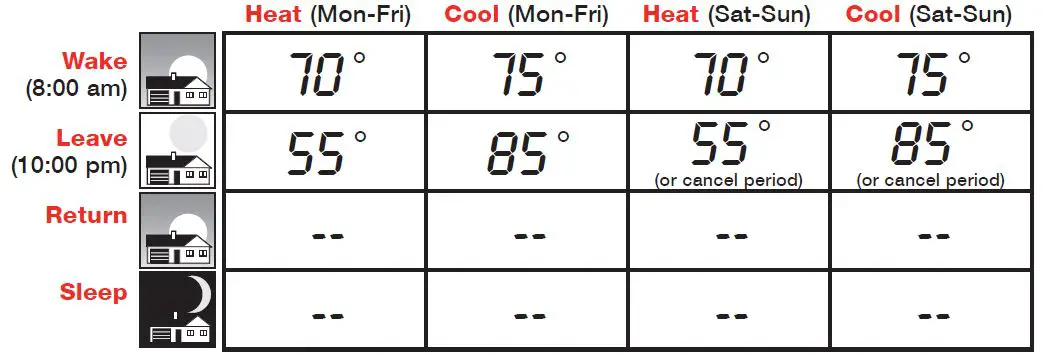
May cancel Leave, Return and Sleep periods.
To adjust program schedules

- Press SET CLOCK/DAY/SCHEDULE, then SET SCHEDULE.
- Press or to set your weekday occupied1/Wake time (Mon–Fri), then press NEXT.
- Press or to set the heat temperature for this time period, then press NEXT.
- Press or to set the cool temperature for this time period, then press NEXT.
- Set time and temperature for the next time period (unoccupied1/Leave). Repeat steps 4 and 5 for each weekday time period.
- Press NEXT to set weekend time periods (Sat-Sun), then press DONE to save & exit.
Note: You may cancel a period using the CANCEL PERIOD button. If configured, you may power the system completely off during the period by using the POWER OFF PERIOD button.
Schedule override (commercial only)
If a person is present during an unoccupied period, press HOLD to temporarily use occupied tempera-ture. Each additional press of HOLD extends the HOLD UNTIL duration by 1 hour to a limit set by the installer.
The timer will expire automati-cally or schedule may be manually resumed by pressing CANCEL.
Note: Permanent hold not available on commercial configuration.
Holiday override (commercial only)

If the building will be unoccupied for more than one day, you can use Holiday override to main-tain an unoccupied temperature.
Press MORE until the Hold Until screen appears.
Press or to set the number of days, then press NEXT.
Press or to set the heat or cool tempera-ture setting, then press DONE.
The cool temperature setting can only be set higher and the heat temperature setting can only be set lower than the unoccupied program schedule.
To clear the Holiday override from the home screen, press CANCEL.
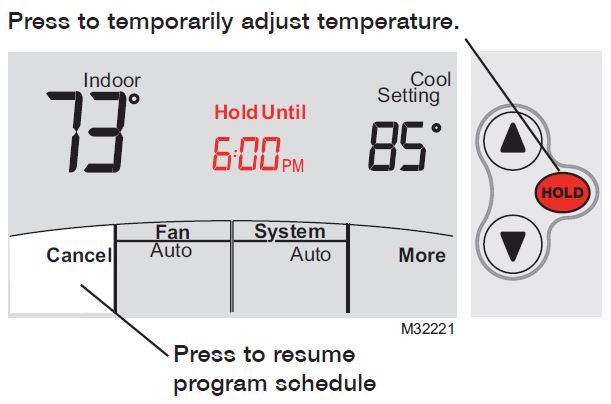
Temporary hold (residential only)

Press or to immediately adjust the temperature. This will temporarily override the temperature setting for the current time period.
The new temperature will be maintained only until the next programmed time period begins (see page 11).
To cancel the temporary setting at any time, press CANCEL.
Permanent hold (residential only)

Press HOLD to permanently adjust the temperature. This will override the temperature settings for all time periods.
The HOLD feature turns off the program schedule and allows you to adjust the temperature manually, as needed.
The system will maintain the set temperature until you manually change it or you press CANCEL to resume the program schedule.
System Changeover
System Changeover is a feature used in climates where both air conditioning and heating are often used on the same day. When the system is set to “Auto,” the remote controller automatically selects heating or cooling depending on the indoor temperature.
Heat and cool settings must be at least 2 degrees apart, depending how your remote controller was configured. The remote controller will automatically adjust settings to maintain this 2
(or more) degree separation.
Note: The “Auto” system setting may not appear, depending on how your remote controller was configured.
Portable Central Controller (optional)

The optional Portable Central Controller can manage temperatures of multiple split-zoning systems from almost anywhere on the property.
The Portable Central Controller also works with other RedLINK™ devices used with other types of heating and cooling equipment.
One Portable Comfort Control can adjust up to 16 zones on a single property.
Note: The remote controller may take up to 15 seconds to respond to commands entered at the Portable Central Controller.
Outdoor air sensor (optional)
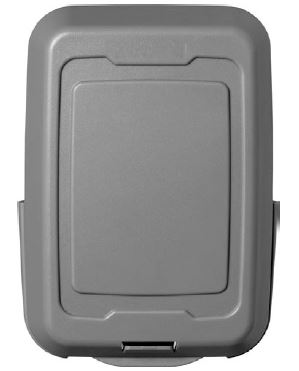
The outdoor air sensor allows outdoor air temperature and humidity to be shown on your remote controller.
The outdoor air sensor also works with other RedLINK™ devices used with other types of heating and cooling equipment.
Only use AA lithium batteries for the outdoor air sensor.
Remote Controller additional features
To display outdoor temperature and humidity
If you have an outdoor air sensor, press MORE to display the current outdoor temperature and humidity. Press DONE to exit.

To find a lost Portable Central Controller
If you misplace a Portable Central Controller, press MORE, then FIND REMOTE. The Portable Central Controller will beep for two minutes to help you locate it. Press anywhere on the display screen of the Portable Central Controller to stop the beeping.
Remote Controller additional features (continued)
To set up/down airflow direction (vane control)
If you would like to manually set the airflow direction, press MORE, then or to select the desired posi-tion, “Auto” or “Oscillate.”

Note: “Auto” position is determined by the system equipment to provide maxi-mum efficiency and comfort. Top and bottom positions may change after 1 hour to prevent condensation.
Note: Airflow direction positions may vary depending on your equipment.
Remote Controller additional features (continued)
Set a timer to automatically power off the indoor unit (if configured)
Press MORE until “Power Off At” is displayed. Press or to set the time at which you would like the unit to turn off. Press DONE to exit. Note: This is not a recurring timer.
This timer can be set up to 24 hours in advance. Depending on how this feature was installed, the indoor unit will either:
- A) Stay turned Off indefinitely until the user changes the system mode.
- B) Stay turned Off until the next scheduled period
Example:
If a room will be unoccupied at 10:00 PM, press MORE until “Power Off At” appears. Press s until 10:00 PM. Press DONE to exit.
To clear the “Power Off At” timer from the home screen, press CANCEL.

Remote Controller additional features (continued)
Optimal Start: This feature eliminates the guesswork when setting your schedule. It allows the remote controller to “learn” how long your Split-Zoning System takes to reach programmed temperature settings, so the temperature is reached at the time you set.
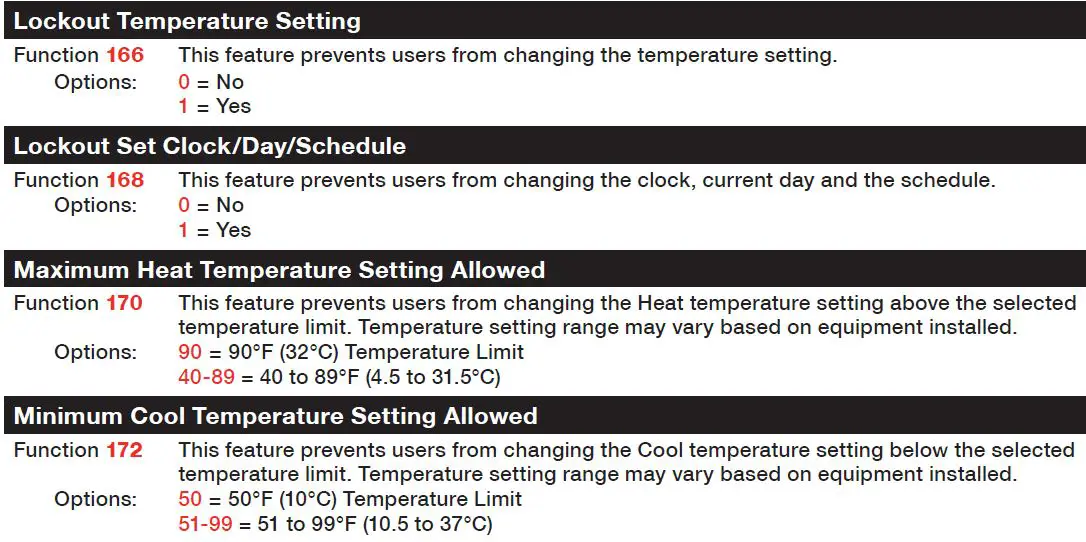
Locked: To prevent tampering, features can be fully or partially locked. When a selected feature is locked, the word “Locked” is displayed on the screen for approximately 5 seconds.
Reset Clean Filter: When Remote Controller is flashing “Clean Filter,” press More and then press Reset. See page 25 to change or remove filter timer.

Advanced functions
Press and hold the MORE button until the display changes. “WAIT” will be displayed for up to 40 seconds.
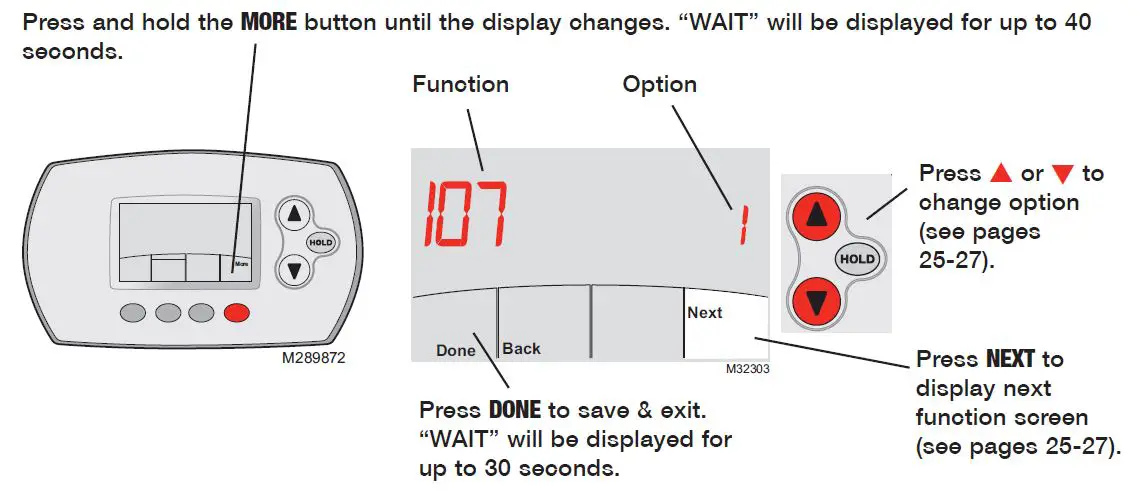
Press /to change option, then press NEXT.


Battery replacement (remote controller)

Install fresh batteries when the “REPLACE BATTERY” warning begins flashing. The warning flashes about two months before the batteries are depleted.
Remove the battery holder and install 2 fresh AA alkaline batteries. Do not use rechargeable batteries.
After batteries are installed, the remote controller will automatically restore communication with the wireless network within a few minutes.
Note: If batteries are inserted within 2 minutes, the time and day will not have to be reset. All other settings are retained in memory.
Battery replacement (Portable Central Controller)

Install fresh batteries when the “REPLACE BATTERY” warning begins flashing. The warning flashes about two months before the batteries are depleted.
Remove the battery cover and install 3 fresh AA alkaline batteries. Do not use rechargeable batteries.
After batteries are installed, the Portable Central Controller will automatically restore communication with the wireless network within a few minutes.
Battery replacement (outdoor air sensor)

Replace outdoor sensor batteries when the “Replace Battery Outdoor” warning begins flashing on the remote controller. The warning flashes about two months before the batteries are depleted.
Remove the sensor from the bracket, remove the cover and install 2 fresh AA lithium batteries. Do not use rechargeable batteries.
After batteries are installed, the sensor will automatically restore communication with the wireless network within a few minutes.
In case of difficulty
Indoor unit does not respond
- Check circuit breaker and reset if necessary.
- Make sure power switch at equipment is on.
- Wait 5 minutes for the system to respond.
Screen displays “No Signal”
Remote contoller has lost radio contact with the wireless network (usually because of a power outage). To restore power:
- Check circuit breaker and reset if necessary.
- Make sure power switch at indoor unit is on.
After power is restored, the remote controller will automatically restore wireless communication within a few minutes.
Displayed indoor temperature is above/below temperature setting
The system requires a minimum on time for component protection. Please wait up to 6 minutes.
Regulatory information
FCC Compliance Statement (Part 15.19) (USA only)
This device complies with Part 15 of the FCC Rules. Operation is subject to the following two conditions:
- This device may not cause harmful interference, and
- This device must accept any interference received, including interference that may cause undesired operation.
FCC Warning (Part 15.21) (USA only)
Changes or modifications not expressly approved by the party responsible for compliance could void the user’s authority to operate the equipment.
FCC Interference Statement (Part 15.105 (b)) (USA only)
This equipment has been tested and found to comply with the limits for a Class B digital device, pursuant to Part 15 of the FCC Rules. These limits are designed to provide reasonable protection against harmful interference in a residential installation. This equipment generates uses and can radiate radio frequency energy and, if not installed and used in accordance with the instructions, may cause harmful interference to radio communications. However, there is no guarantee that interference will not occur in a particular installation. If this equipment does cause harmful interference to radio or television reception, which can be determined by turning the equipment off and on, the user is encouraged to try to correct the interference by one of the following measures:

Limited warranty
Refer to warranty statement in equipment documentation.