Contents
Maytag W10284980A Undercounter Stainless Steel Dishwasher

DISHWASHER SAFETY
- We have provided many important safety messages in this manual and on your appliance. Always read and obey all safety messages.
- This is the safety alert symbol.
- This symbol alerts you to potential hazards that can kill or hurt you and others.
- All safety messages will follow the safety alert symbol and either the word “DANGER” or “WARNING.”
These words mean:
- You can be killed or seriously injured if you don’t immediately follow instructions
- You can be killed or seriously injured if you don’t follow instructions.
You Need to:
- Slowly open dishwasher door while someone grasps the rear of the dishwasher. Remove shipping materials, drain hose and lower rack. Close dishwasher door until latched.
- Observe all governing codes and ordinances.
- Install this dishwasher as specified in these instructions.
- Installation should be performed by a qualified service technician. The dishwasher must be installed to meet all electrical and plumbing national and local codes and ordinances.
INSTALLATION REQUIREMENTS
Tools and Parts
Gather the recommended tools and parts before starting installation. Read and follow the instructions provided with any tools listed here.
All Installations
Tools needed:

Other useful items you may need

Parts supplied:

Parts needed:

Other parts you may also need:

In addition, for firsRt-time installations
Tools needed:

Parts needed:

Additional parts supplied with certain models only:

Location Requirements
Grounded electrical supply required. Do not run drain lines, water lines or electrical wiring where they can interfere with or contact dishwasher motor or legs. The location where the dishwasher will be installed must provide clearance between motor and flooring. Motor should not touch the floor. Do not install dishwasher over carpeted flooring. Avoid damage from freezing to the dishwasher and water lines leading to the dishwasher. Damage from freezing is not covered by the warranty. A side panel kit is available from your dealer for installing your dishwasher at the end of your cabinetry. A moisture barrier accessory (Part Number 4396277) is available from your dealer for installing underneath the countertop. Call 1-800-688-9900 to order. Check location where dishwasher will be installed. The location must provide:
- easy access to water, electricity and drain.
- convenient access for loading and unloading dishes.
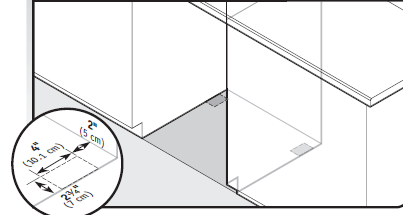
Corner locations require a 2″ (5.1 cm) minimum clearance between the side of the dishwasher door and the wall or cabinet.
- square opening for proper operation and appearance.
- cabinet front perpendicular to floor.
- level floor. (If floor at front of opening is not level with floor at rear of opening, shims may be needed to level dishwasher.)
Helpful Tip: Be sure to accurately measure dimensions and ensure dishwasher is level if the floor in the dishwasher opening is uneven (example: Flooring extends only partway into opening). NOTE: To avoid shifting during dishwasher operation, shims must be securely attached to the floor. If dishwasher will be left unused for a period of time or in a location where it may be subject to freezing, have it winterized by authorized service personnel. Make sure pipes, wires and drain hose are within the shaded area shown in the “Product and Cabinet Opening Dimensions” section.
Product and Cabinet Opening Dimensions
Drain Requirements
A new drain hose is supplied with your dishwasher. If drain hose is not long enough, use a new drain hose with a maximum length of 12’ (3.7 m) (Part Number 3385556) that meets all current AHAM/IAPMO test standards, is resistant to heat and detergent, and fits the 1″ (2.5 cm) drain connector of the dishwasher. Make sure to connect drain hose to waste tee or disposer inlet above drain trap in house plumbing and 20″ (50.8 cm) minimum above the floor. It is recommended that the drain hose either be looped up and securely fastened to the underside of the counter, or be connected to an air gap.
Use of air gap
- Make sure to use an air gap if the drain hose is connected to house plumbing lower than 20″ (50.8 cm) above subfloor or floor.
- Use ¹⁄2″ minimum I.D. drain line fittings.
- If required, the air gap should be installed in accordance with the air gap installation instructions.
- When you are connecting the air gap a rubber hose (not provided) will be needed to connect to the waste tee or disposer inlet.
Water Supply Requirements
- A hot water line with 20-120 psi (138-862 kPa) water pressure can be verified by a licensed plumber.
- 120°F (49°C) water at dishwasher.
- ³⁄8″ O.D. copper tubing with compression fitting or flexible braided water supply line
- (Part Number 4396897RP)
- NOTE: ¹⁄2″ minimum plastic tubing is not recommended.
- A 90° elbow with ³⁄8″ N.P.T. external pipe threads on one end.
- Do not solder within 6″ (15.2 cm) from water inlet valve.
Electrical Requirements
Be sure that the electrical connection and wire size are adequate and in conformance with the National Electrical Code, ANSI/NFPA 70 – latest edition and all local codes and ordinances. A copy of the above code standards can be obtained from: National Fire Protection Association One Batterymarch Park Quincy, MA 02269
- You must have:
- 120-volt, 60 Hz, AC-only, 15 or 20 amp, fused electrical supply.
- copper wire only.
- We recommend:
- a time-delay fuse or circuit breaker.
- a separate circuit.
If connecting dishwasher with a power supply cord:
- Use UL listed power supply cord kit (Part No. 4317824) marked for use with dishwasher.
- Power supply cord must plug into a grounded 3 prong outlet, located in the cabinet next to the dishwasher opening. Outlet must meet all local codes and ordinances.

If connecting dishwasher with direct wiring:
- Use flexible, armored or nonmetallic sheathed, copper wire with grounding wire that meets the wiring requirements for your home and local codes and ordinances.
- Use a UL listed or CSA approved strain relief.

INSTALLATION INSTRUCTIONS
- Disconnect power
- Shut Off Water Supply
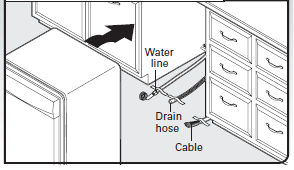
- Do you already have utility hookups?

Prepare Cabinet Opening—Existing Utilities
If the water line and the cable extend to the locations shown, proceed to the “Install Drain Hose” section. If they do not reach far enough, follow the instructions in the “Prepare Cabinet Opening—New Utilities” section.
Prepare Cabinet Opening—New Utilities
What type of electrical connection will you use?
Option A, Power Supply Cord
- Power Supply Cord—Drill hole

- Power Supply Cord–Prepare the hole

Option B, Direct Wire:
- Direct Wire — Drill hole

- Direct Wire–Prepare hole

- Direct Wire–Route cable

Prepare and Route Water Line
- Drill hole

- Measure water supply line

- Route water supply line

- Flush water supply line

- Slide nut and ferrule onto tubing

- Add 90° elbow fitting to the water supply line

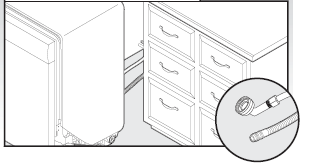
Install Drain Hose
- Drill hole

- Route drain hose

- Connect drain hose
- Connect drain hose to waste tee or waste disposer using one of the following options:
- Option A, Waste disposer – no air gap
- Option B , No Waste disposer – no air gap
- Option C, Waste disposer – with air gap
- Option D, No waste disposer – with air gap
- Connect drain hose to waste tee or waste disposer using one of the following options:
Option A, Waste disposer – no air gap
Waste disposer – no air gap
- Using a hammer and screwdriver, knock plug into disposer.
- Use needle-nose pliers to remove plug.
- Attach drain hose to disposer inlet with large silver drain hose clamp (provided). Use pliers to squeeze clamp open and move into position

Option B, No waste disposer – no air gap
No waste disposer – no air gap
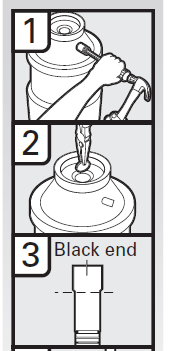
- Connect black end of of drain hose to waste tee and cut if needed. (Do not cut ribbed section.)
- Attach black end of drain hose to waste tee with a large silver drain hose clamp (provided). Use pliers to squeeze clamp open and move into position. If the drain hose was cut, use a 1¹⁄2″ to 2″ (3.8 to 5 cm) screw-type clamp (not provided

Option C, Waste disposer – with air gap
Waste disposer – with air gap
- Using a hammer and screwdriver, knock plug into disposer.
- Use needle-nose pliers to remove plug.
- Connect black end of drain hose to air gap and cut if needed. (Do not cut ribbed section.)
- Attach drain hose to air gap with large silver drain hose clamp (provided).
- Use pliers to squeeze clamp open and move into position. If the drain hose was cut, use a 1¹⁄2″ to 2″ (3.8 to 5 cm) screw-type clamp (not provided).
- Use a rubber hose (not provided) with screw-type clamps (not provided) to connect from air gap to disposer inlet.

Option D, No waste disposer – with air gap
No waste disposer – with air gap
- Connect black end of drain hose to air gap and cut if needed. (Do not cut ribbed section.)
- Attach drain hose to air gap with large silver drain hose clamp (provided).
- Use pliers to squeeze clamp open and move into position. If the drain hose was cut, use a 1¹⁄2″ to 2″ (3.8 to 5 cm) screw-type clamp (not provided).
- Use a rubber hose (not provided) with screw-type clamps (not provided) to connect from waste tee to air gap.

Install moisture barrier (on some models
- Make sure the area under the cabinet is clean and dry for installation of the moisture barrier.
- Remove the backing of the moisture barrier and apply to underside of the countertop along the front edge of the counter.

Prepare Dishwasher
- Put dishwasher on its back

- Remove panels

- Remove terminal box cover

- install strain relief

What type of electrical connection will you use?
Make Power Supply Cord Connection
Option A, Power Supply Cord:
- Power Cord—Route cord into terminal box

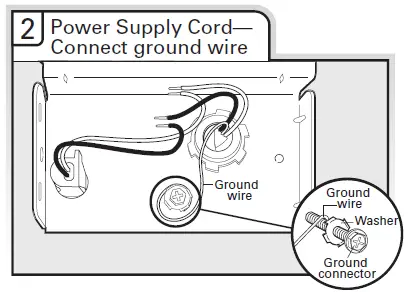
- Power Supply Cord— Connect ground wire
- Power Cord—Connect remaining wires

- Power Cord – Secure cord o conduit conector
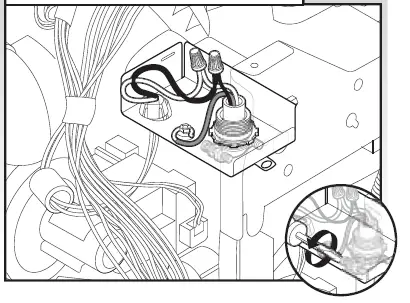
- Power Cord—Reinstall terminal box cover

Wiring configuration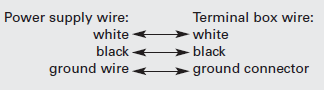
Determine Cabinet Opening
- Measure cabinet opening

- Adjust wheels and legs

- Built-up Floors — Add shims as needed
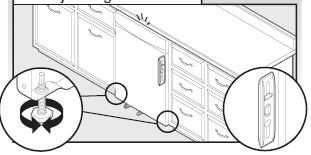
Install the Door Handle (on some models
Install door handle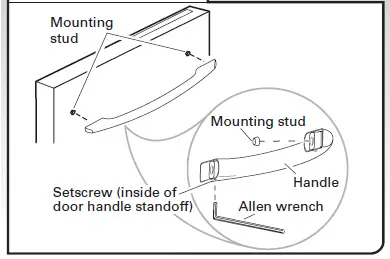
Choose Attachment Option
Option 1, Countertop attachment
- Countertop attachment

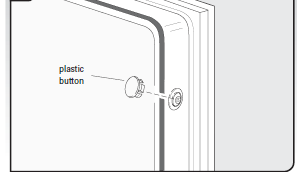
Option 2, Dishwasher side attachment
- Remove brackets from the top

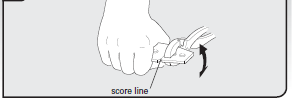
- Break end of bracket
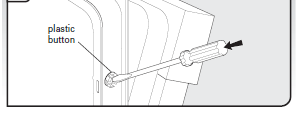
- Insert plastic buttons
- Reinstall bracket

Move Dishwasher into Cabinet Opening
-
- Stand dishwasher upright

- Move dishwasher close to cabinet opening
- Check water and drain hose position
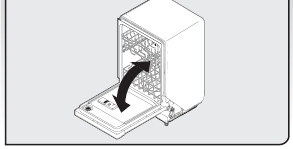
- Open and close door
- Closes too quickly— Decrease spring tension
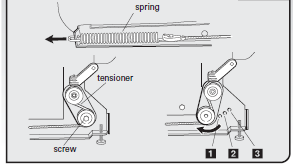
- Door falls open — Increase spring tension

- Move dishwasher into cabinet opening

- Align front of dishwasher with front of cabinet doors

- Stand dishwasher upright
- Check for plumb and adjust legs if needed

- Check level side to side and adjust legs if needed

Connect to Water Supply
- Tighten 90° elbow fitting to valve

- Check for leaks

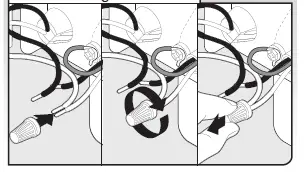
Connect to Drain
- Connect drain hose

- Slide clamp onto connector
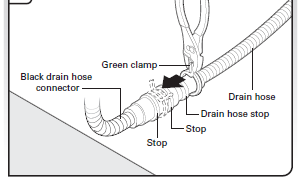
- Hose clamp final position

Make Direct Wire Electrical Connection
Option B, Direct Wire
- Direct Wire—Route cable into terminal box

- Direct Wire—Connect ground wire

- Direct Wire—Connect remaining wires
- Direct Wire—Secure cable in strain relief

- Direct Wire—Reinstall terminal box cover

Wiring configuration
Secure Dishwasher in Cabinet Opening
- Double-check dishwasher alignment in cabinet opening

- Remove lower dish rack and place towel

- Check door clearance
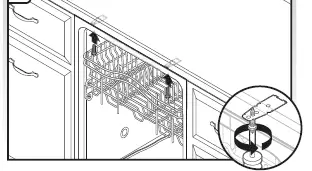
- Check inner spacing

- Check side attachment

- Remove towel and replace
- lower dishwasher rack

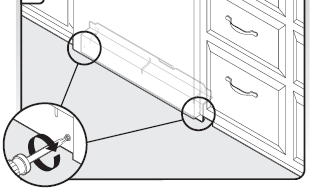
Complete Installation
- Reinstall access panels
- Reinstall access panels

- Check lower panel edge

- Tighten screws
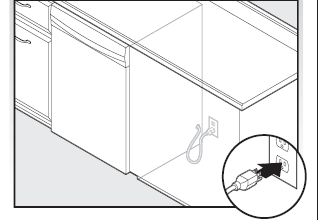
Power supply cord—Plug into a grounded 3 prong outlet
Check Operation
- Read the Dishwasher User Instructions that came with your dishwasher.
- Check that all parts have been installed and no steps were skipped. Check that you have all tools used.
- Start dishwasher and allow it to complete the shortest wash cycle. After the first 2 minutes unlatch door, wait 5 seconds, then open door.
- Check that there is water in the bottom of the dishwasher tub. Check that dishwasher is working properly.
- If the dishwasher is not working properly, disconnect power or unplug dishwasher and see “If Dishwasher
- Does Not Operate” section
If Dishwasher Does Not Operate
- First try the solutions suggested here to possibly avoid the cost of a service call.
- Has the circuit breaker tripped or the house fuse blown?
- Is the door closed tightly and latched?
- Has the cycle been set correctly to start the dishwasher?
- Is the water turned on?
- If none of these solve the problem, call 1-800-688-9900, or in Canada, call 1-800-807-6777
Additional Tips
Expect longer wash times. Your new dishwasher will average 2 to 3 hours per load, but use nearly 40% less energy than older models. Designed with a low wattage, low energy consumption motor, your dishwasher washes longer to ensure exceptional cleaning. Certain models are equipped with an optical water sensor so the first cycle will run longer to calibrate to optical sensor. Selecting certain options could increase cycle time past 3.5 hours. Rinse Aid is necessary for good drying results: This dishwasher is designed to be used with rinse aid for good drying performance and controlling hard water deposit buildup. Energy efficient dishwashers use less water and energy so they depend on the water sheeting action of rinse aid for good drying performance. Start/Resume light may flash: When pressing Start/Resume, you must make sure the door is closed within 3 seconds. If you do not close the door, the Start/Resume light will flash until you press it again. (You must also do this when adding a dish during the middle of a cycle.)