![]()
888-230-2225
[email protected]

Eiffel 28.35 Floating Cabinet
2 Doors Floating Cabinet
Model # 251BMC6, 251BMC8, 251BMC83, 251BMC84, 251BMC85

The indicated values consider static weights and evenly distributed over the parts.

Ed. 001, 2022/06 – Manhattan Comfort.
INCLUDED IN THE PACKAGE

REAR VIEW

FRONT VIEW
FINAL APPEARANCE

|
n.° ID |
Parts identification (Description) |
Quantity |
|
01 |
Top Panel and Base |
2 |
|
02 |
Side Panel |
2 |
|
03 |
Back Panel |
2 |
|
04 |
Shelf |
1 |
|
05 |
Left Door |
1 |
|
06 |
Right Door |
1 |
|
07 |
Plastic “H” Profile 665mm |
1 |
TOOLS NEEDED


Manual screwdriver. Simple hammer. Level indicator.

Electric drill and electric screwdriver with drill bit Ø1/2 inch and phillips tips.
IMPORTANT! Two people are recommended to assemble and install this product.
The cabinet must be installed suspended and fixed to the wall (check the conditions of the wall to anchor the cabinet).
INCLUDED IN THE HARDWARE
| A 8x
|
B 8x
|
C 8x
|
| D 28x
|
E 4x
|
F 4x
|
| G 4x
|
H 40x
|
I 1x
|
| J 1x
|
K 8x
|
L 2x
|
| M 2x
|
N 4x
|
O 4x
|
| P 4x
|
||


STEP 1
Preparing the Side Panels (02):
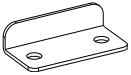
- Fix the metal brackets (E) with bolts (H) in the Side Panels (02), as shown in the DETAIL 1 and DETAIL 2.
DETAIL 1

DETAIL 2
STEP 2
- Connect the Top Panel and Base (01) to the Side Panels (02) with dowels (A) and bolts (B).
At the end of the fixing, apply the adhesive covers (C) on bolts (B).

STEP 3
Fixing the Back Panels (03):
IMPORTANT! The fixing the Back Panels (03) is optional. The cabinet can be installed on the wall with or without the back panels, according to the user’s preference.
- Fix the Back Panels (03) by fitting the plastic profile (07) at the junction between the two parts and applying the nails (D) in the indicated positions.

REAR VIEW
STEP 4
ATTENTION! Before installing the cabinet, check the conditions of the wall to anchor it and the existence and posicion of hydraulic, electrical and gas pipes, avoiding damage to these structures when drilling the holes for the bushings and bolts. The Kap Toggle bushings (O) supplied with the product are for hollow walls or dry wall type. Check the type of the wall on which the installation will be made and, if necessary, look for more suitable fixing devices. To mark the position and fix the cabinet on the wall, check the level of the entire assembly and the position of the feet in relation to the floor.
FRONT VIEW
 DETAIL 3
Installing the cabinet on the wall:
- Place the already assembled cabinet on the desired site for installation and mark the position for the holes on the wall to fixation throught the four metal brackets (E), as shown in the drawing and using the brackets themselves as a reference.
- With electric drill and drill bit Ø1/2 inch, make the four holes in the wall and apply the bushings (O).
- Replace the cabinet in the site and apply the bolts 1/4 x 2.1/4 inches as shown in the drawing, for fixing the brackets (E) at the bushings (O) already applied on the wall. At the end, apply the plastic covers (F) over the brackets (E).
STEP 5
Preparing the Doors (05) and (06):
- Fix the hinges (G) with bolts (H) in the Doors (05) and (06), as shown in the DETAIL 4.
- Fix the handle (M) in the Doors (05) and (06) with bolts (N).
- Fix the metal plate (I) with bolts (K) in the indicated position on the Left Door (05).
- Fix the lock (J) with bolts (K) in the Right Door (06).
 DETAIL 4
STEP 6

DETAIL 5
Installing the Shelf (04):
- Insert the metal brackets (P) into the holes in the Side Panels (02) and install the Shelf (04) over them.
- If you prefer, fix the Shelf (04) on the metal brackets (P) applying the bolts (H), as shown in the DETAIL 5.
STEP 7
 DETAIL 6
Installing the Doors (05) and (06):
- Fix the hinges connectors (G) of the Doors (05) and (06) on the Side Panels (02) with bolts (H), taking the markings in these Panels (02) as a reference for correct positioning.
The hinge and its connector includes two more bolts, shown in DETAIL 6. Use these fixer and adjustment bolts to tighten, adjust and align the doors. - Fix the metal stopper (L) on the Base (01) with bolts (K) so that both doors are aligned.
![]()