Contents
jura Drip Drain Set GIGA
Product Information
| Language | Product Name | Supplied as Standard | Installation Steps | Contact Details |
|---|---|---|---|---|
| de | Restwasserablauf-Set GIGA | Restwasserschlauch, Ventil | T Bohrloch mit einer Feile entgraten. T Kaffeevollautomat wieder aufstellen. T Restwasserschale einsetzen. T Wassertank einsetzen. T Die blauen Verriegelungen nach innen drehen. T Serviceabdeckung wieder einsetzen und Aromaschutzdeckel aufsetzen. T Netzstecker in Netzsteckdose stecken. T Kaffeevollautomat einschalten. |
– |
| en | Drip drain set GIGA | Drain hose, Valve | T Switch off coffee machine. T Unplug from the power socket. T Remove the water tank. T Open the service cover on the back of the machine by pressing above the JURA logo. T Push the red sliding catches completely to the rear to close the bean containers. T Turn the blue locking devices outwards. T Remove both bean containers. T Remove drip tray and coffee grounds container. T Carefully lay the coffee machine on its back. T Slide drain hose into guide until it clicks. T Set coffee machine upright again. T Fit drip tray. T Fit water tank. T Fit both bean containers. T Turn the blue locking devices inwards. T Pull the red sliding catches completely to the front to open the bean containers again. T Refit the service cover and fix it by pressing above the JURA logo. It will click into place audibly. T Fill the bean containers with coffee beans and fit the aroma preservation covers. T Plug the machine into the power socket. T Switch on coffee machine. |
– |
| fr | Set scarico acqua residua GIGA | – | T Kaffeevollautomat wieder aufstellen. T Restwasserschale einsetzen. |
– |
| it | Istruzioni per l’uso | – | T Wassertank einsetzen. T Die blauen Verriegelungen nach innen drehen. |
– |
| nl | Set afvoer restwater GIGA | – | T Serviceabdeckung wieder einsetzen und und Aromaschutzdeckel aufsetzen. |
– |
| es | Set scarico acqua residua GIGA | – | T Netzstecker in Netzsteckdose stecken. T Kaffeevollautomat einschalten. |
– |
| pt | Modo de empleo | – | T Drill hole for valve in drip tray (10 mm drill bit). T Deburr drilled hole with a file. |
JURA Elektroapparate AG Kaffeeweltstrasse 10 CH-4626 Niederbuchsiten Tel. +41 (0)62 38 98 233 @ You will find additional contact details for your country at www.jura.com. |
| sv | Droppvattenavrinnings-set GIGA | – | – | – |
| ru | Restwasserablauf-Set GIGA | – | – | – |
Supplied as standard

Tool required
- Drill
- 10 mm drill bit
- File
Installation
- Switch off the coffee machine.
- Unplug from the power socket.
- Remove the water tank.
- Open the service cover on the back of the machine by pressing above the JURA logo.
- Push the red sliding catches completely to the rear to close the bean containers.
- Turn the blue locking devices outwards.
- Remove both bean containers.
- Remove the drip tray and coffee grounds container.
- Carefully lay the coffee machine on its back.
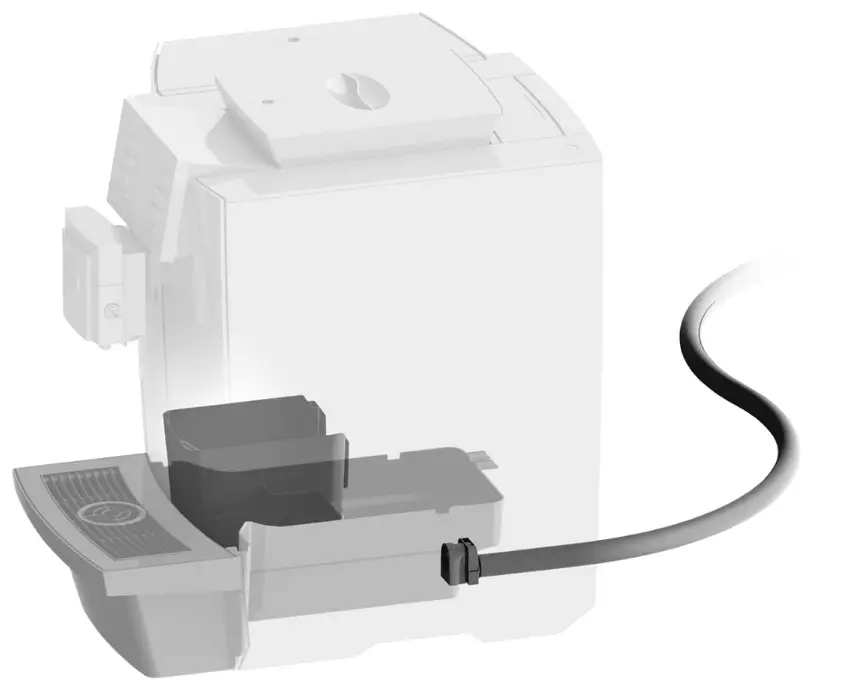
- Slide the drain hose into the guide until it clicks.

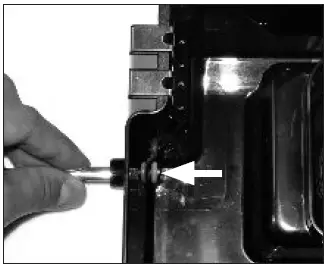
- Drill hole for the valve in the drip tray (10 mm drill bit).

- Deburr drilled a hole with a file.
- Insert valve (valve body and pressure spring from outside, red O-ring from inside).
- Set the coffee machine upright again.
- Fit drip tray.
- Fit water tank.
- Fit both bean containers.
- Turn the blue locking devices inwards.
- Pull the red sliding catches completely to the front to open the bean containers again.
- Refit the service cover and fix it by pressing above the JURA logo. It will click into place audibly.
- Fill the bean containers with coffee beans and fit the aroma preservation covers.
- Plug the machine into the power socket.
- Switch on the coffee machine.
JURA contact details / Legal information
Tel. +41 (0)62 38 98 233 You will find additional contact details for your country at www.jura.com. Copyright
The instructions for use contain information that is protected by copyright. It is not permitted to photocopy these instructions for use or translate them into another language without the prior written consent of JURA Elektroapparate AG.