![]()

COMPACT HD 5 – 20X
DIGITAL DAY/NIGHT
SCOPE
Contents
Safety Instructions
Read and follow all instructions
Read alt warnings!
Do not attempt to disassemble the device by yourself. all services must be provided by the manufacturer
CAUTION
- INFRAR-ED (IR) illuminator may cause harm to human eyes, DO NOT look directly at it.
- Switch off the IR Illuminator when not in use. Continuous use of IR light will generates excessive heat. Avoid pointing it towards flammable objects.
Operating temperature is between -4F-122F ( -20~50°C).
Description
CP258,a 24/7 all-weather conditioned digital scope, with its excellent day and night time image quality, is specifically designed for outdoor hunting.
Package Content
- CP258 Scope
- Rail Accessories (M6 / M4 screws, mount, spanner, lens cleaning cloth)
- Eyepiece Protector
- USB Cable
- User Manual
Specification
| Model Compact HD 5-20X Sensor Specifications |
|
| Resolution | 1920 x 1080 Pixels |
| Frame Rate | 60Hz |
| Video Record Resolution | 1920 x 1080 Pixels |
| Optical Specifications | |
| Digital Magnification | 5 — 20x |
| Eye Relief | 45mm |
| Diopter Adjustment | ±5D |
| Detection Range | 400M |
| Display Specifications | |
| Type | Micro – OLED |
| Display Resolution | 1920 x 1080 Pixels |
| Frame Rate | 60Hz |
| Battery Power Supply | |
| Battery Type | 18650 Battery |
| Operating Time | 8h |
| External Power Supply | 5V – Type C USB |
| Physical Specifications | |
| Net Weight .(teibattery,mounteeyepiece protector) Gross Weight |
410g 539g |
| Dimensions | 201 *74 * 48mm |
| Micro SD card | 32 —128 ( U1/C10 )GB |
| Ingress Protection | IP67 |
| WIFI / APP | Supported by HITTAC |
| IR Wavelength | 850/940nm |
| Infrared Power | 5W |
| Working Temperature | -20-50°C |
Features
- High Resolution Imaging
- Video Recording In 1920 x 1080 60 Hz
- Micro-OLED HD Display, 60 Hz
- Instantaneous Zeroing
- 3-Axis Gyroscope
- Picture-in-Picture Function
- Full-Color Under Low Light Conditions
- Anti-Backlight Overexposure Compensation
- Wi-Fi To App Direct Connection
- Wireless Firmware Updating Via App
- One Touch Zeroing Via App
Controls

Power Supply
“This device is powered by an external 18650 battery with up to 8 hours of operation time (when the IR mode switched off). When battery is low, it can either be charged independently or by connecting the device to TYPE C port. Please note that it is recommended to fully charge the 18650 battery before inial use.

- Open the Battery Cap (17) and pull it off.
- Insert 18650 battery (19) into slot in the orientation indicated “+”
- Apply pressure to Battery Cap (17) against battery “-” and turn it until fully tightened.
Note: To use TYPE C cable for charging, a power adapter (5V2A) is needed.
TF Card Slot
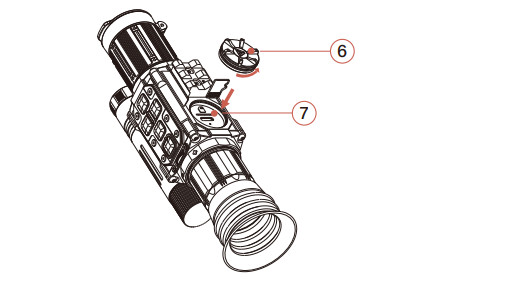
Open the Side Knob 6 insert TF card into the slot 7
Note: TF card insert to certain direction.

Rotate the Illuminator 13 to adjust brightness.
Note: Optimal focus enables maximum detection range.
Indicator
| Indicator | Color | On | Flash |
| Charging 0; | Charging | — | |
| Status (16) | Working | — | |
| Standby | Updating: Yellow light flashing |
Control Description
| Button | Status | Short Press | Long Press | Rotation |
| Off | — | On | — | |
| Power Button |
View Interface | Standby | Off | — |
| Standby | Wake-up | — | — | |
| Zeroing Interface | Freeze/Continue | — | — | |
| View Interface | Reticle Color Switch | Menu Interface | — | |
| Menu Button |
Primary Menu Interface | View Interface | — | — |
| Secondary Menu Interface | Primary Menu Interface | — | __ | |
| IR Mode Switch Button |
View Interface | — | Color Mode Switch | — |
| Black/White Mode | IR BrightnessAdjust | Color Mode | — | |
| Menu Interface | Move Cursor to the Left | — | — | |
| Zeroing Interface | Move Cursorto the Left | Save and Exit | — | |
| Time Setting Interface | Move Cursorto the Left | Save and Exit | — | |
| Brightness Button |
View Interface | Display Brightness Adjustment | Wi-Fi On/Off | — |
| Menu Interface | Move Cursor to the Right | — | — | |
| Zeroing Interface | Move Cursor to the Right | Exit Current Setting | — | |
| Time Setting Interface | Move Cursor to the Right | Exit Current Setting | — | |
| Record Button” |
rf View Interface |
Start Recording /Pause /Resume | Start/EndRecording | — |
| Menu Interface | Confirm the Selection | — | — | |
| Reticle Zeroing Interface | Reticle X/Y Value Adjust Once | Reticle X/Y Value Continuous Adjust | — | |
| Magnification Knob |
View Interface | — | — | To Right Increase the Magnification / To Left Decrease the Magnification |
| Reticle Zeroing Interface | — | — | To Right Increase the Magnification I To Left Decrease the Magnification |
Interface Description
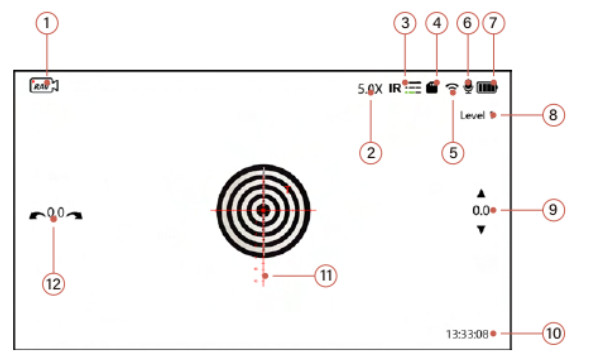
- Recording Indicator: The recording timer indicates that the device is currently recording: “The displayed number on the timer represerts the duration ofthe recorded video.
- Current Magnification ( eg: 50x ).
- The displayed icon indicates i the device s i black and white made; otherwise color mode.

Black and white mode; Illuminator off Brightness Level 1 Brightness Level 2 Brightness Level 3 Brightness Level 4 Brightness Level 5 Black and white mode; Brightness will be adjusted automatically - TF card
 ( Card icon appears when it’s inserted. The recording won’t work without the TF card).
 - WiFi (
 Wi-Fi On,
  Wi-Fi Off).
 - Microphone. Indicates whether sounds to be included when recording.
 Microphone On
  Microphone Off.
 - Battery Status
Icon Ba 
1 bar 10%-20% 2 bar 20%-50% 3 bar 50%-80% 4 bar 80%-100% Cherging Connect Type C to charge - Level T Current Display Brightness (Level 16 with Increasing Brightness).
- Gyroscope Vertical Drift.
- Curent Time.
- Reticle
- Gyroscope Horizontal Drift:
Menu List
Long press Menu (4) for 2 seconds to enter Menu list; There are 15 selections in total; Use IR Mode Switch Button (15) and Brightness Button (5) to navigate through menu options; Short press the Record Button (14) to confirm selection.
| Icon | Description |
| [Recording] Auto Video Recording after Shooting | |
| [PiP] PiP Window on View Interface | |
| [Wi-Fi] Wi-Fi On/Off | |
| [Reticle Zeroing] Reticle Zeroing | |
| [Color Boost Mode] Select Mode: Color Boost/ Natural Color | |
| [Overexposure Compensation] Compensate Against Overexposure with Night Mode | |
| [Sound Record Control] Control whether to include sound in Recorded Video | |
| [Loop Recording] Set Video Duration : 1 Minute, 3 Minutes,5 Minutes or OFF (default 10 Minutes) |
|
| [Gyro] Gyroscope Calibration | |
| [Timestamp] If Timestamp is Shown In Recorded Videos | |
| [Date and Time Settings] Set Current Time and Date | |
| [Auto Sleep] In Auto Sleep Mode, The Device will Automatically Power OFF after 10, 20 or 30 Minutes of Inactivity |
|
| [Language Setting] Language Selection | |
| (System Settings] Format the TF Card and Restore The Factory Default Settings (Note: Formatting the TF card will erase all files stored on the card) |
|
| [Version Number] Current Version |
Main Function Description
Reticle Zeroing
Long press the Menu Button (9 for 2 seconds to enter menu list![]() Press the Brightness Button () to move cursor to Reticle Setting menu, then press Recording Button (4 to select Reticle Setting.
Press the Brightness Button () to move cursor to Reticle Setting menu, then press Recording Button (4 to select Reticle Setting.
- Short press Brightness Button (5) to move cursor to the right; Short press the IR Mode Switch Button (15) to move cursor to the left;
- Short press Recording Button to increase current value by 1; Long press (without release) to continuously increase the current value within the allowed range. Short
press the Menu Button (4) to decrease current value by 1; Long press (without release) to continuously decrease the current value within the allowed range; - Long press IR Mode Switch Button (15) for 2 seconds to save and exit Reticle Zeroing; Long press Brightness Button (5) to exit without saving;
- Short press Power Button (3) to freeze/reactivate current image.
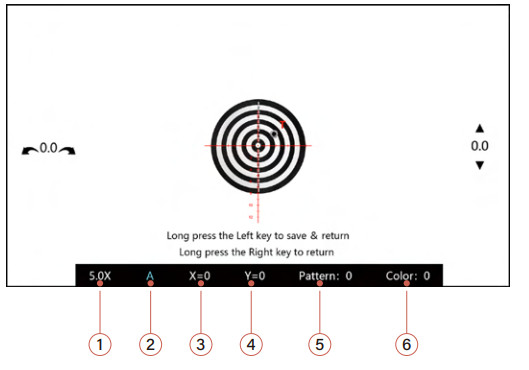
- 5.0x Current objective magnification; adjustable with Magnification Knob
- A: Current ballistic profiles; up to 26 (A-2) profiles for etic settings
- X=0: Current coordinate paint of reticle in horizontal direction
- Y=0: Current coordinate point of reticle n vertical direction
- Pattern 3 excel patterns
- Color: 4 color options white(0), green(1), ed(2), yellow(3)
Reticle Zeroing
Example
Place the target at 50 meters, tum Focusing Adjustment (10) to ensure the Objective Lens (2 provide a clear view of the target; Align the crosshairs with the target. The bullet hole will create an impact point (7). While keeping the current aiming point unchanged, short press the Power Button (T) to freeze current image. Move X and Y coordinates of the reticle to align cross hark center precisely with impact point (7).

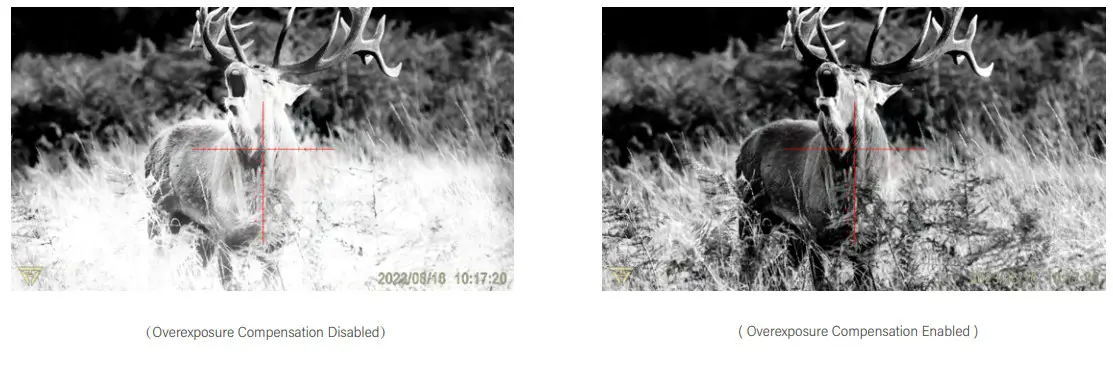
Image Quality Enhancement Function
Multiple image qualties: natural images and color-enhanced images.

Overexposure Compensation
Highly recommended to tum on the overexposure compensation only at closer range and turn of it at longer range.
App Instruction
Please download ” HITTAC ” App by scanning the QR code below or search and download from the App store;
For Android phones, please go to Google Play Store
For i0S phones, please go to Apple Store
Search for ” HITTAC ” to download the App.

App Connection and Use
[Step 1] After turning on the device, long press the Brightness Button(8) for 2 seconds to turn on W-Fi the account (starting with CP258) and password (12345678) can be seen on the display.
[step 2 ] Go to Wi-Fisetting on the phone to connect the device.
[Step 31 open “HITTAC” App and Enjoyi(User instruction is included in the App).
Firmware Update
Using the ‘Firmware Update” feature on the App to perform online OTA Wireless Updates:
Reticle Zeroing on App
Tap the icon![]() on App. When in landscape mode, short press Power Button () to freeze current image;
on App. When in landscape mode, short press Power Button () to freeze current image;
Swirly move your finger from the reticle center to point of impact on the phone; Precise adjustment of X and Y coordinates can be done by tapping the up and down arrow on the App. Once the reticle center and the point of impact s perfectly aligned, click ‘0K’ to complete the current Zeroing.

FCC WARNING
This device complies with part 15 of the FCC Rules. Operation is subject to the following two conditions: (1) this device may not cause hamaul interference, and (2)this device must accept any interference received, including interference that may cause undesired operation Any changes or modifications not expressly approved by the party responsible for compliance. could void the user’s authority to operate the equipment.
NOTE: This equipment has been tested and found to comply with the limits for a Class B digital device, pursuant to Part 15 of the FCC Rules. These limits are designed to provide reasonable protection against harmful interference in a residential installation. This equipment generates, uses and can radiate radio frequency energy and, if notinstalled and used in accordance with the instructions, may cause harmol interference to radio communications. However, there is no guarantee that interference will not occur in a particular installation.
Ifthis equipment does cause harmiul interference to radio or television reception, which can be determined by turning the equipment off and on, the user is encouraged to try to correct the interference by one or more of the following measures:
- Reorient or relocate the receiving antenna.
- Increase the separation between the equipment and receiver.
- Connect the equipment into an outlet on a circuit different fromthat to which the receiver is connected.
- Consult the dealer or an experienced radio/TV technician for help.
To maintain compliance with FCC’ s RF Exposure guidelines, This equipment should be installed and operated with minimum distance between 20cm the radiator your body: Use only the supplied antenna.
