HAYVE WTM-W1-A Digital Electron Microscope User Manual
Contents
Read Me First
- Thank you for purchasing the WTM-WI-A WiFi digital micro-scope.
- Please read this user manual carefully and keep it for future reference.
- Pay attention to protect the lens part. Close the lens lid after using to avoid entering dust or strange objects.
- The microscope can be used in hand or inserted as a desktop, with attention to avoid damage to the components.
- When placing items, place them directly below the center of the lens as much as possible. Avoid not seeing objects clearly and bringing about a bad experience.
Packing List
- Microscope
- Base
- Type-C Date Cable
- User Manual
- Calibration Card
Parts Description
* Before using the microscope, make sure your hands are secured, or use it on the desktop.

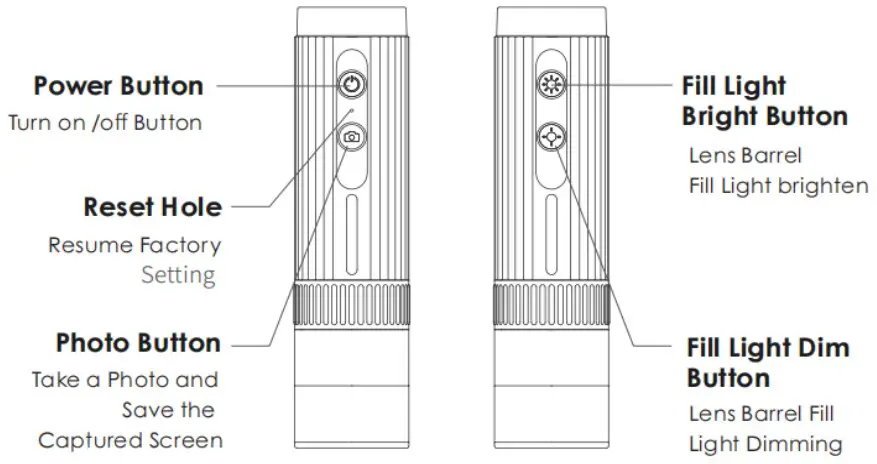
You can use a daily mobile phone charger, computer, and charger to charge the microscope.
The charging time should not exceed 12 hours to avoid affecting the battery life.
During the charging process, if the microscope shell and the battery are slightly heated, please rest assured to use the normal phenomenon.
Detailed Operation
How to zoom in and focus?
- Counter-Clockwise Rotation: multiple magnification
- Clockwise Rotation: multiple reduction
(Note: At the same distance, the rotating zoom cylinder has two magnification. To adjust more multiples, it can be adjusted up and down through the microscope base bracket.)
Work with cell phone
Download the App
- Scan the QR code, click download and install.
- The mobile terminal is the iOS system, and you can search for “Uni Lab” at APP Store for download
Software to download the QR code

The 103 / Android APP Icon

Operating steps
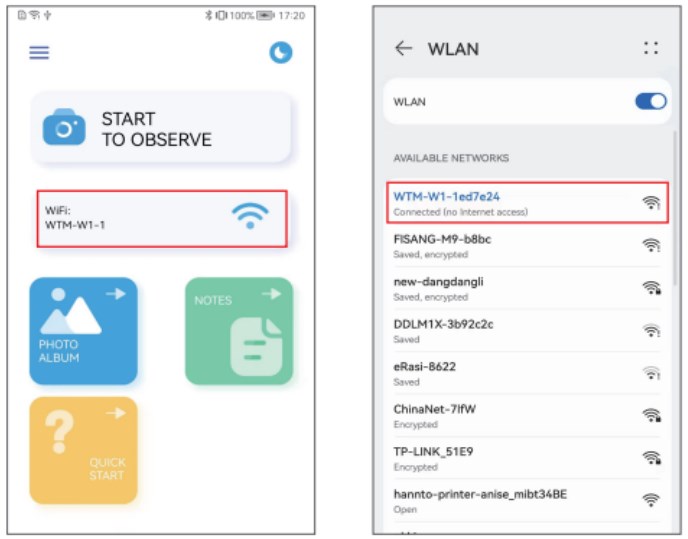
Step 1 Turn on the microscope
Long press the power button for 3s, and the blue light flashes under the button after turning on, indicating that the app has not been connected yet.
Step 2 Connect the microscope to Android / iOS
- Open the Uni Lab APP, click WiFi, jump to the WiFi connection page of the Android / IOS device, select the corresponding network name of the product “WTM-Wl-XXXXXX” (network without encryption)
- Connect to the network. If the connection confirmation prompt appears, please click “Keep Connected”(Android version) / click “OK”
- After the connection is successful, the microscope blue lights on. When you return to the app, you can see the image on your phone.
(Note: Please open the phone / tablet location permission when the APP is connected to the microscope.)
Run the APP, and follow the indicated operation steps. (Follow the red box instructions to make the selection)

Introduction of the APP
- APP Homepage
Because of the mobile phone model version is different, the pictures are for reference only

- Photo: Select a photo mode
- Video: Select the recording mode
- Zoom in: Click to zoom in on the screen (use when the screen is too small)
- Zoom Out: Click to zoom out the screen (used when the screen is too large, the default is the smallest each time it is opened)
Work with Windows
Software download
The device camera button cannot be used, it can only be realized through software Photo recording function
- For Windows 8, Windows 10 or higher system, search “UniLab”(as shown in ” 410 “) in the Microsoft Store to download it.
- For Windows 7 and Windows XP, download the software from the website: https://www.weetool.net

Operating steps
Step 1 With the microscope turned off, connect the micro-scope to the computer using a data cable.
Step 2 Turn on the microscope, run the software, select the corresponding device name, you can see the image on the computer, and take photos and videos through the software.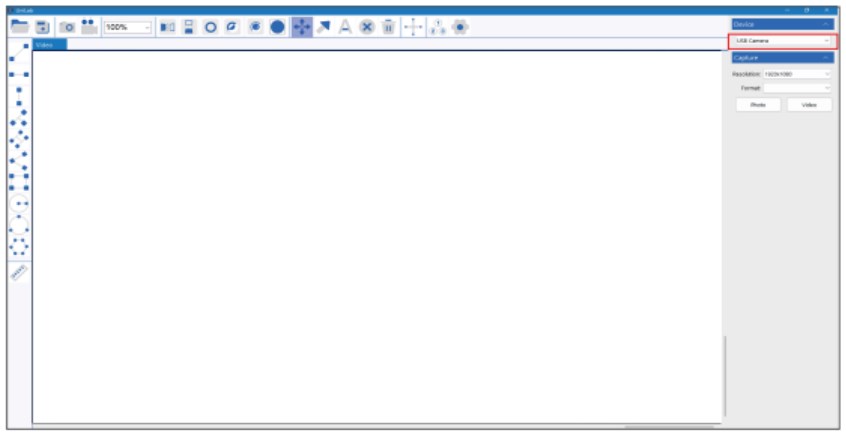
Work with Mac/iMac
* The device camera button cannot be used, it can only be realized through software Photo recording function
Software download
For Mac OS x 10.5 or higher system, use the default software “Photo Boothlas shown in” ®”)
Operating steps
Step 1 With the microscope turned off, connect the micro-scope to the computer using a data cable.
Step 2 Turn on the microscope, run Photo Booth, you can see the image on the computer, and take photos and videos through Photo Booth

Product Parameters
| Project | Parameter |
| Picture Format | JPG |
| Picture Size | 1920’1080 |
| LED Quantity | 8 SMD 3528 bright white lights (brightness adjustable) |
| Focus Mode and Focus Range | Manual adjustment, 0 to 40 mm |
| Imaging Distance | 3mm to Infinity |
| Sensor Size | 1/4″ |
| Sensitivity | 4300mV/lux-sec |
| Video Recording Format | AVI |
| Video Resolution | 1920’1080 |
| Working Range | 0-10m (Open scene. Sheltered scene will affect working range) |
| Working Hours | 1.5h |
| Power Supply Mode | 700mAh |
| Charging Requirements | DC-5V-1A |
| Charging Time | 1.5h |
| Working Current | -260mA |
| The Win Working Environment | Android 4.0 and above systems, ios 8.0 and above systems |
| PC Operating System | Windows xp, win 7, win 8, win10 , Mac 0Sx10.5 or higher |
Troubleshoot the Microscope
| Problem Phenomenon | Cause | Processing Method |
| The device heats up during charging | During the chorging process.the current is large and the battery heat is high,which is a normal phenomenon | The normal state |
| The APP is disconnected | (1.) The distance is too for(4 The device is powered off(3) Equipment failure | W Close distance repeat connection (29 Charge the device and use it® Close the APP and restart the device before use |
| The device cannot be charged | CO The charging port is not securely inserted (2) No power is connected® Equipment failure | (1) Remove and reinsert the interface(2) Switch on the power |
| The lens shows blurred images | The ambient temperature changes rapidly, causing the lens to fog | Wait for the tempera-ture balance, a period of time after the fog disappeared to use |
| The product can not be shut down or the key failure | System halted | Please plug in the power supply to reset and restart |
(Note: It is normal for the APP to exit after being plugged in.)