![]() TOYOTA TUNDRA DOUBLE CAB (2007-2021)
TOYOTA TUNDRA DOUBLE CAB (2007-2021)
FOOT RAILS / LOW PROFILE
FATT006
Contents
FATT006 Slimline II Roof Rack
START HERE!
READ ME FIRST
Don’t be a hero and muscle through this installation without reading these fitting instructions first! Improper installation of this gear may void certain aspects of your warranty.
Before you begin, take a moment and open all your Front Runner rack kit boxes and gather the assembly instructions for the various components.
A complete kit will contain:
1. A Front Runner Slimsport kit.
This document will guide you through the assembly of the mounting system and assist you in fitting the roof rack tray or load bars to your specific vehicle.
Please refer to the next page for a list of all the components, quantities and tools required. 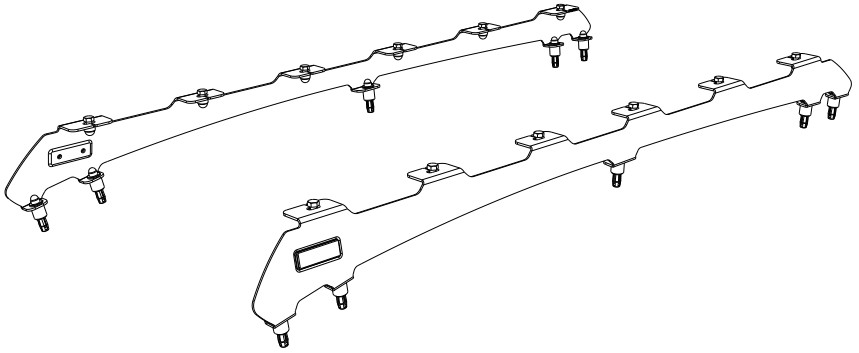 IMPORTANT WARNING!
IT IS CRITICAL THAT ALL FRONT RUNNER PRODUCTS BE PROPERLY AND SECURELY ASSEMBLED AND ATTACHED TO YOUR VEHICLE. IMPROPER ATTACHMENT COULD RESULT IN AN AUTOMOBILE ACCIDENT, AND COULD CAUSE SERIOUS BODILY INJURY OR DEATH. YOU ARE RESPONSIBLE FOR ASSEMBLING AND SECURING ALL FRONT RUNNER PRODUCTS TO YOUR VEHICLE, CHECKING THE ATTACHMENTS PRIOR TO USE, AND PERIODICALLY INSPECTING THE PRODUCTS FOR ADJUSTMENT, WEAR AND DAMAGE. THEREFORE, YOU MUST READ AND UNDERSTAND ALL OF THE INSTRUCTIONS AND PRECAUTIONS SUPPLIED WITH YOUR FRONT RUNNER PRODUCT PRIOR TO INSTALLATION OR USE. IF YOU DO NOT UNDERSTAND ALL OF THE INSTRUCTIONS AND CAUTIONS, OR IF YOU HAVE NO MECHANICAL EXPERIENCE AND ARE NOT THOROUGHLY FAMILIAR WITH THE INSTALLATION PROCEDURES, YOU SHOULD HAVE THE PRODUCT INSTALLED BY A PROFESSIONAL INSTALLER OR OTHER QUALIFIED PERSONNEL.
NOTE: Front Runner will not be responsible for any damage caused by the failure to install the product according to these instructions. Please call us if you have any questions about the installation of this product.
CHECK ONLINE FOR LATEST FITMENT GUIDE
WWW.FRONTRUNNEROUTFITTERS.COM
GET ORGANIZED
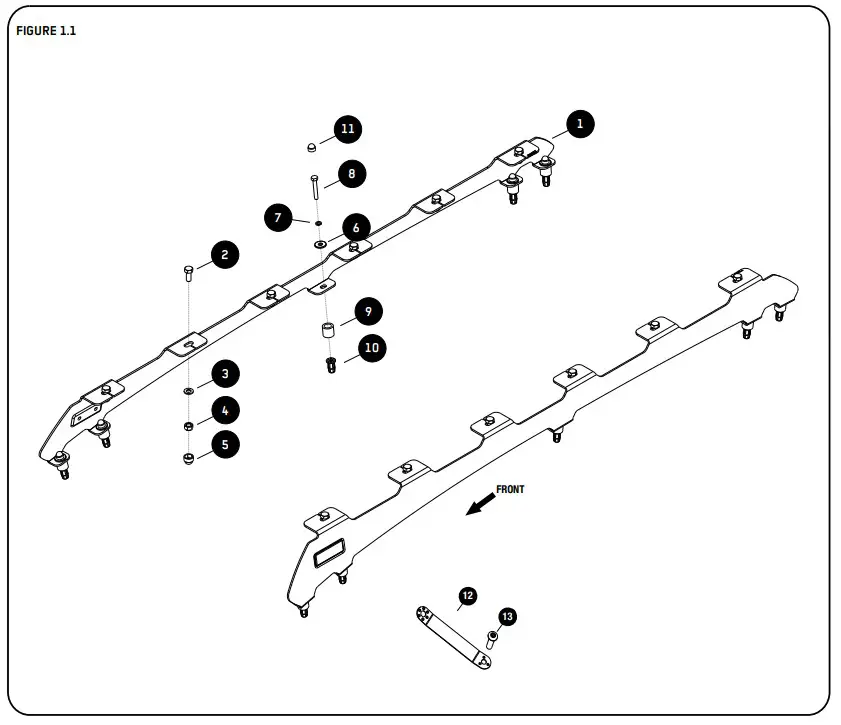
IN THE BOX
| 1 | 2 X | Foot Rail 1LH + 1RH |
| 2 | 12 X | M8 x 20 Hex Head Bolt |
| 3 | 12 X | M8 x 16 x 1.6 Flat Washer |
| 4 | 12 X | M8 Nyloc Nut |
| 5 | 12 X | M8 Nut Cap |
| 6 | 10 X | M6 x 20 x 2 Flat Washer |
| 7 | 10 X | M6 Spring Washer |
| 8 | 10 X | M6 x 40 Hex Head Bolt |
| 9 | 10 X | Aluminium Spacer 19 x 12.5 x 18 |
| 10 | 11 X | M6 Jack Nut Large |
| 11 | 10 X | M6 Nut Cap |
| 12 | 1 X | Jack Nut Tool |
| 13 | 1 X | M6 x 35 Button Head Bolt |
TOOLS NEEDED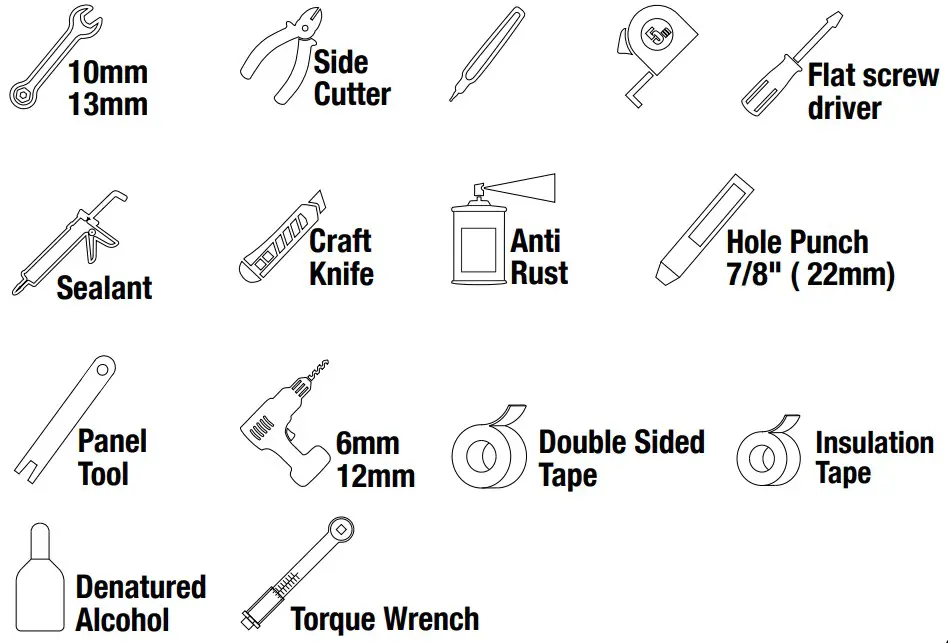
FIT AND SECURE
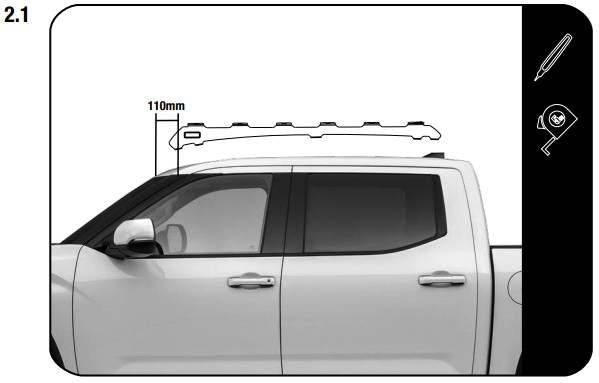
![]() Starting at the top edge of the vehicle’s windscreen, measure and mark the dimensions as shown onto each of the ditch trim pieces.
Starting at the top edge of the vehicle’s windscreen, measure and mark the dimensions as shown onto each of the ditch trim pieces.
Place the foot rail on to the vehicle’s roof, lining up the front slot center with the mark you made earlier and mark the centre of the remaining four slots.
Repeat this step with the opposite side.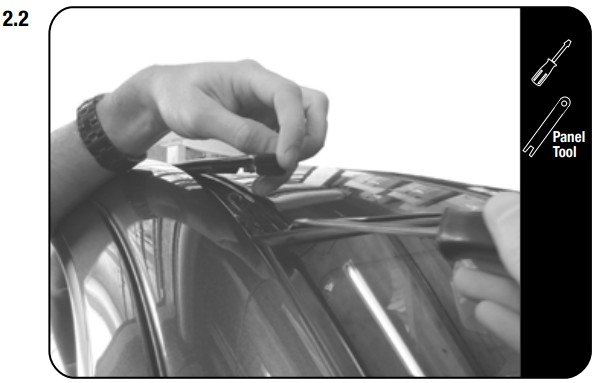
![]() Using a panel tool or flat screw driver start from the front of the vehicle, lift and remove the two ditch moldings running along either side of the roof.
Using a panel tool or flat screw driver start from the front of the vehicle, lift and remove the two ditch moldings running along either side of the roof.
Repeat this process on both the LH / RH ditch moldings.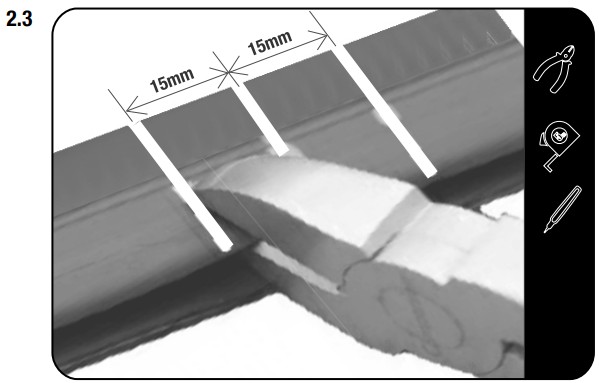
![]() You need to remove sections from the underside of the ditch molding – so you need to transfer the hole centers to the underside of the molding. Mark a line 15mm either side of the center lines marked in step 2.1.
You need to remove sections from the underside of the ditch molding – so you need to transfer the hole centers to the underside of the molding. Mark a line 15mm either side of the center lines marked in step 2.1.
Using a pair of side cutters and a utility knife, remove the marked section of the ditch molding as shown in Step 2.3 through to Step 2.5. 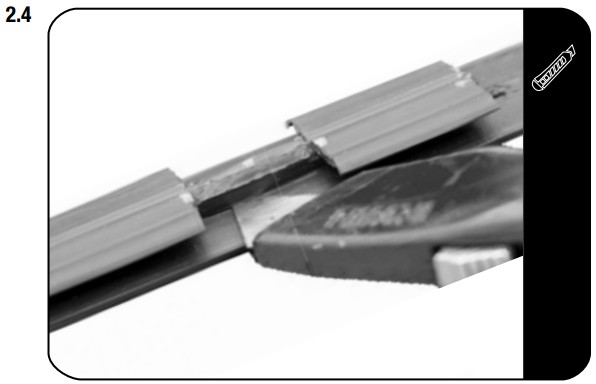
![]() Refer to Step 2.3.
Refer to Step 2.3.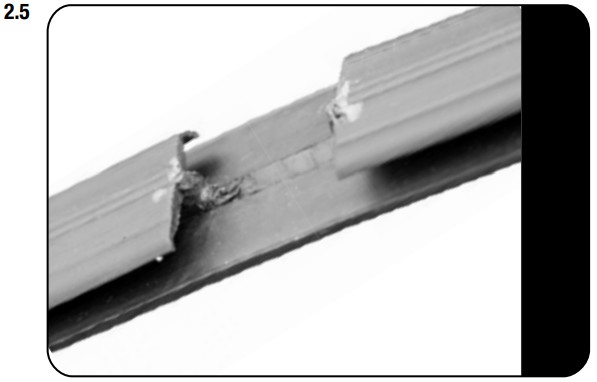
![]() Refer to Step 2.3.
Refer to Step 2.3.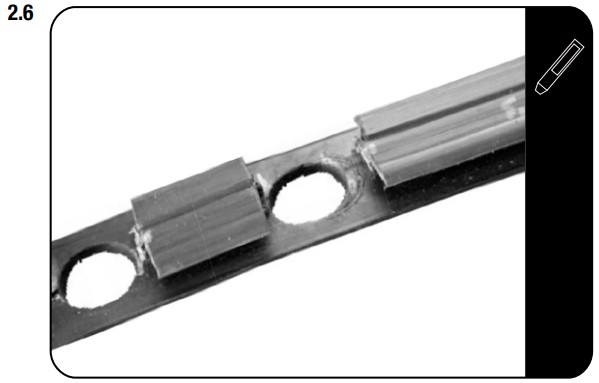
![]() Drill a pilot hole from above using your original marked holes – then open the holes to 22mm using a punch, step drill or hole saw
Drill a pilot hole from above using your original marked holes – then open the holes to 22mm using a punch, step drill or hole saw 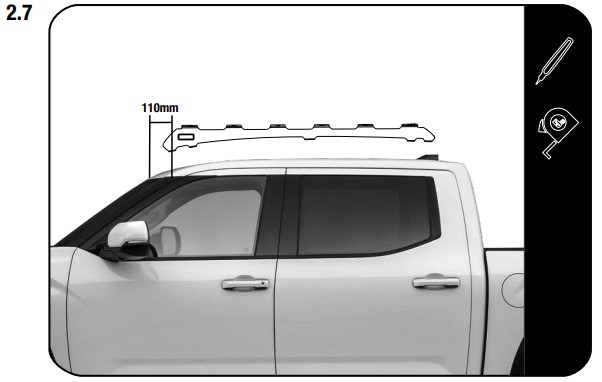
![]() Starting at the top edge of the vehicle’s windscreen, measure and mark the dimensions as shown onto each of the ditch centers.
Starting at the top edge of the vehicle’s windscreen, measure and mark the dimensions as shown onto each of the ditch centers.
Place the foot rail on the vehicle’s roof lining up the front slot center with the mark you made earlier and mark the centre of the remaining four slots.
Repeat this step with the opposite side.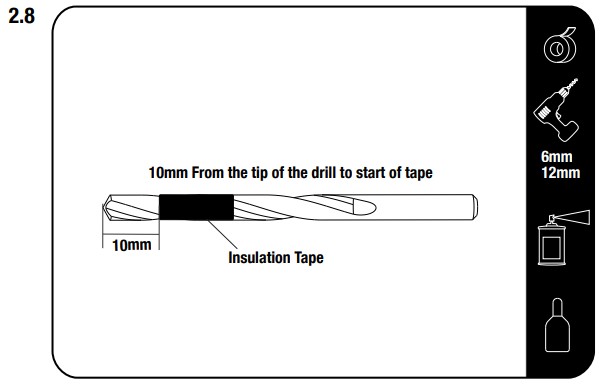 TIP:
TIP:
Place tape around the drill to mark a depth of 10mm, take care as there are airbags and canisters below.
![]() Drill the holes you marked, starting with a 6mm pilot hole before opening to a 12mm hole. There is no need for a lot of downward pressure. Let the drill do the work.
Drill the holes you marked, starting with a 6mm pilot hole before opening to a 12mm hole. There is no need for a lot of downward pressure. Let the drill do the work.
Clean the area around the holes drilled using a rag and denatured alcohol. Apply anti-rust around all the holes. 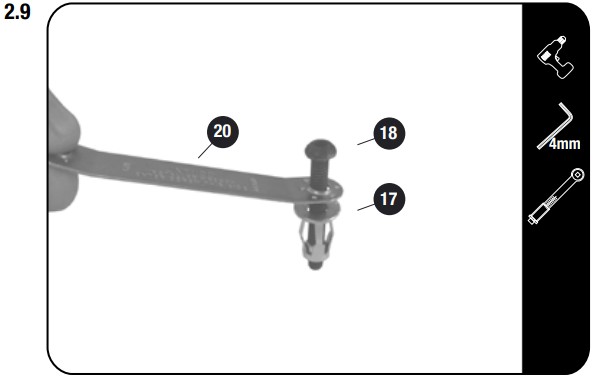
![]() Insert a M6 x 35 Button Head Bolt (Item 13) into the Jack Nut Tool (Item 12) and loosely fit a Jack Nut (Item 10) to the button head bolt as shown.
Insert a M6 x 35 Button Head Bolt (Item 13) into the Jack Nut Tool (Item 12) and loosely fit a Jack Nut (Item 10) to the button head bolt as shown.
Using the Jack Nut Tool and a M6 x 35 button head bolt, set the M6 jack nut into both the holes, opened in step 2.8.
Using a cordless driver and a 4mm allen cordless bit, set the jack nut into the hole while holding the Jack Nut Tool, to prevent the Jack Nut from turning. 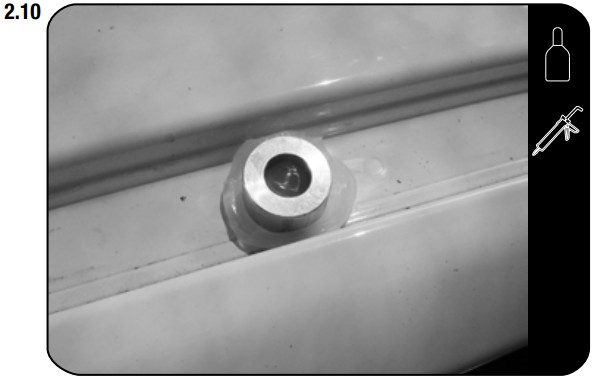
![]() Clear the area around each mounting point in the ditch using a rag and denatured alcohol.
Clear the area around each mounting point in the ditch using a rag and denatured alcohol.
Refit the ditch trim using double sided tape (Not Supplied).
Place a small amount of silicone over each mounting point, followed by the aluminium spacers as shown (Item 9).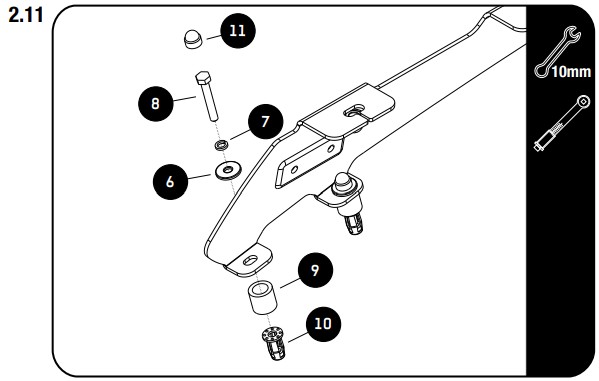 Tightening Torque:
M6 : 8-10Nm / 5.9 ft lb – 7.38 ft lb
![]() Place a bead of silicone down the threads of each bolt before inserting (Item 6).
Place a bead of silicone down the threads of each bolt before inserting (Item 6).
Place the Foot Rail (Item 1) onto the Spacers (Item 9), aligning the holes in the base of the Foot Rail with the center of each Spacer.
Secure the Foot Rail to the vehicle using M6 x 40 Hex Head Bolts, M6 Spring Washers and M6 x 20 x 2 Flat Washers (Items 6, 7 & 8).
Place M6 Nut Caps (Item 11) over all Nyloc Nuts.
FIT AND SECURE
3.1 Refer to RRSTUNI when assembling your Slimline II Tray. 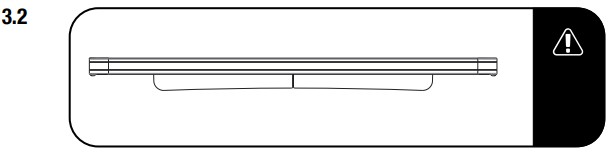 Make sure that the wind deflector is installed before you proceed to the next step.
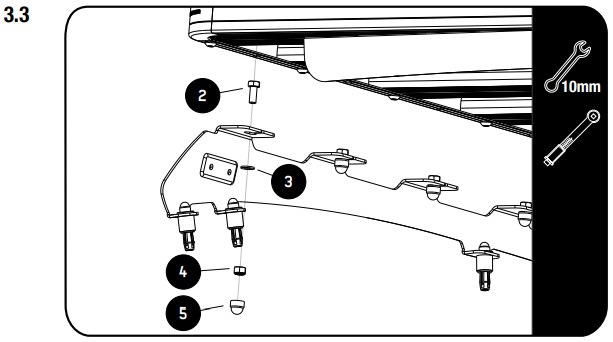
![]() Fit your roof rack to the Foot Rails using M8 x 20 Hex Bolts, M8 x 16 x 1.6 Flat Washers and M8 Nyloc Nuts (Items 2, 3 & 4) as shown.
Fit your roof rack to the Foot Rails using M8 x 20 Hex Bolts, M8 x 16 x 1.6 Flat Washers and M8 Nyloc Nuts (Items 2, 3 & 4) as shown.
3.4  Center the rack and fully tighten. Use M8 Nut Caps (Items 5) to finish off the nuts.
COMPLETION
4.1  Congratulations! You did it. Take a step back and admire your work!
INSTALL OTHER VEHICLE AND RACK ACCESSORIES
Now’s the time to visit your favorite Front Runner dealer in person or online.
IMPORTANT!
FRONT RUNNER RACK KITS OFTEN HAVE A HIGHER LOAD RATING THAN THE VEHICLES THEY ARE MOUNTED TO. PLEASE REFER TO YOUR SPECIFIC VEHICLE MANUFACTURER FOR A RECOMMENDED ROOF RATING. FRONT RUNNER CANNOT BE RESPONSIBLE FOR IMPROPER LOADING BEYOND THE VEHICLE MANUFACTURER’S STATED LOAD CAPACITY.
Be sure to tag us. We love to see our gear in action! #FrontRunnerOutfitters #BornToRoam Share your adventures on: 
![]() FATT006_REV_A00
FATT006_REV_A00
© 2021 FRONT RUNNER VEHICLE OUTFITTERS