![]() 36X72 Inch Outdoor Panels Screws
36X72 Inch Outdoor Panels Screws
Instruction Manual
Contents
BEFORE YOU BEGIN
- Read these instructions carefully through to the end.
- See our full, detailed Installation Instructions for mounting frames, mounting styles, frame construction, and panel preparation at design-vu.com/installation.
- Following best building practices for installing DESIGN-VU Decorative Modular Panels in accordance with their intended purpose – installed on a vertical plane, as on a wall or fence – to stay within warranty and avoid panel damage. Check with authorities about building codes/standards that may apply to your project.
- Make sure the supporting structure is strong enough to support the additional weight and wind load of the panel(s). See panel weights and other specs at design-vu.com/patterns.
SCREWS
- Our specially designed screws, with ¾” heads, securely attach 36″ x 72″ DESIGN-VU poly panels and allow for temperature- related expansion.
- For use on a timber frame or fence.
-
If desired, paint screw heads before use.
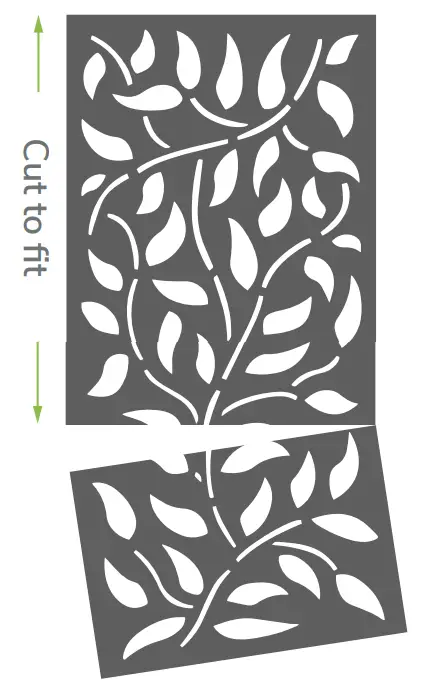
PANEL FITTING![]()
If necessary, cut panels to fit your installation using a circular, table, or jig saw with a blade for cutting wood.
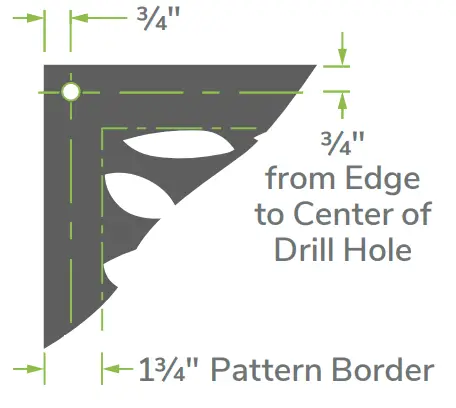
PRE-DRILL ALL PANELS![]()
DRILL-HOLE SIZE Drill ⁷⁄₁₆”∅ holes to allow panels to expand and contract.

DRILL-HOLE Position
Position center of drill holes ¾” from panel edges.
DRILL-HOLE SPACING
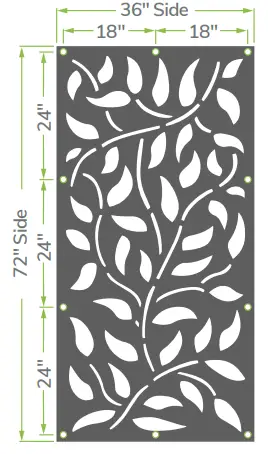
Space drill holes on all four sides of each panel:
- Every 18″ on 36″ side
- Every 24″ on 72″ side
ATTACH PANELS
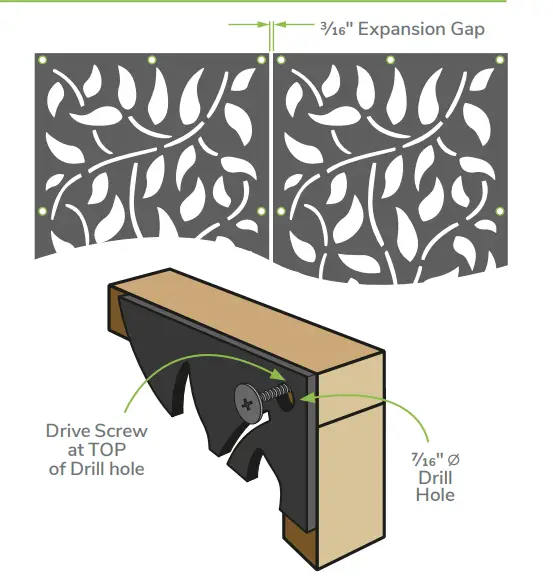
- Where multiple panels adjoin horizontally and vertically, leave a ³⁄₁₆” gap to allow for panel expansion. Use ³⁄₁₆” spacers between panel edges.
- IMPORTANT: Insert and drive each screw at the TOP of the ⁷⁄₁₆” hole (not in the center) to facilitate panel expansion.
- To avoid damaging panels and to allow for temperature-related expansion, do not overtighten screws. Screws should be loose enough to allow panel movement.
- Check that panels move within the drill holes freely by lifting them up by hand.
- If panels don’t move easily, loosen screws that cause restriction in movement or reposition them so they are at the top of each ⁷⁄₁₆” hole.
- Panels could buckle in hot weather if screws are not attached at the TOP of the drill hole or are driven in too tightly.
![]() MADE IN CHINA
MADE IN CHINA
Distributed by OUTDECO USA
2045 Corte Del Nogal, Carlsbad, CA 92011
©2022 OUTDECO USA. All rights reserved.