![]() Assembly instructions for Azalea Assist (Not Tall)
Assembly instructions for Azalea Assist (Not Tall)
MED3053
Contents
MED3053 Azalea Assist
- Remove wheels on both sides.

- Check that the stop pin is as shown in the picture above, and that no anti-tip devices are fitted to the E-drive unit. Remember to use original anti-tip devices.

- Assembly the plate (right side) according to picture. For mounting on one side, the following must be included.
| Item No. | Part Number | Qty | Description |
| 1 | MED2000 | 1 | Bracket |
| 2 | XSM8BR | 1 | Plain Washer M8 |
| 3 | XSM8ML | 1 | Locknut M8 |
| 4 | XSM8X25 | 1 | Screw M8 x 25 |
| 5 | 100 400 017 | 1 | Spacer |
| 6 | HW069 | 1 | Hubsleever M16x1/12,7 |
| 7 | 405239 | 1 | Nordlock Washer M16 |
| 8 | XSM16FJ | 1 | Single Coil Washer M16 |
| 9 | XSM16M | 1 | Nut M16X1 Low |
| 10 | XSM12ML | 2 | Locknut M12 |
| 11 | XSM12BR | 2 | Washer Plain M12 |
| 12 | XSFM12X60 | 2 | Screw Countersunk M12 x 60 |
| 13 | MED1383R | 1 | Bracket(R=Right, L=Left) |
There are two options to assemble the bracket.

Mounting the Joystick

- Loosen the screws and place the bracket so that it is clamped between the plates, assemble, and tighten the new screws in the slot.
| Item No. | Part number | Qty | Description |
| 1 | MED1662 | 1 | Bracket Azalea Left |
| 2 | XOC-48160-B0 | 1 | SwingAway Bracket |
| 3 | XSM6X16 | 2 | Screw rounded M6 x 16 |
| 4 | XSM6ML | 2 | Lock nut M6 |
| 5 | XSM6BR | 2 | Plain washer M6 |
| 6 | XSM4X20 | 2 | Screw rounded M4 x 20 |
| 7 | XSM4BR | 2 | Plain Washer M4 |
MED1414R
Mounting the Joystick

- Loosen the screws and place the bracket so that it is clamped between the plates, assemble, and tighten the new screws in the slot.
Item No. Part number Qty Description 1 MED1661 1 Bracket Azalea Right 2 XOC-48160-B0 1 SwingAway Bracket 3 XSM6X16 2 Screw rounded M6 x 16 4 XSM6ML 2 Lock nut M6 5 XSM6BR 2 Plain washer M6 6 XSM4X20 2 Screw rounded M4 x 20 7 XSM4BR 2 Plain Washer M4 Mounting of Joystick with parallel arm
MED1647 right. MED1648 left.
- Loosen the screws and place the bracket so that it is clamped between the plates, assemble, and tighten the new screws in the slot.
Item No. Part number Qty Description 1 MED1661 1 Bracket Azalea Right 2 X0F-48160-D00 1 Upper bracket paralell 3 XSM6X16 2 Screw rounded M6 x 16 4 XSM6ML 2 Lock nut M6 5 XSM6BR 2 Plain washer M6 6 XSM4X20 2 Screw rounded M4 x 20 7 XSM4BR 2 Plain Washer M4 MED1356
Attendant control with Joystick controller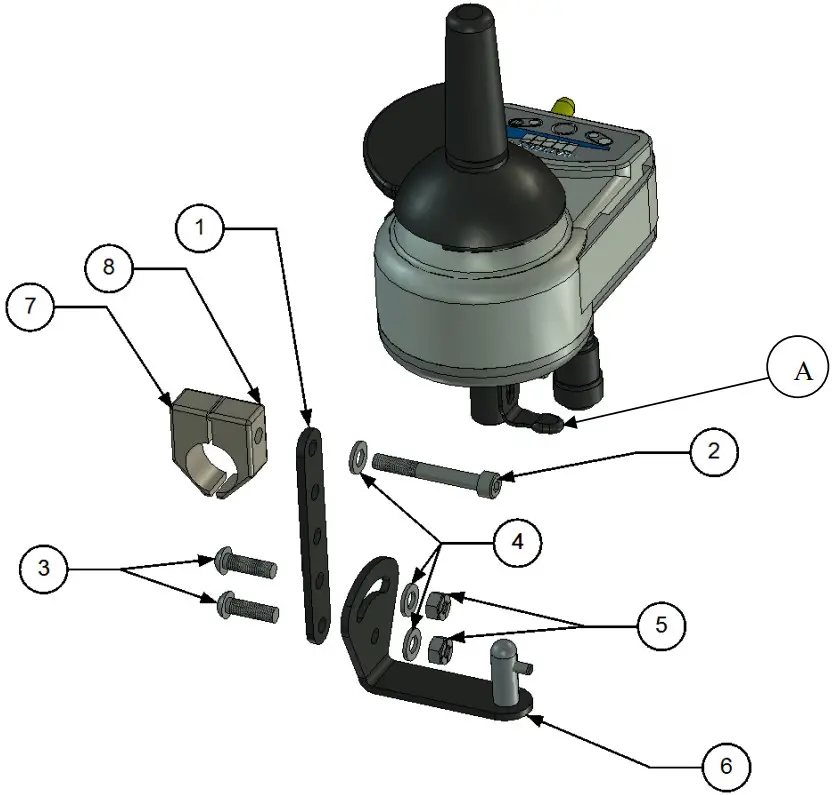
Item No. Part Number Qty Description 1 MED1317 1 Bracket 2 XSM6X35 1 Screw M6 x 35 3 XSM6X16 2 Screw M6 x 16 4 XSM6BR 3 Plain Washer M6 5 XSM6ML 2 Locknut M6 6 MED1316 1 Plate with pin 7 XA2-2612K-00 1 Clamp with thread 8 XA2-2612E-00 1 Clamp with hole - Assemble the Attendant control with the Joystick control on any side. If you change side you must move (A) to the other side.
MED1226
Attendant control with attendant controller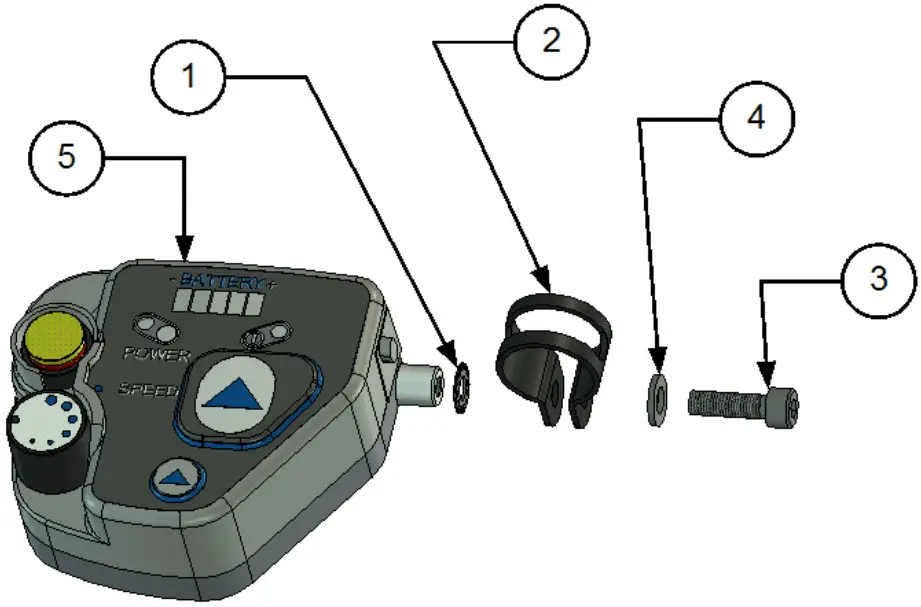
- For the attendant control unit, you need these parts.
Item No Part Number Qty Description 1 XSM6BRTG 1 Torn washer 2 X-Klamma2 1 Clamp 22 mm 3 XSM6X20 1 Screw M6 x 20 4 XSM6BR 1 Plain Washer 5 MED1200 1 Assist control
MED1643
The attendant control is also possible to mount on the left side. For this you need MED1643 which is ordered separately.

Use either a bolt with position 4 or 5 depending on which clamp is mounted on the chair’s handle tube. The shorter one fits the sheet metal clip and the threaded aluminum clip, the longer aluminum clip without threads.
- For installation attendant control, the following must be included.
Item No. Part number Qty Description 1 XSM6M 1 Lock nut M6 2 XSM6BR 1 Plain washer M6 3 XSM6BRTG 2 Serrated lock washer M6 4 MED1640 1 Bracket attendant control left side 5 MC6SM6X60 1 Bolt M6x60 6 MC6SM6X35 1 Bolt M6x35 7 MC6SM6X16 1 Bolt M6x16 - Assemble the back placed battery bag.

- Assemble the extended brake parts.
Item No. Part Number Qty Description 1 MC6SM5X35 1 Screw Socket M5 x 35 2 100 400 018 1 Spacer - Assemble the back placed battery bag.
Unless otherwise specified, use the following tightening torque.
Metric coarse threads, steel.
| Thread | Tightening torque |
| M3 | 1,2 Nm |
| M4 | 3 Nm |
| M5 | 6 Nm |
| M6 | 10 Nm |
| M8 | 25 Nm |
| M10 | 50 Nm |
| M12 | 85 Nm |
Sleeve.
| Thread | Tightening torque |
| M16x1 | 30 Nm |
| M18x1 | 40 Nm |
2023-02-24