![]() WIRELESS KEYPAD
WIRELESS KEYPAD
WKE301
QUICK INSTALLATION GUIDE
Contents
WKE301 Wireless Keypad
DAEWOO SECURITY Alarm system accessories
PRODUCT DESCRIPTION
This product is a wireless touch keypad that arms and disarms your security system with a passcode or RFID tag. It is connected to your alarm hub via the eV1527 protocol, with an effective communication range of up to 80 meters without obstacles. The internal lithium-ion rechargeable battery provides power operation up to 3 months.
SPECIFICATION
- Power supply : Micro USB+5VDC/1000mA
- Backup Battery: 3.7V, 500mAh Lithium-ion Battery
- Consumption: <15uA@sleep and <15mA@ready
- Radio Frequency: 433Mhz
- RFID Chip: 4100/4200
- RFID Frequency: 125KHz
- Operation Temperature: -10~55°C
IN THE BOX
- Keypad x1
- Mounting Screws x2
- User Guide x1
- USB Cable x1
- RFID tag x2
AT A GLANDE

| 1. RFID tag reader zone 2. Power / Ready indicator 3. Away / Home arming indicator 4. Disarming indicator 5. Setting indicator 6. Away arming button 7. Dismarming button 8. Home arming button |
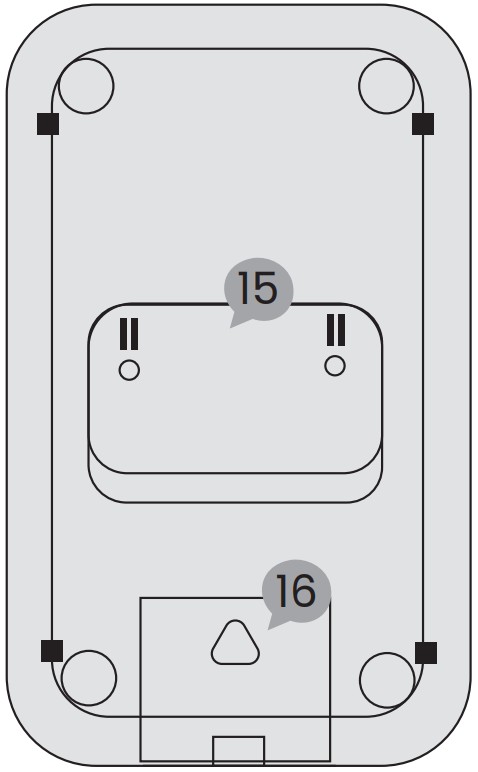
9. Doorbell button 10. Clear / Return button 11. Check / Set / Continue button 12. Tamper Switch 13. Battery on / off switch 14. Power / Charging port 15. Bracket 16. Back cover |
POWER / READY INDICATOR
| What you see | What it means |
| Blinking red | Battery failure of battery switch is off |
| Flashing red once per 2s | Low battery |
| Solid red | Ready |
| Breathing green | Charging |
| Solid green | Charged fully |
CHARGING THE BATTERY
Push the battery switch to on. Connect your keypad to a power outlet using the included cable and USB power adapter.
It takes two to three hours to charge the keypad battery fully from an empty state. The power indicator turning from breathing green to solid green means that the battery is fully charged.
If the keypad is low battery, the power indicator may flash red once per 2 seconds, indicating that it needs to charge.
INSTALLATION OF YOUR KEYPAD
After having correctly installed your AM301 central to your Daewoo Home Connect control app, you can add your wireless keypad WKE301.
- Click on “add an accessory + ” from the page of your AM301 central.
- Select the “Keypad” tab.
- Turn on your WKE301 keypad.
- Enter the user code (1234) then press the Arm icon.
- Install your keyboard in your home :
– Secure the bracket to the surface with the screws provided.
– Insert the keyboard into the bracket.
It is not recommended to mount the keypad on metal surfaces as the material may block RF signals between the keypad and the control panel.
ABOUT KEYPAD
- Sleep / Wake mode
To save the battery power, the keypad goes to sleep without operation within 20 seconds.
Touch any button to wake the keypad. - User and Admin Passcode
The keypad has two 4-digit passcodes.
The user passcode is used to arm, home arm and disarm your security system, the admin passcode can be used to pair, delete RFID tags and change passcodes.
The default user passcode is “1234” and admin passcode is “8888”.
PROGRAMMING
- Basic programming steps
STEP 1 – Enter admin passcode then √, the setting indicator lighting on means that programming mode is ready.
STEP 2 – Input number to select functions:
| 1 | Pair RFID Tag |
| 2 | Delete RFID Tag |
| 3 | Delete All RFID Tags |
| 0 | Set User Passcode |
| 9 | Set Admin Passcode then √, the setting indicator blinks. |
STEP 3 – Enter setting then √, the buzzer beeps twice.
LAST STEP – Press![]() then √ to exit programming.
then √ to exit programming.
PAIRING RFID TAG
The RFID tags supplied with this kit are paired with keypad. IF NOT or you want to pair more, you might easily pair the tag with your keypad as following.

Tips: up to 10 RFID tags can be added.
STEP 1 – Enter admin passcode ( 8888 default ) then √.
STEP 2 – Press 1 then √.
STEP 3 – Enter a digit from 0 to 9 to designate a unique number for the tag to be paired, then √, the arming, disarming and setting indicators blinks together.
STEP 4 – Tap the tag on the read zone, the keypad gives two beeps of successful indication.
TEST : Press then swipe your RFID tag on the keypad to arm the system
DELETING RFID TAG
STEP 1 – Enter admin passcode then √.
STEP 2 – Press 2 then √.
STEP 3 – Enter the tag number from 0 to 9 to be deleted, then √.
DELETING ALL RFID TAGS
STEP 1 – Enter admin passcode then √.
STEP 2 – Press 3 then √ to delete all RFID tags.
DELETING ALL RFID TAGS
STEP 1 – Enter admin passcode then √.
STEP 2 – Press 3 then √ to delete all RFID tags.
SETTING ADMIN PASSCODE
STEP 1 – Enter admin passcode then √.
STEP 2 – Press 9 then √.
STEP 3 – Enter the new 4-digit user passcode, then √.
The default user password is “1234”.
The administrator password is “8888”.
DOORBELL
![]() The doorbell identification number in transmission code to the hub is different from the arming/disarming id number, so It is necessary to pair doorbell code with your hub before using doorbell. Do like the followings: Fix the bracket to the surface with included screws. Insert the keypad into the bracket.
The doorbell identification number in transmission code to the hub is different from the arming/disarming id number, so It is necessary to pair doorbell code with your hub before using doorbell. Do like the followings: Fix the bracket to the surface with included screws. Insert the keypad into the bracket.
STEP 1 – Set your hub into pairing/sniffer mode.
STEP 2 – Enter user passcode then press![]() to send arming transmission signal to bub.
to send arming transmission signal to bub.
STEP 3 – The hub gives the successful indication.
Now the doorbell function can be used.
The default user password is “1234”.
The administrator password is “8888”.
ARMING / DISARMING YOUR SYSTEM
- Using User Passcode
Enter user passcode then press to away arm.
Enter user passcode then press to disarm.
Enter user passcode then press to home arm.
 - Using RFID Tag
Press then tap the RFID tag to away arm.
Press then tap the RFID tag to disarm.
Press then tap the RFID tag to home arm.
RESET
This process resets your keypad to factory settings and removes all RFID tags.
Press and release tamper switch found underneath the bracket ten times, then all indicators are on, then the keypad restarts.
STANDARS
This product bears the selective sorting symbol for waste electrical and electronic equipment (WEEE). This means that this product must be handled pursuant to European Directive 2012/19/EU in order to be recycled or dismantled to minimize its impact on the environment. For further information, please contact your local or regional authorities. Electronic products not included in the selective sorting process are potentially dangerous of hazardous substances.
In compliance with European Laws. This product is in the essential requierements and other relevant provisions of Directive 2014/53/EU ( RED ) substances
This product was designed and manufactured in compliance with Directive 2011/65/EU of the European Parliament and of the Council on the restriction of use of certain hazardous substances in electrical and electronic equipement ( RoHS Directive – RoHS ) and is deemed to comply with the maximum concentration values set by the European Technical Adaptation Committee ( TAC )
Manufactured in China