![]() WH-210
WH-210
User Manual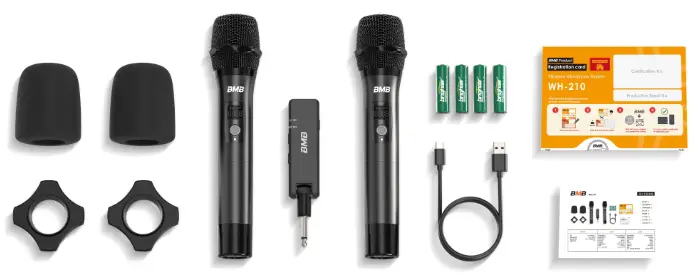
Contents
WH-210 Wireless Microphone System
- Receiver x 1
- Wireless Transmitter x 2
- USB Cable x 1
- Foam Cover x 2
- Anti-slip Rings x 2
- AA Batteries X 4
- User Registration Card x 1
- User Manual x 1
| SYSTEM SPECIFICATIONS | RECEIVER | TRANSMITTER | |||
| Type Frequency Response Working Distance Thd+n Normal Frequency Range THA/TWN Frequency Range US Frequency Range |
UHF 50Hz-15KHz 50m(LOS) <1% 640-690MHz 748-758MHz 902-928MHz |
Oscillation Frequency Channel Selection Frequency Stability Display Power Supply Audio Output Interface Weight Size |
PLL Digital Frequency Automatic 30ppm Indicator Lamp DC 5V≥1A 6.35mm 100g 150 × 32 × 26mm |
Oscillation Frequency Channel Selection Frequency Stability Core Sensitivity Display Power Supply Weight Size |
PLL Digital Frequency Automatic 30ppm Dynamic -54dB LED 2 × AA Batteries 255g 245 × 36 × 54mm |
This device complies with Part 15 of the FCC Rules. Operation is subject to the following two conditions:
- this device may not cause harmful interference, and
- this device must accept any interference received, including interference that may cause undesired operation
NOTE: This equipment has been tested and found to comply with the limits for a Class B digital device, pursuant to Part 15 of the FCC Rules. These limits are designed to provide reasonable protection against harmful interference in a residential installation. This equipment generates, uses and can radiate radio frequency energy and, if not installed and used in accordance with the instructions, may cause harmful interference to radio communications. However, there is no guarantee that interference will not occur in a particular installation.
If this equipment does cause harmful interference to radio or television reception, which can be determined by turning the equipment off and on, the user is encouraged to try to correct the interference by one or more of the following measures:
- Reorient or relocate the receiving antenna.
- Increase the separation between the equipment and receiver.
- Connect the equipment into an outlet on a circuit different from that to which the receiver is connected.
- Consult the dealer or an experienced radio/TV technician for help.
Warning: changes or modifications not expressly approved by the party responsible for compliance could void the user’s authority to operate the equipment
The devices has been evaluated to meet general RF exposure requirement, the device can be used in portable exposure condition without restriction
RECEIVER USE THE OPERATING STEPS
- Power On
Press the power-on button for 2s to turn on/off the receiver. - Volume adjustment
Under the receiver on, click on the “volume +”Button, the volume increase, Simultaneously working indicator light flash; Click on the “volume -” Button, the volume decrease, at the same time working indicator light flash., after the adjustment to the maximum/minimum volume, click again according to the volume buttons, work lights flash three times. The working lights flashes three times to indicate that the volume has reached the maximum/minimum value.
TRANSMITTER USE THE OPERATING STEPS
- Power On
Long press power button 2s, realize the transmitter on/off the power. - Built-in FM
Press “FREQUANCY” buttons, can choose the required frequency.
SPECIAL STATEMENT
This product before delivery, the default matching, as a result, the user without additional matching operation before use. Such as individual matching failure condition, the pairing steps below for reference.
- Please close the transmitter and receiver.
- Unscrew transmitter the tail pipe, install the battery into the battery compartments of transmitter.
- Push the transmitter FM long shutdown state, don’t let go, press the power button at the same time, until the fast scintillation screen, and then synchronization loosen the button. (“FREQUENCY” Button and power button synchronous release).
- .Long press on the receiver power button, after 5 seconds, a green light flashing, press launch FM keypad. If receiver matching light is normally on after flashing, matching success.
- Close the transmitter, then tighten the emission tail pipe, pairing is complete.
MULTIPLE SETS OF EQUIPMENT DEVELOPMENT, ROUNDING OPERATION
Products support multiple sets of equipment used at the same time, please refer to the following operation instructions.
- When the power is on, unscrew the transmitter tailpipe and click the “FREQUANCY” button to switch the frequency.
- When the switching frequency to set all the transmitter respectively to different frequencies, in conditions allow, as far as possible frequency intervals, to ensure the transmitter noninterference at work (at the multiple sets of equipment used at the same time, if the two sets of transmitter in frequency at the same time, the transmitter will not work).
BMB International Japan www.bmb.com
 WARNING: The receiver output plug and sharp.
Receiver shaft parts, worry about clip hand;
![]()