![]() 50 913.6
50 913.6
Wall luminaire for indoor use
 Instructions for use
Contents
Application
Wall luminaire · Indoor luminaire with velvet black metal housing.
Luminaire with light source shielded to the front and metallic inside colour of the reflection surface.
Radial light emission 360°.
Product description
Wall luminaire “STUDIO LINE”
Aluminium luminaire housing, finish Colour velvet black inside hue matt copper
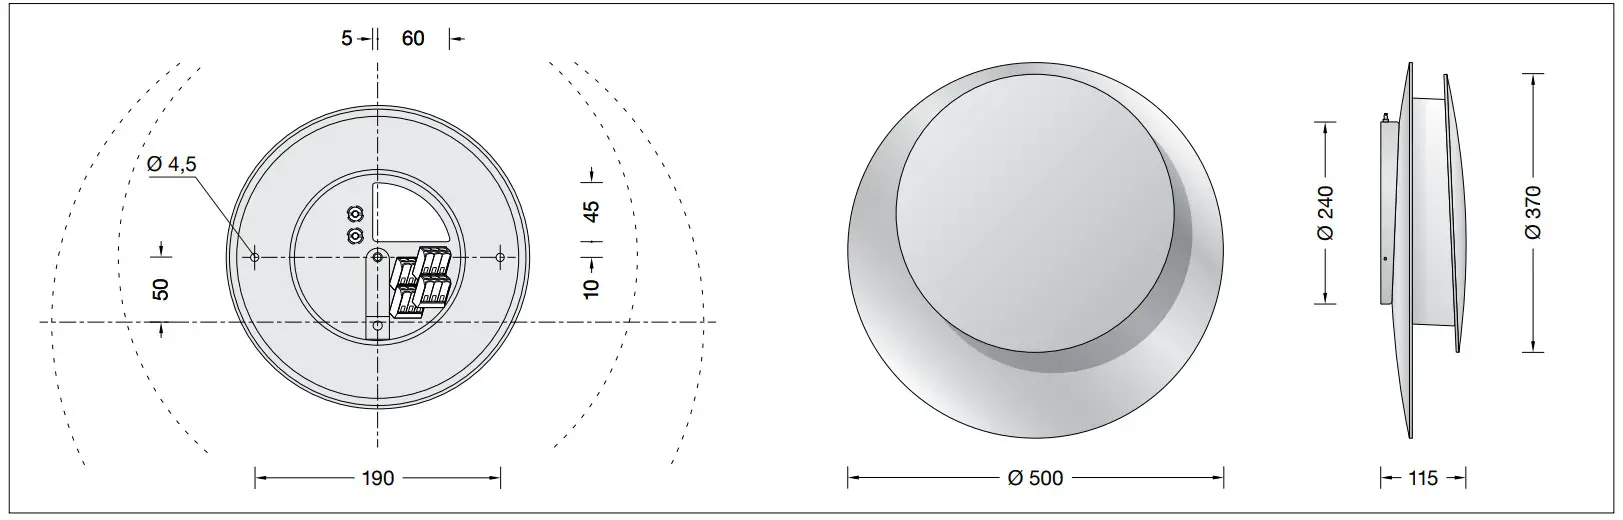
Synthetic cover, translucent white 2 mounting holes ø 4.5 mm
Distance apart 190 mm
1 cable entry for through-wiring for mains cable
Connecting terminals 2.5@
Earth conductor terminal 2-pole connection terminals for digital control
LED power supply unit
220-240 V x 0/50-60 Hz
DC 196-250 V
DALI-controllable
Basic insulation is provided between the mains
and control cables
BEGA Thermal Control®
Temporary thermal regulation to protect temperature-sensitive components without switching off the luminaire
Safety class I
 – Conformity mark
Weight: 4.5 kg
This product contains light sources of energy efficiency classes D
Safety
The installation and operation of this luminaire are subject to national safety regulations.
Installation and commissioning may only be carried out by a qualified electrician.
The manufacturer accepts no liability for damage caused by improper use or installation.
If subsequent modifications are made to the luminaire, the person responsible for these modifications shall be considered the manufacturer.
Overvoltage protection
The electronic components installed in the luminaire are protected against overvoltage in accordance with DIN EN 61547.
To achieve an additional protection against e. g. transients, etc. we recommend separate overvoltage protection components.
You can find them on our website at www.bega.com.
Lamp
| Module connected wattage | 23.1 W |
| Luminaire connected wattage | 25.8 W |
| Rated temperature | ta = 25 °C |
| Ambient temperature | ta max = 40 °C |
50 913.6 K3
| Module designation | LED-1174/930 |
| Colour temperature | 3000 K |
| Colour rendering index | CRI > 90 |
| Module luminous flux | 3655 lm |
| Luminaire luminous flux | 524 lm |
| Luminaire luminous efficiency | 20,3 lm / W |
Installation
LED are high-quality electronic components!
Please avoid touching the light output opening of the LED directly during installation or relamping.
Remove the mounting plate with LED unit from its packaging.
Loosen the knurled screw (slotted) and remove the ring made of synthetic material from the LED unit.
Pass the power connecting cable through the cable entry in the mounting plate.
Fasten the mounting plate with the supplied fastening material or other suitable fastening material to the installation surface.
Establish the earth conductor connection on the earthing screw (1) of the mounting plate.
Make the electrical connection to the terminals.
Observe the correct configuration of the connecting cable. Connect the live conductor to the brown wire (L) and the neutral conductor to the blue wire (N).
The two connecting terminals marked DA, DA are provided for digital control purposes.
If these terminals are not assigned, the luminaire will work with full light output.
Insert the ring made of synthetic material back into the LED unit and tighten the knurled screw (slotted).
Unpack luminaire housing and carefully guide it over the LED unit.
Position and align the luminaire housing on the mounting plate and tighten the locking screw on the side.
Cleaning & Maintenance
Clean luminaire regularly with solvent-free cleansers from dirt.
Replacing the LED module
Replacing the power supply unit
The designation of the LED module is noted on a label in the luminaire.
The light colour and light output of BEGA replacement modules correspond to those of the modules originally fitted. The replacement can be carried out by a qualified person using standard tools.
Disconnect the system from the power supply.
Loosen the locking screw on the side and lift the luminaire housing off the mounting plate.
Loosen the knurled screw (slotted) and remove the ring made of synthetic material from the LED unit.
Disconnect the earth conductor connection and the electrical connection to the terminal.
Loosen the mounting screws of the power supply unit, the round blank bracket and earthing screws (Torx).
Remove the pot with LED module. Install the replacement pot.
Please follow the installation instructions for the LED module.
Replace defective LED power supply unit.
Install in reverse order.
Spares
| Synthetic cover | 15 000 650 B2 |
| LED power supply unit | DEV-0305/500i |
| LED module 3000 K | LED-1174/930 |
| Round blank Ø 500 | 71 003 452 B16 |
| Round blank Ø 400 | 75 004 766 |
BEGA Gantenbrink-Leuchten KG · Postfach 31 60 · 58689 Menden · [email protected] · www.bega.com