![]()
![]() 50 685.6
50 685.6
Technical amendments reserved
Recessed ceiling downlight for indoor use
Instruction Manual
Contents
50 685.6 Recessed Ceiling Downlight for Indoor Use
 Instructions for use
Application
Recessed ceiling luminaire · indoor luminaire with symmetrical wide beam light distribution for connection to external LED power supply unit.
For flush-mounting installation in indoor suspended ceilings of 5-25 mm thickness.
Product description
Recessed ceiling luminaire downlight »STUDIO LINE« without power supply unit
Luminaire housing made of cast aluminium
The recessed housing is made of glass fibre reinforced synthetic material
Centre-plate made of rigid polystyrene foam
Trim ring, Colour velvet black
Reflector made of pure anodised aluminium
Inside hue matt copper
Recessed opening ø 142 mm
Required installation depth 105 mm
1 connecting cable with strain relief and plug
connector system for BEGA power supply unit, on/off or DALI
Safety class III ![]()
![]() – Conformity mark
– Conformity mark
Weight: 0.75 kg
This product contains light sources of energy efficiency class(es) E
Safety
The installation and operation of this luminaire are subject to national safety regulations.
Installation and commissioning may only be carried out by a qualified electrician.
The manufacturer accepts no liability for damage caused by improper use or installation.
If subsequent modifications are made to the luminaire, the person responsible for these modifications shall be considered the manufacturer.
Overvoltage protection
The electronic components installed in the luminaire are protected against overvoltage in accordance with DIN EN 61547.
To achieve an additional protection against e. g. transients, etc. we recommend separate overvoltage protection components.
You can find them on our website at www.bega.com.
Lamp
| Module connected wattage | 11.5 W |
| Luminaire connected wattage | 13.5 W |
| Rated temperature | ta = 25 °C |
| Ambient temperature | ta max = 45 °C |
50 685.6 K3
| Module designation | LED-0800/930 |
| Colour temperature | 3000 K |
| Colour rendering index | CRI > 90 |
| Module luminous flux | 1735 lm |
| Luminaire luminous flux | 1096 lm |
| Luminaire luminous efficiency | 81,2 lm / W |
Notice prior to installation:
Additional filler is required for the flush installation of the recessed housing in the suspended ceiling.
Installation
![]() Luminaire housing and external LED power supply unit must not be covered by any heat insulating materials.
Luminaire housing and external LED power supply unit must not be covered by any heat insulating materials.
A separate power supply unit is required to operate the luminaire.
For connection to external LED-power supply unit – accessory 13 144 or 13 169 – the luminaire is equipped with a 2-pin connector.
Note operating instructions of the LED-power supply units.
LED are high-quality electronic components!
Please avoid touching the light output opening of the LED directly during installation or relamping.
The recessed housing is fixed in the recessed opening by screwing it to the ceiling from below.
Installation in suspended ceilings:
A recessed opening of 142 mm with a minimum depth of 105 mm is required.
The lateral clearance between the recessed housing and parts of the building must be at least 50 mm.
Make the appropriate cutout in the suspended ceiling. The ceiling cutout must have an all-round chamfer of 45°, depending on the thickness of the ceiling panel.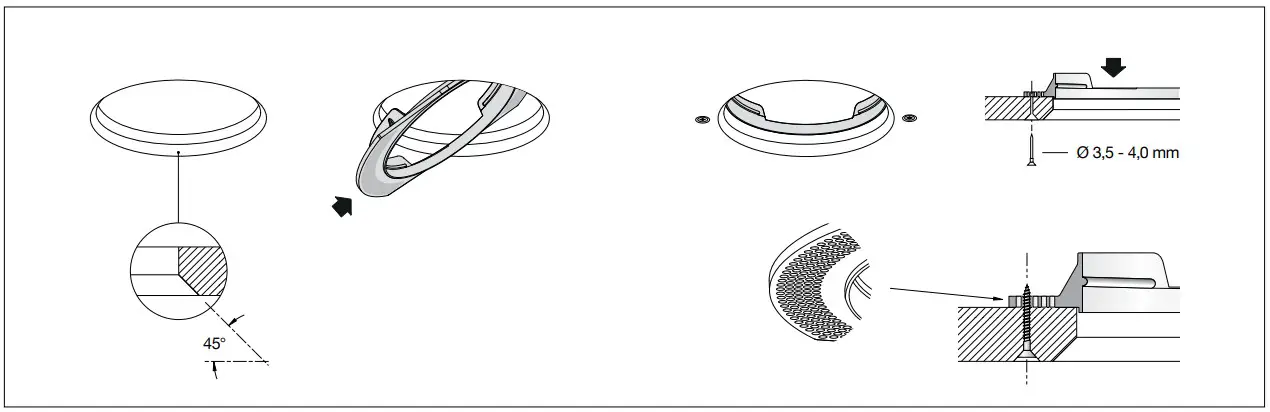 Remove the ceiling mounting plate by turning it upwards and out of the thread of the adjusting sleeve, move it through the ceiling cutout and place it on the suspended ceiling.
Secure the ceiling mounting plate with screws (Ø 3.5 to 4 mm) suitable for gypsum plasterboard panels from below through the suspended ceiling.
When doing so, hold the ceiling mounting plate through the ceiling cutout.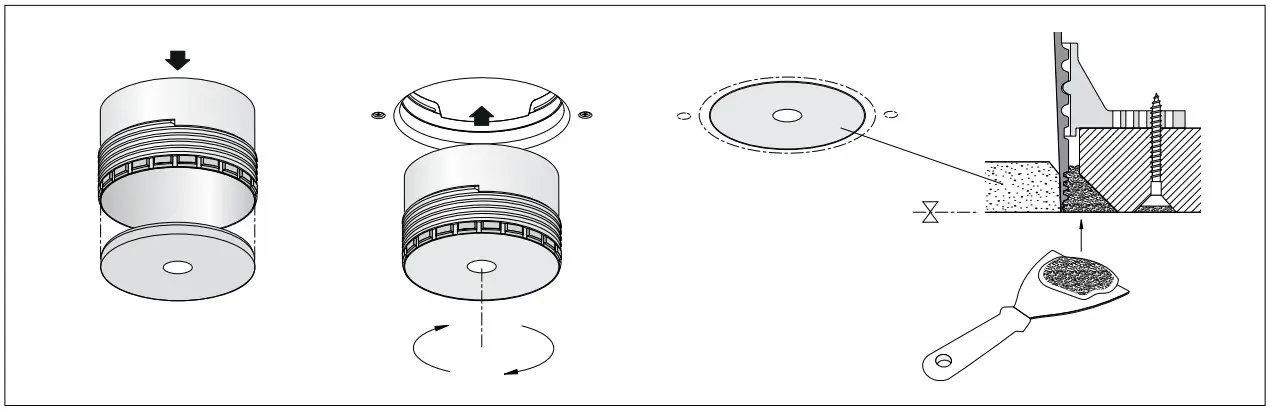 Turn the adjusting sleeve into the thread of the previously fitted ceiling mounting plate until it is exactly flush with the ceiling.
IMPORTANT:
Make sure to use this centre-plate in order to guarantee the correct installation of the luminaire in the ceiling!
Fill the 45° chamfer of the ceiling cutout with standard filler and smooth it so that it is flush. Allow the filler to set completely! Press the centre-plate about 5 mm upwards into the adjusting sleeve and then pull it down carefully to remove it from the adjusting sleeve.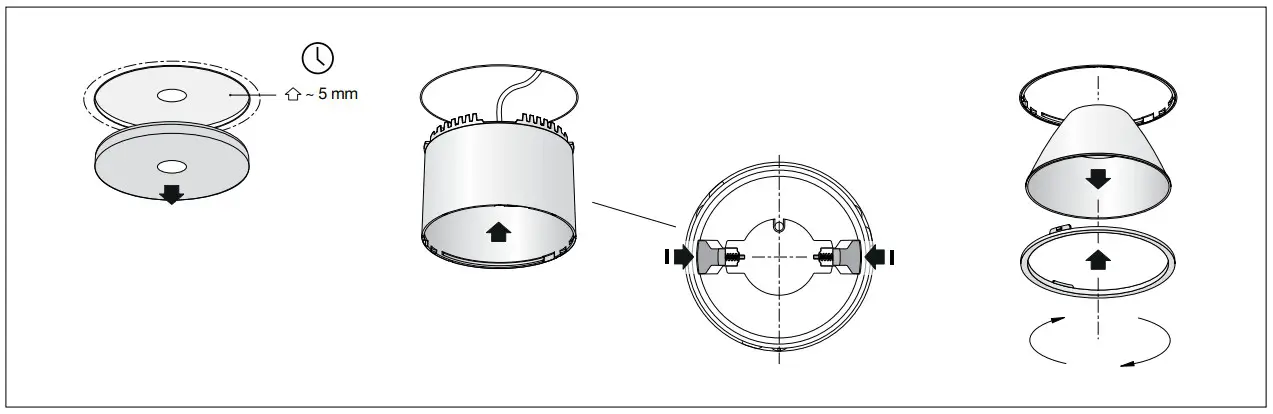 Connect to the LED power supply unit.
Route the LED power supply unit through the installation housing and place it in the suspended ceiling.
Connect the 2-pin plug connector between luminaire and external LED power supply unit.
Press together the two internal fixing sliders inside the luminaire housing.
Push the luminaire housing to the end of the installation housing and then release the fixing sliders.
This mechanism ensures that the luminaire housing sits securely inside the installation housing.
Place the reflector with silicone lens on the ceiling trim ring. Twist the ceiling trim ring complete with the attached reflector to the right to fix the assembly inside the luminaire housing.
Light technique
Symmetrical wide beam light distribution Half beam angle 43°
Cleaning · Maintenance
Clean luminaire regularly with solvent-free cleansers from dirt.
Replacing the LED module
The designation of the LED module is noted on a label in the luminaire.
The light colour and light output of BEGA replacement modules correspond to those of the modules originally fitted. The module can be replaced by qualified persons using standard tools.
Disconnect the system and open the luminaire.
Please follow the installation instructions for the LED module.
Close the luminaire.
Accessories
Power supply units for LED luminaires 220-240 V · 0/50-60 Hz with strain relief and plug connector system.
13 144 Power supply unit on/off
13 169 Power supply unit DALI
The power supply units are only suitable for the operation of one LED luminaire.
For the accessories a separate instructions for use can be provided upon request.
Spares
| Trim ring | 20 000 042 B1 |
| LED module 3000 K | LED-0800/930 |
| Reflector | 75 002 770 |
![]() Gantenbrink-Leuchten KG
Gantenbrink-Leuchten KG
Postfach 31 60
58689 Menden
[email protected]
www.bega.com