solaredge Single Phase Home Hub Inverter

Contents
What’s in the Package
- Inverter
- Wall mount bracket
- SolarEdge Home Network Antenna
 WARNING!
This symbol denotes a hazard. It calls attention to a procedure that if not correctly performed or adhered to could result in injury or loss of life. Do not proceed beyond a warning note until the indicated conditions are fully understood and met.
 CAUTION! Denotes a hazard. It calls attention to a procedure that, if not correctly performed or adhered to, could result in damage or destruction of the product. Do not proceed beyond a caution sign until the indicated conditions are fully understood and met.
WARNING! To avoid danger, read the HANDLING AND SAFETY INSTRUCTIONS provided with this product, or refer to: https://www.solaredge.com/sites/default/files/se_handling_and_safety_instructions.pdf

Before installation, read the datasheet provided with this product, or refer to: https://knowledgecenter.solaredge.com/sites/kc/files/sehome-hub-single-phase-inverter-datasheet-eu.pdf
Tools and Materials
- Drill

- Pencil
- Level

- MC4 crimper

- Wire Cutter

- Hammer

- Open-end 10mm torque wrench
- Torque wrench with 4 mm Allen bit
- Phillips/FlatBlade screwdriver set

- Small Flat-Blade (2mm) Screwdriver

- Mounting screws and wall plugs – max M10

Mounting

Wiring
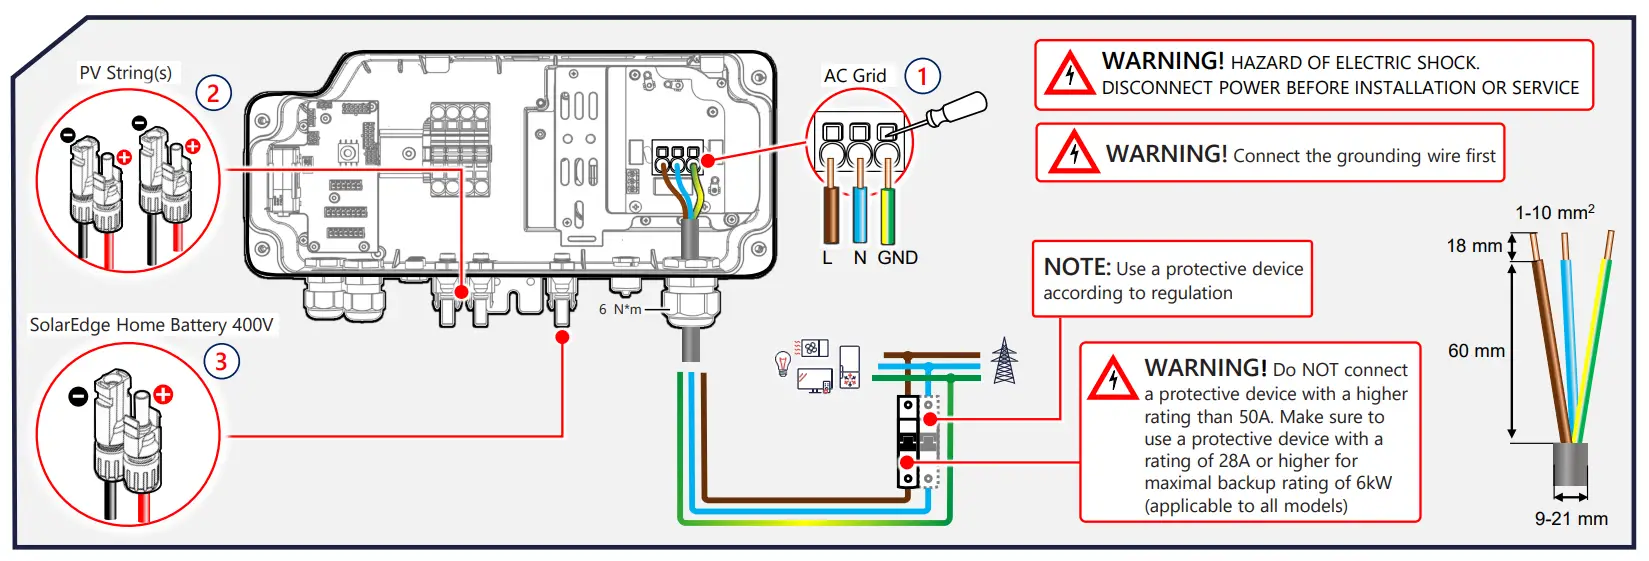
WARNING! Before installing or operating SolarEdge Home Battery 400V, read the safety and handling instructions provided with the battery.
IMPORTANT! The connection to units and accessories shown here is for reference only. For detailed information, refer to the specific product guide
Connecting to LAN or Wi-Fi
(In Leader-Follower configuration, LAN or Wi-Fi MUST connect to the Leader inverter)

Connecting to SolarEdge Home Battery 400V
(Optionally, connect battery communication wirelessly using SolarEdge Home Network)

Connecting to SolarEdge Home Network
(SolarEdge home network module and antenna are included with this product)

Connecting to Backup Interface

Connecting Multiple Inverters

Connecting to Meter and External RSD Switch

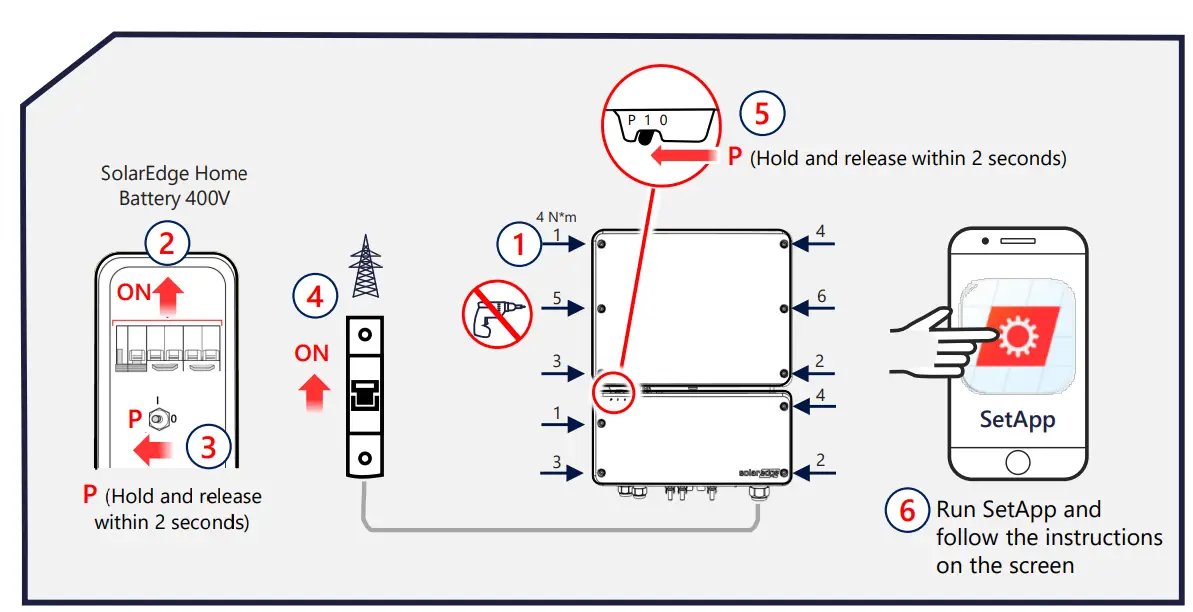
Commissioning the Inverter
LED Indications

- Red: fault
- Green: power production,
- Blinking Green: Grid connection ok
- Blue: communication ok
For more indications refer to: https://www.solaredge.com/leds

For remote status, fault indications, and system performance, refer to Remote Monitoring at:
https://www.solaredge.com/products/pv-monitoring#/