![]()
Baby Monitor Kit
QUICK START GUIDE
V1.10
- Please read this instrucfion manual carefully before using, and keep it for future reference.
- Functions and features are subject to change without further notice.
Contents
Safety Instructions and Warnings
![]()
Hazard Warnings: Potential Risk of Strangulation
- Please be aware that children are at risk of strangula- tion and suffocation accidents caused by rope entanglement.
- Please keep power cords away from children; maintain a distance of at least 3.5 feet (1m).
- Do not allow children to use this product as a toy without supervision.
- Please do not leave the camera in the baby cot or safety fence.
- This baby monitor kit is a monitoring aid and cannot replace the functions and responsibilities of an adult supervision.
- Do not leave your infant unattended or alone at home. Infants need the constant care and attention of an adult.
- Do not use this product in an environment that could potentially leak flammable gas, or expose the product to rain or humid conditions.
Meet the camera
![]()
- Camera Lens
- Status LED indicator
- Microphone
- Rubber Case (removable)
- Thermometer/Hygrometer
- Speaker
- Monitor pairing bution
- Power input (Type C)

Note:
- The camera needs to be plugged in to a power source before it can be used.
- Please use the original AC adapter and power cord (3M) to power on the camera.
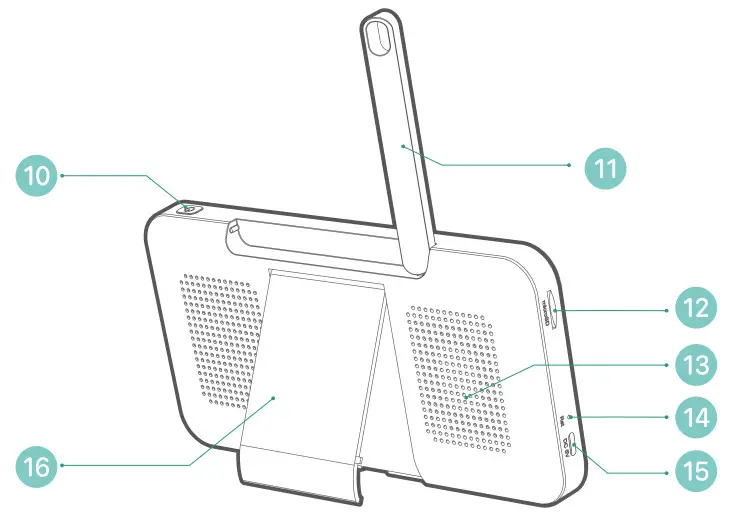
Meet the monitor
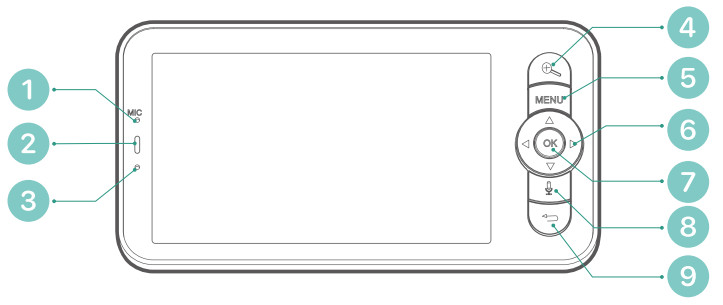
| 1. Microphone | 9. Return |
| 2. LED charging indicator | 10. On/off witch |
| 3. LED status indicator | 12. Antenna |
| 4. Zoom in/out | 13. TF-card slot |
| 5. Menu | 14. Speaker |
| 6. Directional keys | 15. Reset key |
| 7. OK | 16. Type C charging port |
| 8. Intercom | 17. Foldable stand |
Charge Your Monitor


Precautions:
- The monitor comes with a built-in batiery that can last up to 6 hours of continuous use atier a full charge. When the batiery is low, it will pop-up low power alert.
- Please use the original AC adapter and power cord(1M) for batiery recharge. It takes about 5 hours to fully charge the monitor.
- Do not use this product on a sloping or unstable surface, keep it away from heat sources to avoid possible damage, and do not place it near or on any electrical appliances.
- Do not allow children to use this product as a toy without supervision.
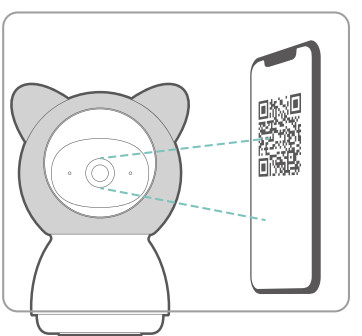
App Download
Search ‘CloudEdge’ in the App stores or scan below QR codes to download the App.![]()
 |
 |
| https://itunes.apple.com/app/id1294635090?mt=8 | https://play.google.com/store/apps/details?id=com.cloudedge.smarteye |
Register an user account and login in. And you will be able to add the camera into your APP account.
Set up Wi-Fi for the camera
The camera can be paired with the monitor through its private AP network, with up to 150 meters wireless intercom range. You can also add the camera into your
APP account, seting up Wi-Fi so as to view & control your camera remotely through mobile devices. Steps to set up camera in your App:
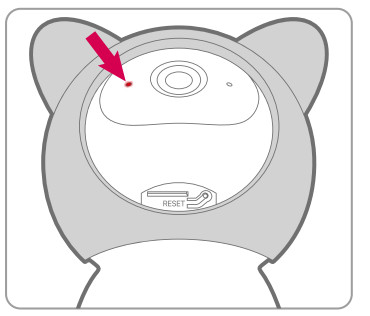
- Plug in to supply power to the camera. Press & hold resetbution for 5 seconds till you hear the tone promted.
- Confirm the LED indicator blinks red. Now you have 2 minutes to set up your camera.
- Complete the network config process following the prompted in-app instructions.
- Adding camera completes, and the indicator light turns to solid blue.
- Note: Please operate the process near your Wi-Fi router.
- Make sure your phone is connecting to a 2.4GHz Wi-Fi.
- Make sure the camera is turned on, and its indicator LED is flashing red. If not, press and hold RESET for 5 seconds.
- Ensure the Wi-Fi signal is good, and the Wi-Fi password is correct.
LED STATUS INDICATION  Solid red
Ready for Wi-Fi configuration.  Flash red (once/sec)
Connecting to Wi-Fi  Flash red (twice/sec)
Device is online  Solid blue
Device is abnormal.  Flash blue (twice/sec)
Firmware upgrading
Pair with Monitor
The camera is pre-paired with its monitor to work as a system. The transmission range is limited by distance.
Make sure the distance between them is within 150m (500 ft).
Disconnect the camera to the monitor:
- Click ‘MENU’ → select ‘ ’ → click ‘OK’ → Click
 , and enter into camera management.
- Long press OK bution on the monitor to release the bond.
Reconnect the camera to the monitor:
- Click ‘MENU’ → select ‘ ’ → click ‘OK’ → Click , and enter into camera management.
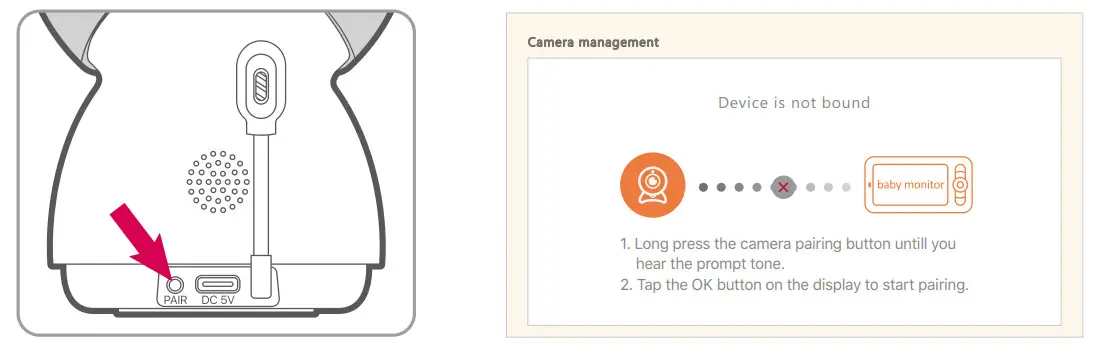
- Long press PAIR bution on the camera till you hear a prompt tone.
- Click the OK bution on the monitor to start pairing.
Use your baby monitor kit
Rotate the camera
When the camera is powered on, press direction butions on the monitor, and you can rotate the camera horizontally or vertically, for a betier view angle.Adjust speaker volume
- Click ‘MENU’ button to display the icon dock.

- Adjust speaker volume with up & down bution.
Display brightness
- Click ‘MENU’ button to display the icon dock.

- Adjust brightness with up & down bution.
Photo & video
Insert a Micro-SD memory card (Max 128GB) to your monitor, and you will be able to record photoes and video clips.
Play music

Turn on/off camera indicator
- Click ‘MENU’ button to display the icon dock.

- Switch on/off the camera indicator light with theleti/right bution.
Setings
| Camera: To pair or unpair a camera. | |
| Feeding Reminder: Make feeding schedules and get reminder alarms. | |
| Temperature & humidity: Detect temperature and huminity. | |
| Smart Care: Smart functions including Motion Detection,Noise detection and Cry detection. | |
| Sleep Mode: Customize screen timeout settings. | |
| Date & Time: Set system date and time. | |
| Camera Light: To turn on/off camera indicator light. | |
| SD Card: Check the memory card status. | |
| Wallpaper: Change wallpaper here. You can customizeyour wallpaper with your photoes in the memory card. | |
| Language: Select operating language for the monitor. | |
| Reset: To restore factory defaults. | |
| Device information: Check camera and monitor information here. | |
| Safety Protection: @ You can choose to cut off camera’s Wi-Fi, and block the remote view access from the APP to your camera. @ All remote access history will be recorded here. |
FCC Warning Statement
Changes or modifications not expressly approved by the party responsible for compliance could void the user’s authority to operate the equipment. This equipment has been tested and found to comply with the limits for a Class B digital device, pursuant to Part 15 of the FCC Rules. These limits are designed to provide reasonable protection against harmful interference in a residential installation. This equipment generates uses and can radiate radio frequency energy and, if not installed and used in accordance with the instructions, may cause harmful interference to radio communications. However, there is no guarantee that interference will not occur in a particular installation. If this quipment does cause harmful interference to radio or television reception, which can be determined by turning the equipment off and on, the user is encouraged to try to correct the interference by one or more of the following measures: – Reorient or relocate the receiving antenna.
– Increase the separation between the equipment and receiver.
– Connect the equipment into an outlet on a circuit different from that to which the receiver is connected.
– Consult the dealer or an experienced radio/TV technician for help.
This device complies with part 15 of the FCC Rules. Operation is subject to the following two conditions:
(1) This device may not cause harmful interference, and (2) this device must accept any interference received, including interference that may cause undesired operation.
RF Exposure Statement(Camera)
To maintain compliance with FCC’s RF Exposure guidelines, This equipment should be installed and operated with minimum distance of 20cm the radiator your body. This device and its antenna(s) must not be co-located or operation in conjunction with any other antenna or transmitter.
SAR statement(Monitor)
This device meets the government's requirements for exposure to radio waves.This device is designed and manufactured not to exceed the emission limits for exposure to radio frequency (RF) energy set by the Federal Communications Commission of the U.S.
Government.
The SAR limit set by the FCC is 1.6W/Kg. For body-worn operation, this device has been tested and meets the FCC RF exposure guidelines for use with an accessory that contains no metal and positions the device a minimum of 0mm from the body. RF exposure compliance with any body-worn accessory that contains metal was not tested and certified. and use of such body-worn accessory should be avoided. Accessory available in market and must be used to keep use distance 0mm from EUT to body-worn operation.