![]()
INSTALLATION INSTRUCTIONS
Door/Window Sensor
Model: WD-MT

Contents
WD-MT Capteur Porte
Congratulations on your purchase of the Skylink Door/Window Sensor, Model: WD-MT. The sensor will monitor the door/window status and works with the SkylinkNet Internet Hub and the Skylink M-Series Alert/Alarm System.
Safety Information
This device complies with Part 15 of the FCC Rules. Operation is subject to the following two conditions: (1) This device may not cause harmful interference, and (2) This device must accept any interference received, including interferences that may cause undesired operation.
WARNING:
Changes or modifications to this unit not expressly approved by the party responsible for compliance could void the user’s authority to operate the equipment.
CE – DECLARATION OF CONFORMITY:
This equipment complies with the requirements relating to electromagnetic compatibility, EN 301489-1, EN301489-3, EN300220-1, EN300220-2 and EN60950-1. This equipment conforms to the essential requirement of the 1999/5/EC R&TTE Directive.
Package Contents
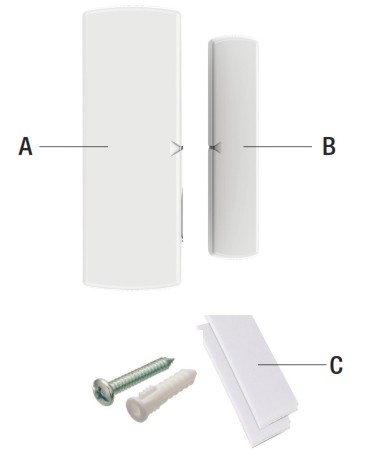
| Parts | Description | Quantity |
| A | Door/Window Sensor | 1 |
| B | Magnet | 1 |
| C | Mounting Accessories | 1 |
Section 1 – Insert a battery in the Door/Window Sensor
![]() NOTE: The battery for the Sensor is not included. Please refer to instruction below to insert an AAA Alkaline Battery.
NOTE: The battery for the Sensor is not included. Please refer to instruction below to insert an AAA Alkaline Battery.
- Press both sides and open the cover of the Door/Window Sensor.

- Insert an AAA Battery in the sensor and close the cover.

Section 2 – Programming the Sensor with M-Series Main Console
![]() NOTE: You can program in total up to 4 sensors in one zone. If you try to program the fifth sensor, the first sensor will be removed.
NOTE: You can program in total up to 4 sensors in one zone. If you try to program the fifth sensor, the first sensor will be removed.

- Press the learn button on the back of the M-Series Main Console for 3 seconds until the Zone 1 light is flashing.

- Zone 1 is selected. Press the learn button to select the zone you want to program the sensor.

- Activate the Sensor by seperating the magnetic contact of the sensor.

- Once the sensor is programmed, the Main Console will beep once and the corresponding zone led will be off.
Section 3 – Programming the Sensor with SkylinkNet Internet Hub
![]() NOTE: Programming the sensor with the SkylinkNet Internet Hub must be done from the SkylinkNet App.
NOTE: Programming the sensor with the SkylinkNet Internet Hub must be done from the SkylinkNet App.


Section 4 – Testing the Sensor with M-Series Alert/Alarm System
 |
 |
| 1. Slide the switch at the back of the Main Console to Alert Mode. | 2. Activate the sensor by separating the magnetic contact of the sensor. |
 |
 |
| 3. The Main Console will start beeping and flash the Zone LED. | 4. Move the magnetic contact back to the sensor and the alert sound will stop. |
Section 5 – Testing the Sensor with SkylinkNet Alarm System
 |
 |
| 1. Activate the sensor by separating the magnetic contact of the sensor. | 2. The blue icon will turn red indicating that the door or window is open. |
 |
 |
| 3. Move the magnetic contact back to the sensor. | 4. The red icon will turn back to blue indicating that the door or window is closed. |
Section 6 – Installing the Door/Window Sensor
Place the sensor in the appropriate location:

Mount the Door/Window Sensor on your door or window with the double sided tape. It can be also installed to monitor or protect cabinets and safes.

If you have a rough surface, install the mounting plate with the screws and attach the Door/Window Sensor with the double sided-tape on the mounting plate.
Section 7 – Battery Indication/Sensor Failure M-Series Alert/Alarm System
![]() NOTE: The corresponding zone LED in the Main Console will flash if a sensor failure or low battery is occurred.
NOTE: The corresponding zone LED in the Main Console will flash if a sensor failure or low battery is occurred.
When a sensor failure occurs, try the following:
- Check if the sensor is located at where it should be.
- Check if there is any physical damage to the sensor.
- Move the Main Console closer to the sensor, if the red LED stops flashing, that means the Main Console or sensor needs to be relocated.
- Replace the battery of the sensor if the Main Console does not respond when the sensor is activated within short range.
Troubleshooting M-Series Alert/Alarm System
| Problem | Solution |
| The M-Series Main Console panel does not respond to the sensor? | – You must program the sensor to the control panel before they can work together. |
| Can I erase just one sensor from a zone in the M-Series Main Console? | – You must erase all the sensors in that zone and then program the sensor you want to keep. |
| I have multiple sensors in a zone and the zone LED keep flashing indicating a sensor failure. How do I know which sensor is having the problem? |
– You need to test each sensor individually. |
Warranty
ONE YEAR WARRANTY
This product is guaranteed to be free of defects in materials and workmanship for 1 year from the date of purchase. If this product is defective, call 1-800-304-1187 for repair or replacement parts.
Guarantee does not include normal wear and tear or batteries.
![]()
If you have any questions, problems or missing parts, please call Skylink Customer Support:
9:00am – 5:00pm EST, Monday-Friday.
1-800-304-1187
Or e-mail us at [email protected]
www.skylinkhome.com
CUSTOMER SERVICE
17 Sheard Avenue, Brampton, Ontario, Canada L6Y1J3
P/N : 101Y141 Rev:0
©2014 SKYLINK GROUP.
Downloaded from www.Manualslib.com manuals search engine