![]()
Electric Standing Desk
Instruction Manual
Contents
TZEDS1 Adjustable Height Electric Standing Desk

Model: TZEDS1/TZEDS1B1/TZEDS1N
Thank you for choosing this product! We strive to provide you with the best quality products and services in the industry. Should you have any issues, please don’t hesitate to contact us
Technical Support:
877-546-8648 Mon-Fri 8am – 8pm(CST)
Other Info: [email protected]
Specification
| Vertical Range: 28.3 – 47.2 in (72-120cm) |
 |
Supplied Parts and Hardware for Step 1

Supplied Parts and Hardware for Step 2

Supplied Parts and Hardware for Step 3

Supplied Parts for Step 5
Step 1 Assemble the Leg Bases and Crossbar

Step 2 Secure the Side Plates and Transmission Rod to the Table Legs


Loosen the pre-assembled coupling nut for adjusting the length. Insert the transmission rod on the left leg into the hex hole and turn the transmission rod anti-clockwise until the left leg goes to the lowest position.
Insert the other end of transmission rod to the slot on the right leg (You may rotate the rod slightly for better installation).  Secure the transmission rod to the slot by tightening the pre-assembled set screw clockwise using the small Allen key [G].
How to Solve the Problem of Different Heights of Two Table Legs
Step 1. Measure whether the height of the two table legs are the same using a measuring tape before installation.
Install Transmission Rod: Please fine-tune the transmission rod. 
Step 3. If the height of the left table leg is lower than the right table leg, insert the transmission rod into the hexagonal hole of the left table leg and rotate the transmission rod clockwise to fine-tune the left table leg to make the left table
leg as high as the right table leg.
Step 2. If the height of left table leg is higher than the right table leg, insert the transmission rod into the hexagonal hole of the left leg, then rotate the transmission rod anti-clockwise to fine-tune the left leg to make the left table leg as high as the right table leg.
Step 3 Secure the Desktop to the Stand

Step 4 Connect the Cables
Step 5 Place the Monitor Stand on the Desktop


Controller Introduction
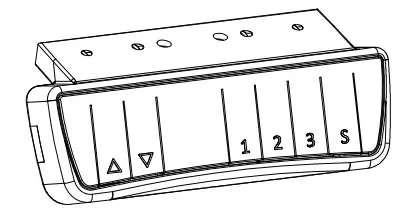
| Short press the button, the unit will lift 0.39 in (1cm). Long press the button, the unit will continuously lift unless it reaches to the highest position of 47.24 in (120cm) or release the button. |
|
| Short press the button, the unit will lower 0.39 in (1cm). Long press the button, the unit will continuously lower unless it reaches to the lowest position of 28.35 in (72cm) or release the button. |
|
 |
Short press [S] button, the display flashes. Press either of 1,2,3 memory keys to save the height. |
 |
Press button, and the desk will move to the certain height that was previous y set for memory 1. |
 |
Press button, and the desk will move to the certain height that was previously set for memory 2. |
 |
Press button, and the desk will move to the certain height that was previously set for memory 3. |
| Engineering Mode | |
| Change Displayed Unit (Un) | Long press the button, “S–“shows and flashes. Press again and the display shows “Un”. Press [sl to select. Press [Zl or [ to switch between” to save your choice. |
| Collision Force Detection (CF) | Long press the button, “S–“shows and flashes. Press again and the display shows “Un”. Press  to switch to “CF”. Press to select. Press to switch between “OFF”, Low (L), Normal (n) or Heavy (H) collision force detection. to switch to “CF”. Press to select. Press to switch between “OFF”, Low (L), Normal (n) or Heavy (H) collision force detection.Press to save your choice. |
| Reset | Long press rebound a bit. Reset finished showing basic height. |
| Protection Mode (auto lock screen mode) | |
| Over-heating protection | Hot: It alarms when continuously working for 2 minutes. Re-powered on and waiting for at least 18 minutes before height adjustment. |
| Sensor less alarm | E10: It alarms when motor sensor can’t be detected. Power off first. Check the connecting of motor and control box, and then re-power on. |
| Overload protection | E20: Overload alarm. If alarming when desk going up, remove the stuff on the desk and try again. If alarming when desk going down, power off first, remove the stuff on the desk and re-power on. |
| Rebound protection | E02: It alarms when vibrated, collided or inclined in desk moving. Check if there is vibrating, obstacles or incline. If no issues above, do the reset process and use it again. |
| Overvoltage alarm | E32: It alarms when voltage is higher than required value. Power off first. Check whether the connection between power and control box is OK. Power on again. |
| Under voltage alarm | E31: It alarms when voltage is lower than required value. Power off first. Check whether the connection between power and control box is OK. Power on again. |
| Step out alarm | E60: It alarms when height difference between left leg and right leg exceeds the set value. Power off first. Check whether the left leg and the right leg are in the same height. If not, re-redo process 4 to make them in same height. Power on again. |
| Breaking protection | It stops and enters protection state when motor lines or manual control lines are removed or disconnected accidentally; back to normal after reconnected and alarm cleared. |
Thank you again for choosing this product!

All of us do appreciate your product purchase. We hope that you are as happy with your product as we are designing and manufacturing it for you. We strive to provide you with the best quality products and services in the industry. Should you have any issues, please don’t hesitate to contact us
![]() Technical Support:
Technical Support:
877-546-8648 Mon-Fri 8am – 8pm(CST)
Other Info: [email protected]
860-00046-00 Rev00