![]()
Contents
INSTRUCTION MANUAL
40V Cordless Snow Thrower
Model # HB2421A/HB2421
 |
PROBLEMS? QUESTIONS? DO NOT RETURN TO STORE CALL OUR CUSTOMER HELP LINE(800)791-9458 Mon-Fri 9-5 EST |
Have product questions or need technical support? Please feel free to contact us!
Website: www.powersmartusa.com
Toll free: 1-800-791-9458 (Mon-Fri 9-5 EST)
Email: [email protected]
[email protected]

Website
TECHNICAL DATA
40V Cordless Snow Thrower
Model#: HB2421A/HB2421(Bare tool)
Charger power input: 120V, 60Hz
Battery type: 40V Lithium-ion
Battery model: DB2102
Charger model: DB2202A
Charging time: 2 hours
Clearing width: 21 inch
Clearing depth: 12.5 inch
Package Dimensions(L x W x H): 22.4 x 22.4 x 19.9 inch
Weight: 55 lbs
Thank you for purchasing PowerSmart products.
It is crucial and highly recommended that you read this instruction manual in its’ entirety, as this is an invaluable tool and reference point in understanding the operation of your unit.
Please register your unit online at www. Amerisuninc.com. This process will allow us to track your warranty information and update our records regarding your unit accordingly.
Important: Our Company does not provide email or personal information to any third party for any reason. For any questions check our website or call customer service at (800)791 9458.
INTRODUCTION
Thank You for Purchasing a PowerSmart® Product. This manual provides information regarding the safe operation and maintenance of this product. Every effort has been made to ensure the accuracy of the information in this manual. PowerSmart® reserves the right to change this product and specifications at any time without prior notice.
Please keep this manual available to all users during the entire life of the snow blower.
 This manual contains special messages to bring attention to potential safety concerns, snow blower damage as well as helpful operating and servicing information. Please read all the information carefully to avoid injury and machine damage.
QUESTIONS? PROBLEMS?
In order to answer questions and solve problems in the most efficient and speedy manner, contact Customer Service at 800-791-9458 , Mon-Fri 9am-5pm EST or email: [email protected].
SAFETY INFORMATION
FOLLOW THESE RULES WHILE OPERATING THE SNOW THROWER
IMPORTANT
READ AND UNDERSTAND ALL INSTRUCTIONS. Failure to follow all instructions listed below may result in electric shock, fire, and/or serious personal injury.
- Walk. Do not run.
- Verify that the snow thrower is not in contact with anything before turning it on.
- Stay away from the discharge chute and impeller openings at all times. Keep face, hands, and feet away from concealed, moving, or rotating parts.
- Be attentive when using the snow thrower, and stay alert for holes in the terrain and other hidden hazards or traffic.
- Do not use the snow thrower on a gravel or crushed rock surface. Use extreme caution when crossing gravel/crushed rock drives, walks, or roads.
- Move up and down slopes when clearing snow. Do not go across a slope. Use caution when changing direction. Do not use this snow thrower to clear snow from steep slopes.
- Do not attempt to use the snow thrower on a roof or on any steeply inclined slippery surface.
- Do not operate the snow thrower if the guards, plates, and other safety protective devices are not in place.
- Do not operate the snow thrower near glass enclosures, automobiles, trucks, window wells, drop-offs, etc. without properly adjusting the angle of the snow discharge. Keep children and pets away from the work area.
- Do not force or overload the snow thrower. The snow thrower will perform better and safer when it is used at the rate that it was designed to work at.
- Do not operate the snow thrower at high speeds on slippery surfaces. Look behind when backing up and exercise caution.
- Do not direct the discharge toward anyone. Do not allow anyone to move in front of the snow thrower while it is in use.
- Wear safety glasses or goggles that meet ANSI Z87.1 standards.
- Use the snow thrower in daylight or in good artificial light. If using at night, turn on the LED lights and be aware of your surroundings.
- To avoid accidental start-ups, remain in the starting position when turning the snow thrower on. The operator and the snow thrower must be in a stable position during start-up. See the section titled Starting/Stopping Instructions.
- Use this snow thrower only for the purposes it was designed.
- Do not overreach. Always keep proper footing and balance.
- Hold the snow thrower with both hands while it is in use. Keep a firm grip on the handles.
- If the impeller does not rotate freely due to ice, thaw the snow thrower thoroughly before attempting to use it.
- Do not attempt to clear the impeller while the motor is running.
- Keep clothing and body parts away from the impeller.
- Stop the motor when stopped or when moving from one location to another.
- Remove the battery pack when it is being transported and when it is not in use.
- After striking a foreign object, turn the snow thrower off and remove the battery pack, and then inspect it for damage. Repair any damage before restarting and using the snow thrower.
- If the snow thrower starts to vibrate abnormally, stop the snow thrower immediately and attempt to determine the cause. Vibration is generally an indication of danger.
- Stop the motor and remove the battery pack whenever the operator is not in the operating position, before unclogging the impeller, and before making any repairs, adjustments, or inspections.
- Do not discharge snow onto public roads or near moving traffic.
- Allow the snow thrower to run for a few minutes after clearing snow in order to prevent moving parts from freezing.
- Only use identical replacement parts and accessories for this snow thrower. The use of nonidentical parts or accessories could lead to serious injury to the user or damage the snow thrower, and will void the warranty.
- Do not pick up the snow thrower while it is running. The snow thrower is designed to travel along the ground.
- Dress Properly – Do not wear loose clothing or jewelry. They can be caught in moving parts.
- Wear rubber boots when operating the snow thrower.
- Operation of the snow thrower in the hand-held position is unsafe, except in accordance with the special instructions for such use provided in the operator’s manual.
- Store Idle Snow Throwers Indoors – When not in use, snow throwers should be stored indoors in dry, locked-up place – out of reach of children.
GENERAL SAFETY RULES
- Verify that the snow thrower is secure while transporting.
- Store the snow thrower in a dry area that will prevent unauthorized use or damage. Keep out of the reach of children.
- Keep handles dry, clean, and free of debris. Clean the snow thrower after each use. Refer to the Maintenance Section in this manual for more information.
- If the labels on the snow thrower become defaced or start to lift off, contact the toll-free helpline, at 800-791-9458.
- Keep these instructions in a safe place for future reference. Refer to them often, and use them to instruct other users. Anyone who uses this snow thrower must read these instructions carefully.
- Maintain the snow thrower with care. Follow the instructions for lubricating and changing
CAUTION
USE ONLY PowerSmart® APPROVED REPLACEMENT BATTERIES, OTHER BATTERIES MAY CAUSE INJURY OR DAMAGE TO THE SNOW THROWER. USE ONLY WITH PowerSmart® 40V BATTERIES and CHARGER.
 |
Safety Alert. Caution. |
 |
WARNING! To reduce the risk of injury, user must read instruction manual. |
 |
Do not expose to rain. Keep dry. |
 |
Keep the bystander away. Use at a distance of at least 33 ft from other people |
 |
CAUTION! Beware of flying debris. |
 |
Wear hearing protection. Wear eye protection. |
 |
The rotating part will continuously run for several seconds after you turn off the machine. |
 |
DANGER! Keep hands and feet away from openings while the machine is running. |
 |
Rotating blades — Do not use hands to unclog chute. Stop motor before removing debris. |
 |
Indoor use only. Only use battery charger in doors. |
ENVIRONMENTAL PROTECTION
Waste electrical products should not be disposed of with household waste. Please recycle where facilities exist. Check with your local authority or retailer for recycling advice.
The battery contains material which is hazardous to you and the environment. It must be removed and disposed of separately at a facility that accepts lithium-ion batteries.
SERVICE
Servicing requires extreme care and knowledge and should be performed only by a qualified service technician. For service we suggest you return the product to your nearest AUTHORIZED SERVICE CENTER for repair. When servicing, use only identical replacement parts.
WARNING
To avoid serious personal injury, do not attempt to use this product until you have read this Owner’s Manual thoroughly and understand it completely. If you do not understand the warnings and instructions in this Owner’s Manual, do not use this product. Call the Toll-free Helpline ( (800)791-9458) for assistance.
WARNING
The operation of any power tool can result in foreign objects being thrown into your eyes, which can result in severe eye damage. Before beginning power tool operation, always wear safety goggles or safety glasses with side shields and, when needed, a full face shield. We recommend Wide Vision Safety Mask for use over eyeglasses or standard safety glasses with side shields. Always use eye protection which is marked to comply with ANSI Z87.1.
SAVE THESE INSTRUCTIONS
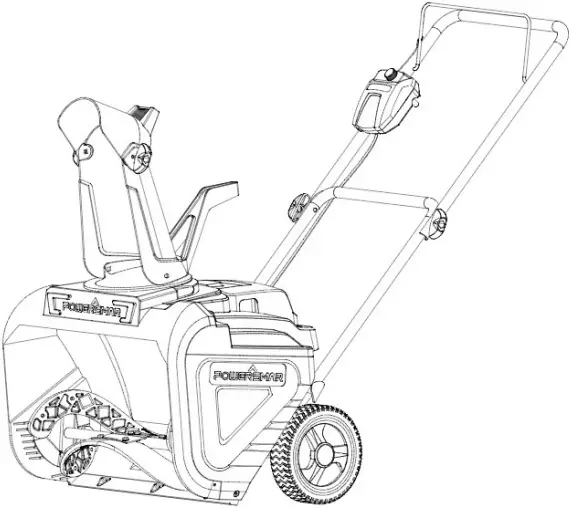
KNOWING YOUR SNOW THROWER
Use the illustrations below to become familiar with the locations and functions of the various components and controls of this snow thrower.
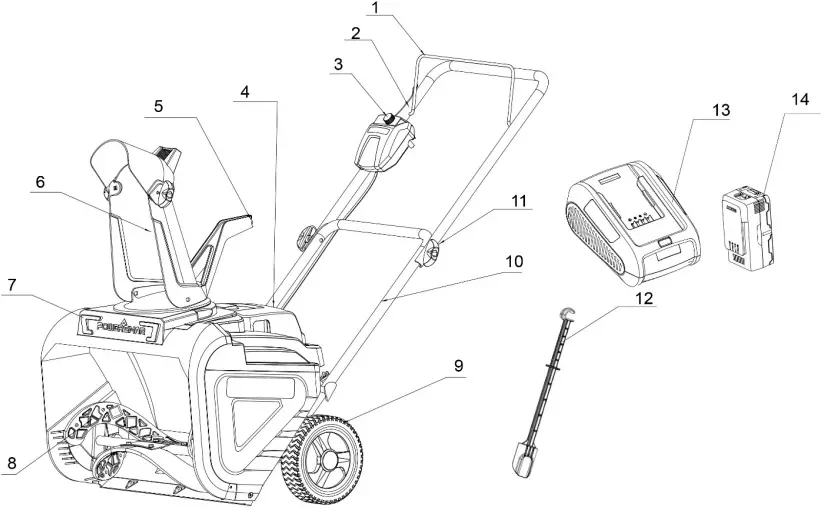
1 Auger Control Bar
2 Upper handle
3 Switch button
4 Battery box
5 Chute Rotation Handle
6 Discharge Chute
7 LED light
8 Auger
9 Wheel
10 Middle handle
11 Knob
12 Clean out tool
13 Charger ( Model#HB2421 not included)
14 Battery ( Model#HB2421 not included)
OPERATING YOUR SNOW THROWER
The following section describes steps to use your Snow Thrower for use. If after reading this section, you are unsure about how to perform any of the steps please call 1-800-791-9458 for customer service.
Failure to perform these steps properly can damage your Snow Thrower or shorten its life.
Review the SAFETY section in this manual before operating snow thrower.
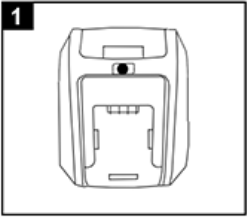
TO INSTALL BATTERY PACK
- Open the battery compartment cover.
- Slide the battery down to lock it into position. The battery is fully inserted into the snow thrower when you hear an audible “click”.
- Close the battery compartment cover.
TO REMOVE BATTERY PACK
- Release your the handle bar to stop the snow thrower.
- Remove the safety key.
- Remove battery pack from the snow thrower.
- Battery
CHARGER OPERATION
Note: Before using the machine make sure that the battery is charged.
- When you turn on the unit the LED light shows red.
- Insert battery pack in the charger and the LED light will show flashing red.
When the temperature is too high the charger will automatically cool. The red and green lights flash alternately, the temperature is too low or too high. After the temperature returned to normal the charger will continue to charge. - After current charging is completed, the LED light will show green.


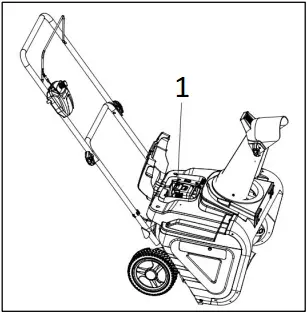
POWERING ON AND OFF
1. To power on, after putting the battery pack into its holder, insert the safety key.
2. Press the rod start button in fully and hold in. The start button is located on the switch housing.
3. While holding the start switch button , pull the handle bar toward you until it touches the handle.
The start button must be pressed in and held before pulling the handle. Once the snow thrower starts, release the start button.


a) Safety key
4.To stop, release the handle bar and allow the handle bar to return to the OFF position.
NOTE: Unit will not operate if you pull the bar towards you first then press in the start button.
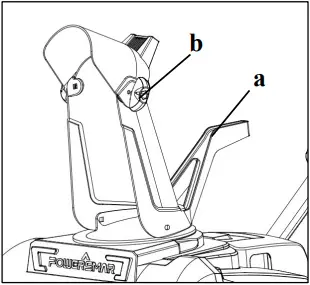
CHUTE DISCHARGE DIRECTION ADJUSTMENT
WARNING: Never direct the snow discharge chute at the operator, bystanders, vehicles, or nearby windows. Discharged snow and foreign objects accidentally picked up by the Snow Thrower can cause serious damage and severe bodily injury. Always point the discharge chute in the opposite direction from potential hazards.
- To adjust the discharge chute, rotate the chute rotation handle(a) in the direction that you wish to direct the snow stream.
- To adjust the chute deflector, loosen both chute deflector knobs(b) to raise or lower the deflector to the desired height you wish to throw the snow. Tighten the knobs to secure the deflector.
OPERATING TIPS
WARNING : If the Snow Thrower hits a foreign object while it is in use, the object could be thrown in the direction of the operator or a bystander. Thrown objects could cause serious personal injury. Keep the area to be cleared free of all foreign objects that may be picked up and thrown by the impeller.
- Keep the area of operation free of foreign objects that can become thrown by the impeller. Perform a thorough inspection of the area since some objects may be hidden from view by surrounding snow. If the snow thrower hits an obstruction or picks up a foreign object during use, stop the snow thrower, remove the battery, remove the obstruction, and inspect the unit for damage. Repair or replace any damaged part before restarting and operating the unit.
- Keep children, pets, and bystanders away from the area of operation. Be aware that the normal noise of the machine when turned on may make it difficult for you to hear approaching people.
- When moving the snow thrower, use the wheels on one side as the pivot point. Slightly tilt the snow thrower on this pivot point to move it forward or backward.
- Start your clearing path outward, throwing snow in a back and forth motion. To clear in the opposite direction, pivot the snow thrower on its wheels. Make sure to overlap clearing paths.
- Note the wind direction. If possible, move in the same direction as the wind so that the snow is not thrown against the wind (and thus back onto you and on the just cleared path).
- Do not push the snow thrower with excessive force. You should push the machine gently and at a consistent speed in accordance with the unit’s throw rate.
- Some parts of the snow thrower may freeze under extreme temperature conditions. Do not attempt to operate the snow thrower with frozen parts. If the parts freeze while the snow thrower is in use, stop the snow thrower, remove the battery, and inspect for frozen parts. Free all parts before restarting or operating the snow thrower. Never force controls that are frozen.
- When working on pebbles, gravel, or unpaved surfaces, avoid throwing loose surface material along with the snow by pushing down on the handle to raise the scraper at the base of the unit above the pebbles or gravel.
- Cold Weather Operation: Lithium Ion batteries can be safely used from temperatures ranging from – 17 degrees to 45 degrees Celsius. NOTE: Do not store or charge battery outside. Battery must be charged and stored indoors prior to use of the snow thrower.
- If the Snow thrower does not start initially remove battery from snow thrower. Place battery on charger and allow to charge for 10 minutes. Remove from charger and install in Snow thrower for use. The start-up issue may be caused from the battery being too cold. To avoid this issue, ensure battery is stored in a dry cool place for storage and charging and leave indoors until ready for use.
MAINTENANCE
SERVICING
Servicing should be performed by a qualified technician. Replacement parts for this snow thrower must be identical to the parts that they replace. If repairs are necessary, contact the toll-free helpline, at 1-800-791-9458.
Note: Identify the left and right sides of the snow thrower when standing in the normal operating position.
WARNING : If the battery pack is installed into the snow thrower, the snow thrower could start accidentally while the operator is performing maintenance on it, which could cause serious personal injury. Remove the battery pack before performing any maintenance.
SRORAGE
- Run the snow thrower for a few minutes in order to melt any snow that may be left on the snow thrower.
- Wipe the snow thrower off with a dry cloth before storage. This will help prevent ice building up on the unit and parts freezing.
- Remove the battery and store it in a cool dry location, if possible. Charge the battery every six months when not in use in order to increase its life.
- Inspect the snow thrower thoroughly for worn, loose, or damaged parts. If any parts must be repaired or replaced, contact the Toll-Free Helpline, at 1-800-791-9458.
- Store the snow thrower in a clean, dry place. Cover it in order to provide added protection.
- Always store battery and charger indoors.
BATTERY CAUTION + DISPOSAL INFORMATION
Always dispose of your battery packs according to federal, state, and local regulations. Contact a recycling agency in your area for recycling locations.
CAUTION! Even discharged battery packs contain some energy. Before disposing, use electrical tape to cover the terminals to prevent the battery packs from shorting, which could cause a fire or explosion.
WARNING! To reduce the risk of injury or explosion, never burn or incinerate battery packs even if it is damaged, dead or completely discharged. When burned, toxic fumes and materials are emitted into the surrounding atmosphere.
- Batteries vary according to device. Consult your manual for specific information.
- Install only new batteries of the same type in your product (where applicable).
- Failure to insert batteries in the correct polarity, as indicated in the battery compartment or manual, may shorten the life of the batteries or cause batteries to leak.
- Do not mix old and new batteries.
- Do not mix Alkaline, Standard (Carbon-Zinc) or Rechargeable (Nickel Cadmium, Nickel Metal Hydride, or Lithium-Ion) batteries.
- Do not dispose of batteries in fire.
- Batteries should be recycled or disposed of as per state and local guidelines.
TROUBLESHOOTING
| PROBLEM | POSSIBLE CAUSE | SOLUTION |
| The handle is not in position. | The bolts are not properly seated. | Make sure the bolts are correctly installed through the handle bars. Check to see if the hand knobs are tight. Refer to Assembling the Handle section in this manual. |
| The snow thrower doesn’t start. | The battery is not charged. | Charge the battery by following the procedures in the battery and charger manual. |
| The switch is defective. | Have the switch replaced by an authorized service center. | |
| Battery is too cold. | Remove battery from snow thrower. Place battery on charger and allow to charge for 10 minutes. Remove from charger and install in Snow thrower for use. | |
| The battery is not attached to the motor. | Check the connection between the motor connector and the battery. | |
| Battery may require service or replacement. | Call toll free helpline | |
| The motor is on, but the impeller does not turn. | The belt is damaged. | Replace the belt |
| The snow thrower leaves a thin layer of snow behind. | The scraper is worn. | Inspect the scraper for wear or damage. Replace the scraper. |
EXPLODED VIEW AND PARTS LIST

|
Item |
Stock# | Description |
Qty |
|
1 |
303020282 | Bolt M6x16 |
6 |
|
2 |
303100034 | Deep groove ball bearing |
2 |
|
3 |
303070797 | Bearing platen welded |
2 |
|
4 |
202450150 | Auger assembly |
1 |
|
4.1 |
303181494 | Auger shaft welding |
1 |
|
4.2 |
203090016 | Auger |
2 |
|
4.3 |
303060179 | Insert |
12 |
|
4.4 |
303020238 | Flange Bolt M6x20 |
8 |
|
4.5 |
303030087 | Lock nut M6 |
8 |
|
4.6 |
303071696 | Clamping piece |
2 |
|
4.7 |
303030087 | Lock nut M6 |
5 |
|
4.8 |
303020238 | Flange Bolt M6x20 |
4 |
|
4.9 |
303020503 | Flange Bolt M6x35 |
1 |
|
5 |
303042018 | Flat washer |
2 |
|
6 |
203010646 | Belt pulley |
1 |
|
7 |
303042009 | Flat washer |
2 |
|
8 |
303041009 | Spring washer |
1 |
|
9 |
303020282 | Bolt M6x16 |
2 |
|
10 |
303010284 | Self tapping screw ST4.2×12 |
6 |
|
11 |
203050654 | Left side cover |
1 |
|
12 |
302040095 | V-Belt |
1 |
|
13 |
303030077 | Nut M8 |
1 |
|
14 |
203100003 | Tension wheel assembly |
1 |
|
15 |
303160197 | Spacer bush |
1 |
|
16 |
303020146 | Bolt M8x35 |
1 |
|
17 |
303130406 | Tension spring |
1 |
|
18 |
303030077 | Lock nut M8 |
1 |
|
19 |
303042013 | Flat gasket |
1 |
|
20 |
303071693 | Fixed plate assembly |
1 |
|
21 |
203051073 | Base |
1 |
|
22 |
303070741A | Shovel plate |
1 |
|
23 |
303010271 | Self tapping screw ST4.2×16 |
3 |
|
24 |
203050655 | Right side cover |
1 |
|
25 |
303070739A | Right corner protector |
1 |
|
26 |
303010284 | Self tapping screw ST4.8×12 |
4 |
|
27 |
303070738A | Left cover |
1 |
|
28 |
202450120 | Lamp panel assembly |
1 |
|
28.1 |
203010885 | Logo plate |
1 |
|
28.1-1 |
203010937 | Logo plate |
1 |
|
28.2 |
203010891 | LED left lampshade |
1 |
|
28.3 |
203010890 | LED right lampshade |
1 |
|
28.4 |
301013048 | Left light panel |
1 |
|
28.5 |
301013049 | Right light panel |
1 |
|
28.6 |
303160513 | Spacer sleeve |
4 |
|
28.7 |
303042019 | Flat washer |
4 |
|
28.8 |
303010237 | Self tapping screw ST4.2×10 |
4 |
|
29 |
203050567 | Motor bracket |
1 |
|
30 |
303010176 | Self tapping screw ST6.3×16 |
18 |
|
31 |
203050171 | Base part |
1 |
|
32 |
303010363 | Self tapping screw |
6 |
|
33 |
203010935 | Rotator |
1 |
|
34 |
303020161 | Bolt M8x25 |
2 |
|
35 |
303030077 | Lock nut M8 |
2 |
|
36 |
203050175 | Middle discharge chute |
1 |
|
37 |
203010647 | Positioning block |
1 |
|
38 |
303130138 | Spring |
2 |
|
39 |
303030066 | Nut M8 |
2 |
|
40 |
203020336A | Knob |
2 |
|
41 |
203020380 | Tooth pad |
2 |
|
42 |
303020161 | Bolt M8x25 |
2 |
|
43 |
203050174 | Chute deflector |
1 |
|
44 |
203010648 | Chute rotation handle |
1 |
|
45 |
303010108 | Self tapping screw |
4 |
|
46 |
203050662 | Battery pack cover |
1 |
|
47 |
303123045 | Magnet |
1 |
|
48 |
303100086 | Battery pack cover shaft |
2 |
|
49 |
203050656 | Upper cover |
1 |
|
50 |
303010176 | Self tapping screw |
2 |
|
51 |
303042109 | Flat washer |
2 |
|
52 |
303010095 | Self tapping screw |
1 |
|
53 |
301030105 | Motor |
1 |
|
54 |
303010352 | Self tapping screw |
4 |
|
55 |
303071697 | Motor briquetting |
1 |
|
56 |
303110039 | Flat Washer |
1 |
|
57 |
303071455A | Motor Holder |
1 |
|
58 |
303041009 | Spring washer |
4 |
|
59 |
303020468 | Bolt M6x10 |
3 |
|
60 |
303010176 | Self tapping screw |
2 |
|
61 |
303060145A | Multi-wedge belt pulley |
1 |
|
62 |
303042009 | flat washer |
1 |
|
63 |
303020282 | Bolt M6x16 |
1 |
|
64 |
303010363 | Self tapping screw |
2 |
|
65 |
203021266A | Charger insert holder |
1 |
|
66 |
303010159 | Self tapping screw |
2 |
|
67 |
203051072 | Battery pack holder |
1 |
|
68 |
303130355 | Spring |
1 |
|
69 |
203050554 | Battery pack holder |
1 |
|
70 |
303010095 | Self tapping screw |
6 |
|
71 |
203021264 | Secure key |
1 |
|
72 |
203010943 | Switch upper cover |
1 |
|
73 |
301100055 | Switch |
1 |
|
74 |
301011029 | Controller |
1 |
|
74.1 |
303071745 | Controller pressure plate |
1 |
|
75 |
203020047 | Cable clamp |
1 |
|
76 |
303010176 | Self tapping screw |
4 |
|
77 |
203050657 | Bottom cover |
1 |
|
78 |
203021362 | 8″ left wheel cover |
1 |
|
79 |
303121002 | Cotter pin |
2 |
|
80 |
203050544 | 8″ wheel |
2 |
|
81 |
303100065 | Wheel bearing |
4 |
|
81.1 |
303042013 | Flat washer |
4 |
|
82 |
303020124 | Bolt M8x35 |
2 |
|
83 |
303030077 | Lock nut M8 |
2 |
|
84 |
303010353 | Self tapping screw |
7 |
|
85 |
303181495 | Left support tube welded |
1 |
|
85.1 |
303020683 | Bolt |
1 |
|
85.2 |
303071694 | Left support plate |
1 |
|
86 |
303161001 | Shaft |
1 |
|
87 |
303160845 | Butterfly pin |
2 |
|
88 |
303071695 | Right support plate |
1 |
|
89 |
203021363 | 8″ right wheel cover |
1 |
|
90 |
303020124 | Bolt M8x35 |
3 |
|
91 |
303030077 | Lock nut M8 |
3 |
|
92 |
303081214 | Lower Tube |
1 |
|
93 |
303081213 | Middle tube |
1 |
|
94 |
303030066 | Nut M8 |
4 |
|
95 |
203020336A | Knob |
4 |
|
96 |
303043010 | Cupped washer |
4 |
|
97 |
303020057 | T-bolt M8x45 |
4 |
|
98 |
303081397 | Upper Tube |
1 |
|
99 |
303080502 | Drive control bar |
1 |
|
100 |
303200154 | Cable |
1 |
|
101 |
303010270 | Self tapping screw |
6 |
|
102 |
203011000 | Lower switch box |
1 |
|
103 |
303130397 | Tension spring |
1 |
|
104 |
203021461 | The cable clamp |
2 |
|
105 |
303130396 | Spring |
1 |
|
106 |
301100046 | Switch |
1 |
|
107 |
203011002 | Cam |
1 |
|
108 |
203021366 | Knob |
1 |
|
109 |
306040064 | Connecting cable |
1 |
|
110 |
203011001 | Upper switch box |
1 |
|
111 |
203050519 | Clip |
2 |
|
112 |
303043009 | Concave cushion |
2 |
|
113 |
303010353 | Self tapping screw |
2 |
|
114 |
203051135 | Clean out tool |
1 |
|
115 |
202460007 | Battery |
1 |
|
116 |
202470013 | Charger |
1 |
TWO (2) YEARS LIMITED WARRANTY
PowerSmart is committed to building tools that are dependable for years. Our warranties are consistent with our commitment and dedication to quality.
TWO (2) YEARS LIMITED WARRANTY OF POWER SMART PRODUCTS FOR HOME USE.
PowerSmart (“Seller”) warrants to the original purchaser only, that all PowerSmart consumer power tools will be free from defects in material or workmanship for a period of two (2) years from date of purchase. Ninety (90) days for all PowerSmart Products, if the tool is used for professional or commercial use.
SELLER’S SOLE OBLIGATION AND YOUR EXCLUSIVE REMEDY under this Two (2) Years Limited
Warranty and, to the extent permitted by law, any warranty or condition implied by law, shall be the repair or replacement of parts, without charge, which are defective in material or workmanship and which have not been misused, carelessly handled, or misrepaired by persons other than Seller or Authorized Service Center. To make a claim under this Limited Warranty, you must return the entire power tool product; transportation prepaid, to PowerSmart Include a legible copy of the original receipt, which lists the date of purchase (month and year) and the name of the company purchased from.
THIS LIMITED WARRANTY DOES NOT APPLY TO ANY ACCESSORY ITEMS INCLUDED WITH THE TOOL SUCH AS CIRCULAR SAW BLADES OTHER RELATED ITEMS OR TO ANY REPLACEMENT PARTS LISTED UNDER MAINTENANCE.
ANY IMPLIED WARRANTIES SHALL BE LIMITED IN DURATION TO TWO (2) YEARS FROM DATE OF PURCHASE. SOME STATES IN THE U.S. AND SOME CANADIAN PROVINCES DO NOT ALLOW LIMITATIONS ON HOW LONG AN IMPLIED WARRANTY LASTS, SO THE ABOVE LIMITATION MAY NOT APPLY TO YOU.
IN NO EVENT SHALL SELLER BE LIABLE FOR ANY INCIDENTAL OR CONSEQUENTIAL DAMAGES (INCLUDING BUT NOT LIMITED TO LIABILITY FOR LOSS OF PROFITS) ARISING FROM THE SALE OR USE OF THIS PRODUCT. SOME STATES IN THE U.S. AND SOME CANADIAN PROVINCES DO NOT ALLOW THE EXCLUSION OR LIMITATION OF INCIDENTAL OR CONSEQUENTIAL DAMAGES, SO THE ABOVE LIMITATION OR EXCLUSION MAY NOT APPLY TO YOU.
THIS LIMITED WARRANTY GIVES YOU SPECIFIC LEGAL RIGHTS, AND YOU MAY ALSO HAVE OTHER RIGHTS WHICH VARY FROM STATE TO STATE IN THE U.S., PROVINCE TO PROVINCE IN CANADA AND FROM COUNTRY TO COUNTRY.
For questions / comments, technical assistance or repair parts – Please call toll free at: 1-800-791-9458 (M-F 9am – 5pm EST) Email:
[email protected]
SAVE YOUR RECEIPTS. THIS WARRANTY IS VOID WITHOUT THEM.