![]()
![]() Customer Service
Customer Service
1-800-618-6798
ASSEMBLY GUIDE
Model: SG3001
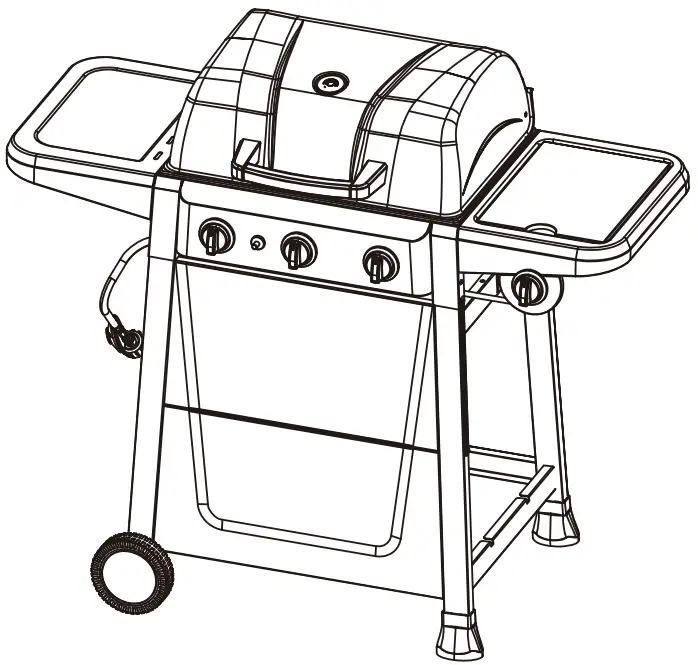
3-Burner Gas Grill with Side Burner
![]()
 |
 |
| https://www.facebook.com/Royal-Gourmet-879976522153340/ | https://mobile.twitter.com/RoyalGourmetUSA |
Contents
FOR YOUR SAFETY!
Use outdoors only! Do not use it in a building, garage or any other enclosed areas.
Read the instructions before assembling and using the appliance.
DO NOT use the grill unless it is completely assembled and all the parts are securely fastened.
This grill will become very hot, do not move it during operation. Keep children and pets away.
CONTACT US FIRST!
This grill has been made to high quality standards. If you have any questions that are not addressed in this manual, or you need parts, please call our customer service hotline or send an email to [email protected]
Learn more at: www.royalgourmetcorp.com
Explosion View
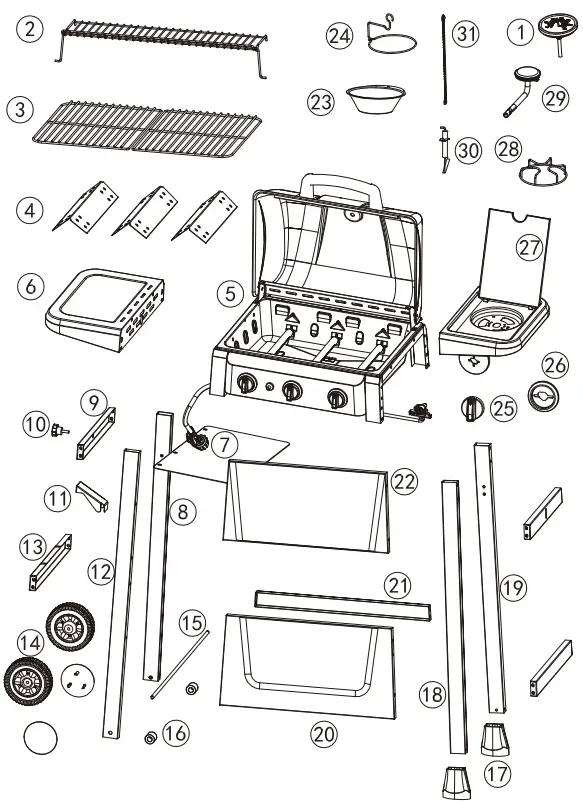
Part List
Hardware List
| Ref | Description | Illustration | QTY |
| 1 | Thermometer W-00020017 |
1 | |
| 2. | Warming rack ZH-GS030002 | 1 | |
| 3. | Cooking grate W-GS02A005 | 2 | |
| 4. | Flame tamer Z-GS030027 | 3 | |
| 5. | Main body | 1 | |
| 6. | Side table Z-GS030022 | 1 | |
| 7. | Thermal baffle Z-GS030011 | 1 | |
| 8. | Left back leg(LB) Z-GS030006 | 1 | |
| 9. | Leg connector upper Z-0S030003 |
2 | |
| 10. | Screw W-GD401008 | 1 | |
| 11. | Tank holder Z-GS030014 | 1 | |
| 12. | Left front leg(LF) Z-GS030005 | 1 | |
| 13. | Leg connector lower Z-GS030001 |
2 | |
| 14. | Wheel & cover w-20130010 W-20130006 |
2 | |
| 15. | Wheel axle W-GS030004 | 1 | |
| 16. | Washer W-10030004 |
2 |
| Ref | Description | Illustration | QTY |
| 17. | Foot W-GS030005 | 2 | |
| 18. | Right front leg(RF) Z-GS030007 | 1 | |
| 19. | Right back leg(RB) Z-GS030008 | 1 | |
| 20. | Cart board lower Z-G3030 029 | 1 | |
| 21. | Leg connector back Z-GS030002 |
1 | |
| 22. | Cart board upper Z-GS030028 | 1 | |
| 23. | Grease cup YBOO1 |
1 |
|
| 24. | Grease cup brae’? YJO01 |
1 | |
| 25. | Knob W-00020020 |
1 | |
| 26. | Knob base W-11030001 |
1 | |
| 27. | Side burner shelf H-OS030002•Z-20130035 W-20130322 |
1 | |
| 28. | Side burner grate W-20130033 |
1 | |
| 29. | Side burner W-GS030018 | 1 | |
| 30. | Electrode W-GC33E012 | 1 | |
| 31. | Extension wire W-013430013 |
1 |
| A | M5X10 | 52pcs | B | 5pcs | C | Split pin | 2pcs | |||||||
PREPARATION
Before beginning assembly, make sure all parts are present. Compare parts with packaged contents list and diagram above. If any parts are missing or damaged, do not attempt to assemble the products. Contact customer service for replacement parts via telephone or email.
![]()
- Estimated assembly time: 40 minutes
- Tools required for assembly: Phillips Screwdriver (not included) and Wrench (not included)
- Note: The right and left sides of the grill are designed as if you are facing the front of the grill.
ASSEMBLY INSTRUCTIONS
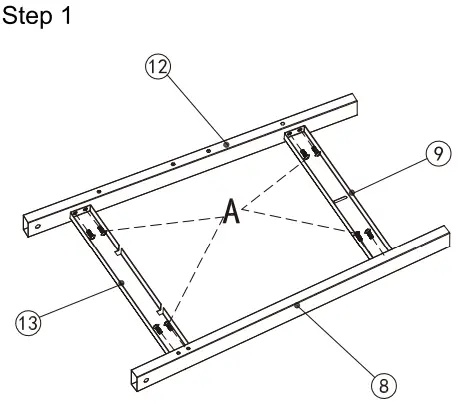
Assemble the leg connector upper (9) and leg connector lower (13) to left front leg (LF)(12) and left back leg (LB)(8) with 8 bolts (A).
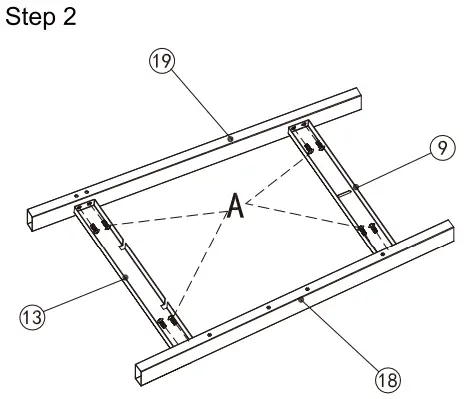
Assemble the leg connector upper (9) and leg connector lower (13) to right front leg (RF)(18) and right back leg (RB)(19) with 8 bolts (A).
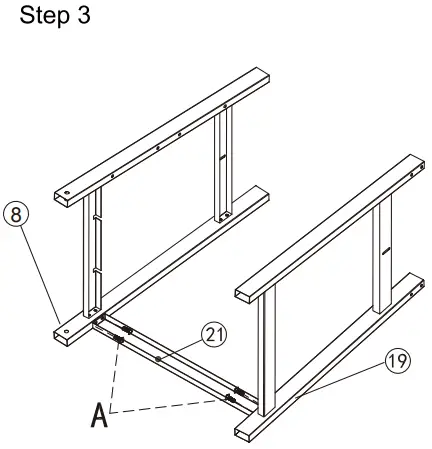
Assemble the leg connector back (21) to left and right side legs with 4 bolts (A).
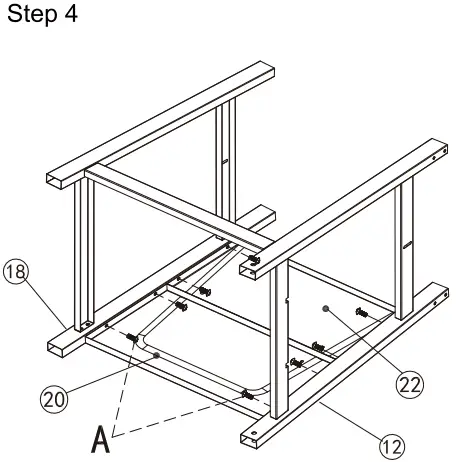
Assemble the cart board upper (22) and cart board lower (20) to left and right side legs with 8 bolts (A).
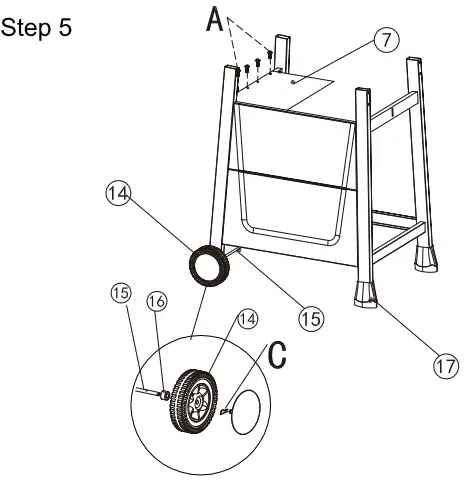
Slide the wheel axle (15) through the left legs (12, 8), attach the wheel washers (16) and wheels (14) on the axle from both sides. Secure them with 2 split pins (C). Attach the wheel cover back to the wheels. Assemble the thermal baffle (7) to leg connector upper (9) with 4 bolts (A).
Install the feet (17) to the right legs.
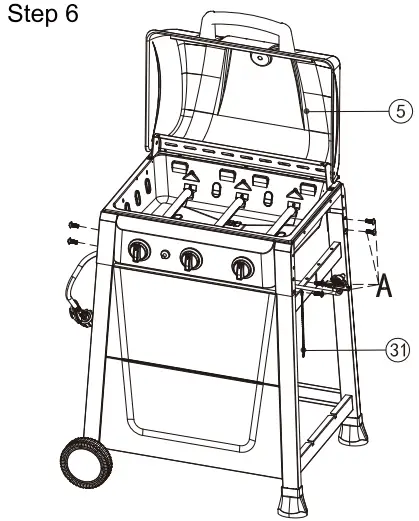
Place the main body (5) onto the cart, fasten it with 8 bolts (A).
Insert the extension wire (31) to the leg connector upper (9) as shown.
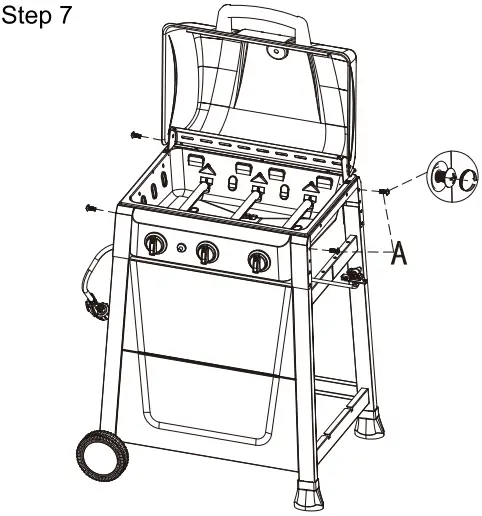
Screw 4 bolts (A) half way on the main body.
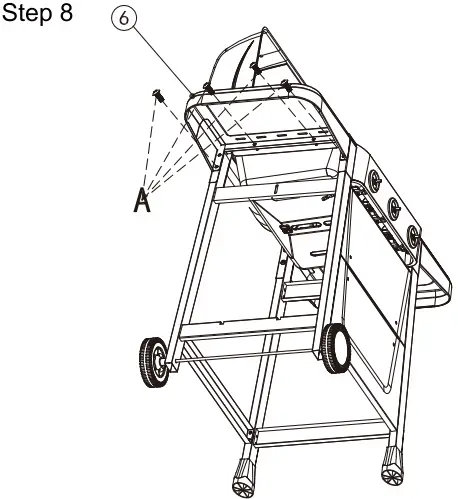
Assemble the side table (6) to the main body by hanging it to the half screwed bolts, fasten it with 4 bolts (A). Then secure the half screwed bolts.
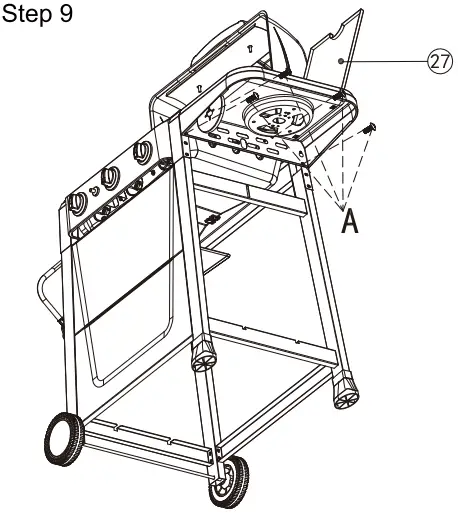
Assemble the side burner shelf (27) to the main body by hanging it to the half screwed bolts, fasten it with 4 bolts (A). Then secure the half screwed bolts.
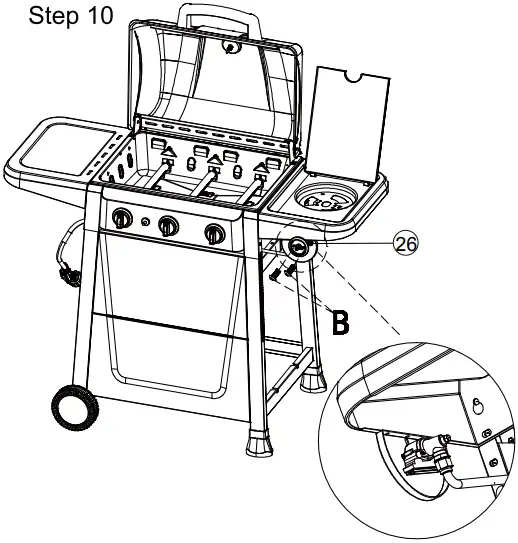
Make the valve insert through the hole of side burner shelf decoration Install the knob base (26) to the side bumer shelf decoration with 2 bolts (B).
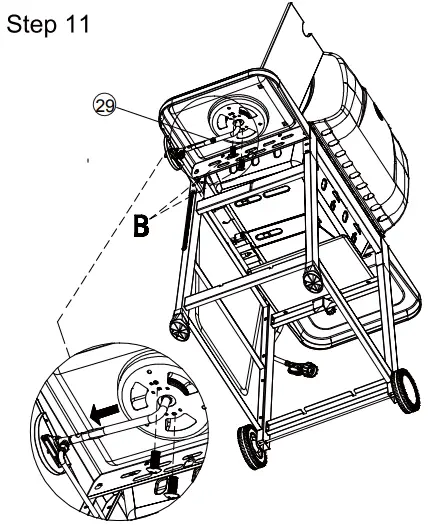
Assemble the burner (29) by sliding on the top center of the side burner shelf. Affix the terminal to the valve.
Fasten burner to shelf with 2 bolts (B).
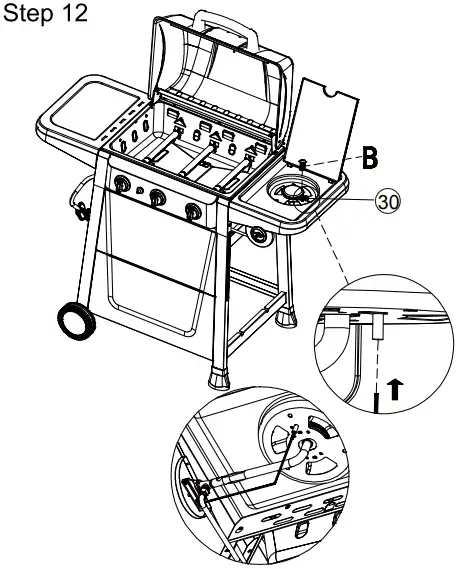
Assemble the electrode (30) to side burner shelf with 1 bolt (B).
Insert the ignition line to the electrode hole as shown.
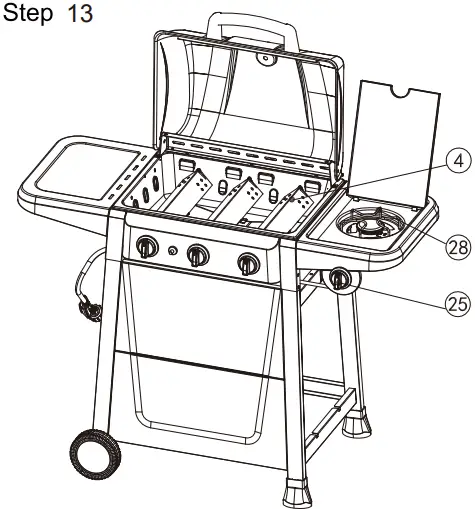
Place the flame tamers (4) into the gas grill.
Install the knob (25) onto the valve .
Place the side burner grate (28) to the side burner shelf.
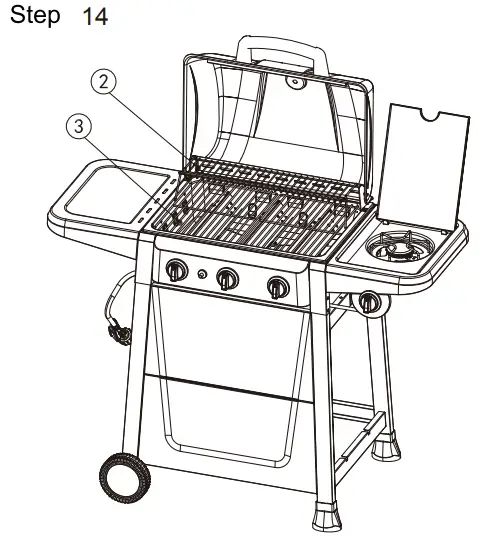
Place the cooking grates (3) onto the main body.
Assemble the warming rack (2)to the main body and lid.
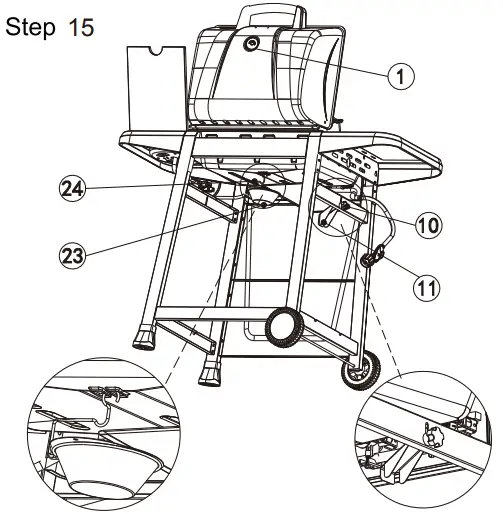
Install the thermometer (1) to the lid.
Hang the grease cup brace (24) underneath the main body, place the grease cup (23) onto the brace.
Assemble the tank holder (11) to leg connector upper with screw (10).
![]()