Contents
SS-44 44 Inch Storm Shell TV Hard Cover and Wall Mount
ASSEMBLY & INSTALLATION INSTRUCTIONS
SS-44 – 44 Inch Storm Shell TV Hard Cover & Wall Mount v 3.3
If you have any questions, please contact us at [email protected], or call at 435-752-6611 Mon – Fri 9am – 5pm (MT)
Before getting started, let’s make sure this
Storm Shell will work for you!
TV SIZE & VESA PATTERN
Maximum TV dimensions (including frame bezel): 41.75 in x 23.5 in x 3.75 inVESA Pattern:
Width: 400 mm (15.75 in) max
Height: 400 mm (15.75 in) max
Will fit 100 mm, 200 mm, 300 mm and 400 mm
VESA patterns.Weight Capacity
Maximum TV Weight (including accessories):
CAUTION! 75 LBS MAX
Wall Material
Hardware is included for:
- Drywall over Wood Studs
- Solid Concrete, structural brick, or masonry (minimum 8 inch thick)
- Outdoor Siding (aluminum, vinyl, stucco, brick veneer, etc.) installed over Wood Studs.
Not all hardware is included for:
- Drywall over Metal Studs
- C 90 Hollow Concrete Block
- Structural brick or masonry (less than 8 inch thick)
Good News! The Storm Shell can be installed on these materials using toggle bolts (not included) to secure the TV Bracket to the wall.
See installation instructions for size details (Step 2C).Toggle Bolts are available at your local hardware store or online source.
Installation Tools (Not Included)
Safety Caution
- Prior to installation of this product, the installation instructions should be read and completely understood to prevent personal injury and property damage. Keep these installation instructions in an easily accessible location for future reference.
- This mount and hard cover contains small parts which can act as a choking hazard if swallowed.
- CAUTION: The maximum TV load capacity is 75 lbs. (34 kg). Use with products exceeding the maximum load capacity may cause serious injury.
- The wall structure must be capable of supporting at least five times the maximum load capacity as indicated. If not, the wall must be reinforced.
- Do not mount on drywall or plywood alone.
- Do not install on a structure that is prone to vibration, movement or chance of impact. Failure to do so could result in damage to the display and/or damage to the mounting surface.
- Do not install near heater, fireplace, air conditioning or any other heat producing source. Failure to do so may result in damage to the display and/or the hard cover and could increase the risk of fire.
- Make sure no water or natural gas lines are present where the mount is to be installed. Cutting or drilling into water or natural gas lines could cause personal injury or property damage.
- Proper installation procedure by yourself or a qualified service technician, as outlined in the installation instructions, must be adhered to. Failure to do so could result in serious personal injury.
- When mounting to a wall that contains wood studs, confirm the dead center of the wood stud prior to installation, it is recommended that the wood studs be a minimum of 16″ apart.
- It is recommended that two people perform the installation. Injury and/or damage can result from dropping or mishandling the display or hard cover.
- If you don’t understand these installation instructions, please consult an installation specialist.
Do you need an Adapter Mounting Plate? (Not Included)
- Concrete wall or hollow wall (not drywall) installation? – No
- Wood Stud installation with stud spacing different than 16 inch? – Yes
- Wood Stud installation with stud spacing = 16 inch? – Maybe…
- The mounting holes must be placed over studs. If the Storm Shell placement is OK, then No Adapter Mounting Plate is required.
- If you desire a different placement of the Storm Shell (left or right of the studs), an Adapter Mounting Plate is required.
No Adapter Mounting Plate required.Yes – Adapter Mounting Plate is required.To order the Adapter Mounting Plate, please visit www.StormshellTV.com/Accessories
Supplied Parts & Hardware
Storm Shell & TV BracketPack #1- Storm Shell Assembly HardwarePack #2- Mounting Bracket Hardware
Assembly & Installation Video
https://stormshelltv.com/pages/tutorials
Scan the QR Code for video link
Step 1 – Prepare the Storm Shell Back
1-2 Attach Buckle Latches1-3 Attach Cover Hooks
Step 2 – Attach Storm Shell Back to Wall
CAUTION! Two people required for installation
Determine the wall material and wall supports. Wall supports are typically wood or metal studs, concrete, structural brick or masonry. Wall material (cladding) is typically drywall, siding (vinyl or aluminum), stucco, brick veneer.
CAUTION!
The Storm Shell TV Wall Mount must be secured into concrete, structural brick or masonry, wood or metal studs. Do not mount directly into drywall or plywood.
- For wood stud installation, follow STEP 2A
- For solid concrete installation, follow STEP 2B
- For hollow wall installation (metal studs, concrete block), follow STEP 2C
Step 2A – Wood Stud Installation
2A-1 Locate and Mark Wood Studs NOTE! If the wall material is outdoor siding (vinyl or aluminum), stucco, or brick veneer; the wood studs may be difficult to locate with a stud finder due to several layers of construction cladding. You may need to locate the wood stud from the inside wall and use measurements to locate the wood stud from the outdoor wall.
2A-2 Locate and mark three studs to mount the Storm Shell Back
NOTE!
If you desire a different mounting position than shown (left-toright), an Adapter Mounting Plate is required (not included). See www.StormShellTV.com/accessories
2A-3 Mount Storm Shell Back
- Place Storm Shell Back at desired installation location
- Mark in top left “key-hole” (ensure the mark is over a stud)
2A-4 Mount Storm Shell Back Remove Storm Shell Back and drill on top left mark with 5/32” wood drill bit 1.5” deep.
2A-5 Mount Storm Shell BackInstall C4 in top left location (leave small gap between screw head and wall) – use 10mm socket
2A-6 Mount Storm Shell Back
- Hang top left key-hole on the installed C4 screw
- Place bubble level on Storm Shell Back, swing so that the enclosure is level
2A-7 Mount Storm Shell Back
With the enclosure level, mark position of top right key-hole
2A-8 Mount Storm Shell Back
Remove Storm Shell Back and drill on top right mark with 5/32” wood drill bit 1.5” deep.
2A-9 Mount Storm Shell BackInstall C4 in top right location (leave small gap between screw head and wall) – use 10mm socket
2A-10 Mount Storm Shell Back Hang Storm Shell Back on the two C4 screws previously mounted into the wall.
2A-11 Mount Storm Shell Back
- Drill through two lower holes with 5/32” wood drill bit, 1.5” deep.
- Drill through three TV Bracket holes with 1/4” wood drill bit. If installation is over drywall, drill 2.5” deep. If installation is over outdoor siding, drill 4” deep.
- Ensure all drill holes are on studs.
2A-12 Mount Storm Shell Back2A-13 Mount Storm Shell Back
NOTE!
E4 or F4 Lag Bolts must penetrate wood studs at least 1.5 inches deep. If wall material (siding, stucco, brick veneer) is too think to allow this, longer lag bolts will be required. 8mm, 1/4”, or 5/16” lag bolts are adequate.
Step 2B – Concrete Wall InstallationRepeat Steps 2A-3 and 2A-4 except use a hammer drill in concrete. Use 5/32” concrete drill bit 1.5” deep.
- Repeat Step 2A-5, 2A-6, 2A-7
- Repeat Steps 2A-8 except use a hammer drill in concrete.
- Use 5/32” concrete drill bit 1.5” deep.
- Repeat Step 2A-9
2B-3 Mount Storm Shell Back Hang Storm Shell Back on the two C4 screws previously mounted into the wall.
2B-4 Mount Storm Shell Back
- Drill through two lower holes with 5/32” concrete drill bit, 1.5 inches deep.
- Drill through the Top and Bottom TV Bracket holes with with 5/16” concrete drill bit, 3.0 inches deep.
2B-5
- Repeat Step 2A-13.
- Install TV Bracket with J4 bolts. Tap-in J4 with hammer, then tighten nuts with crescent wrench
Step 2C – Hollow Wall Installation
2C-1 C90 (Cinder Block) Wall, or Masonry Wall Less Than 8” Thick
- If the C90 wall is filled with concrete, follow Step 2B
- If the C90 wall is hollow, follow Step 2B except use Toggle Bolts (1/4” or 5/16”) in place of J4 to attach the TV Bracket. Use three Toggle Bolts to attach the TV Bracket.
- Toggle Bolts or Strap Toggles are available at standard hardware stores or online.
2C-2 Metal Stud Installation
- Follow Step 2A except use Toggle Bolts (1/4” or 5/16”) in place of E4 to attach the TV Bracket. Use three Toggle Bolts to attach the TV Bracket.
- Toggle Bolts or Strap Toggles are available at standard hardware stores or online.
Step 3 – Test Storm Shell
3-1 Before hanging TV, conduct a “wall integrity test”After mounting bracket is assembled, test bracket by putting downward pressure on bracket (equivalent to TV weight) to ensure proper installation
3-2 Install Storm Shell Front – check fit
Step 4 – Attach TV to Mounting Bracket
4-1 Select TV Screws
4-2 Determine if Spacers are Needed4-3 Measure & Mark Vertical Center of TV4-4 Determine Placement of Vertical Brackets Place Vertical Brackets over VESA holes
4-5 Determine Placement of Vertical Brackets
- Place one of the “Bracket Centering Marks” over the Vertical Center Mark
- Find a position where the bracket covers the VESA holes, but does not overhang the TV
4-6 Determine Placement of Vertical Brackets 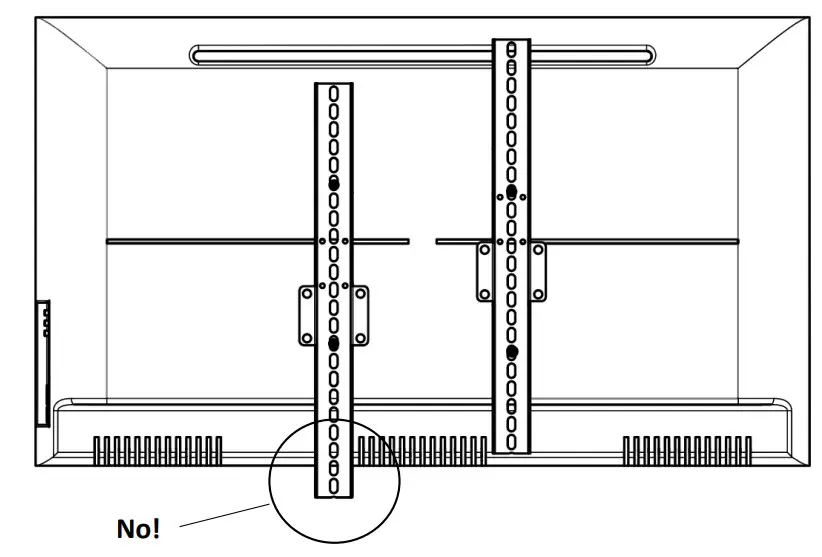 4-7 Attach Vertical Brackets
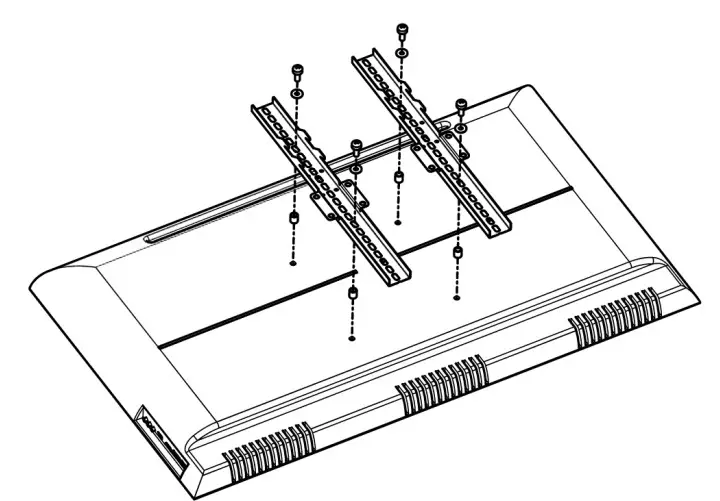 4-8a Attachment without Spacers
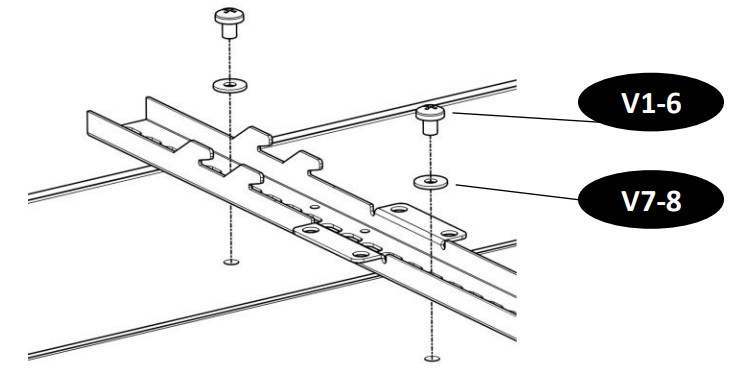 4-8b Attachment with Spacers
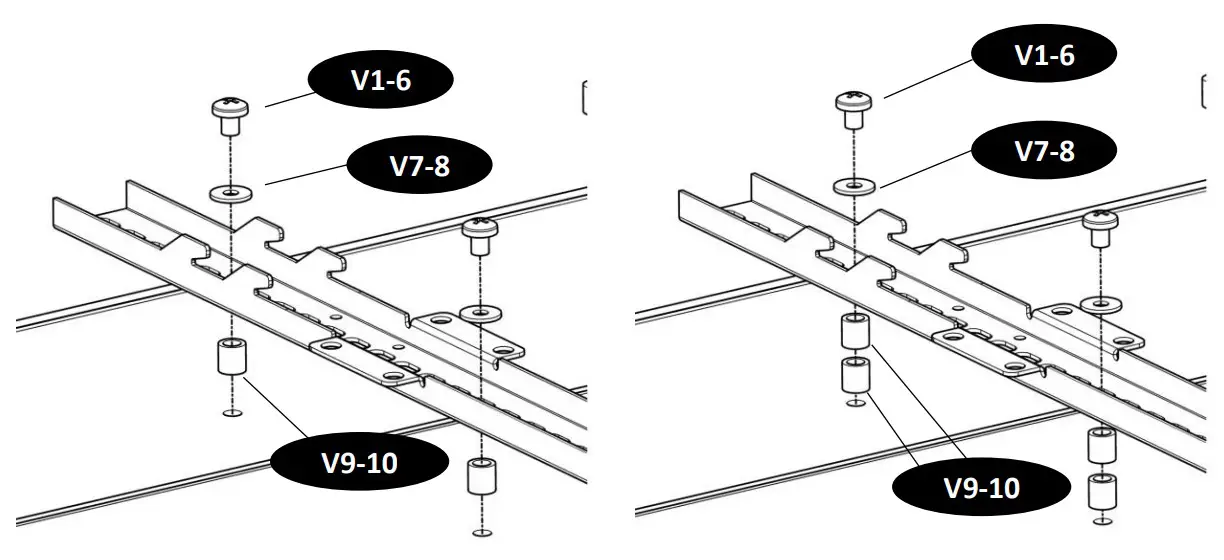 4-9 Determine Which Hook Position to Use
- Determine which “Bracket Centering Mark” covers the Vertical Center Mark
- Use the top hook for the top centering mark, bottom hook for the bottom centering mark.

4-10 Hang and Secure TV to Wall Plate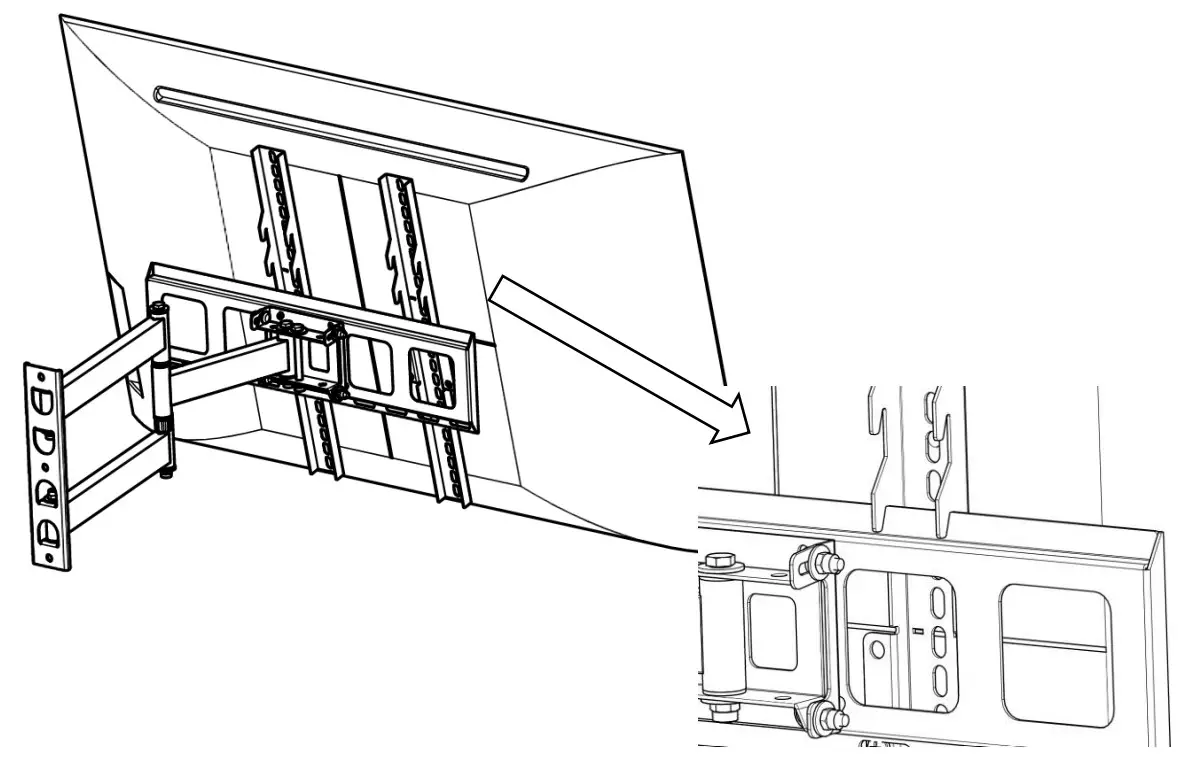 Ensure TV is centered horizontally on TVBracket
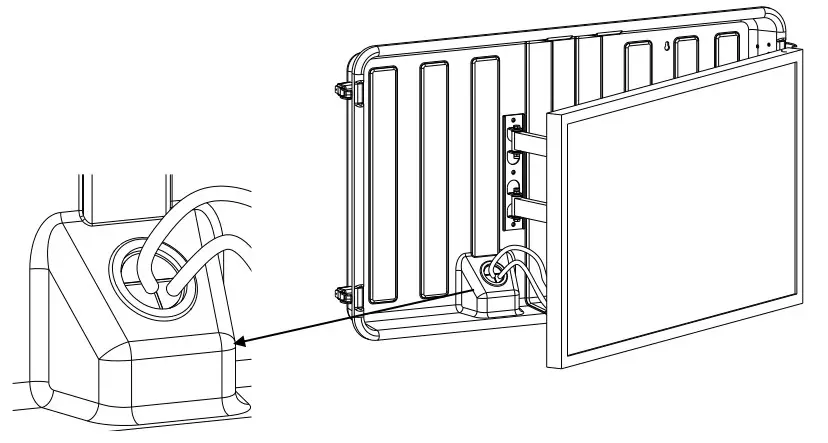
4-11 Attach Securing Screws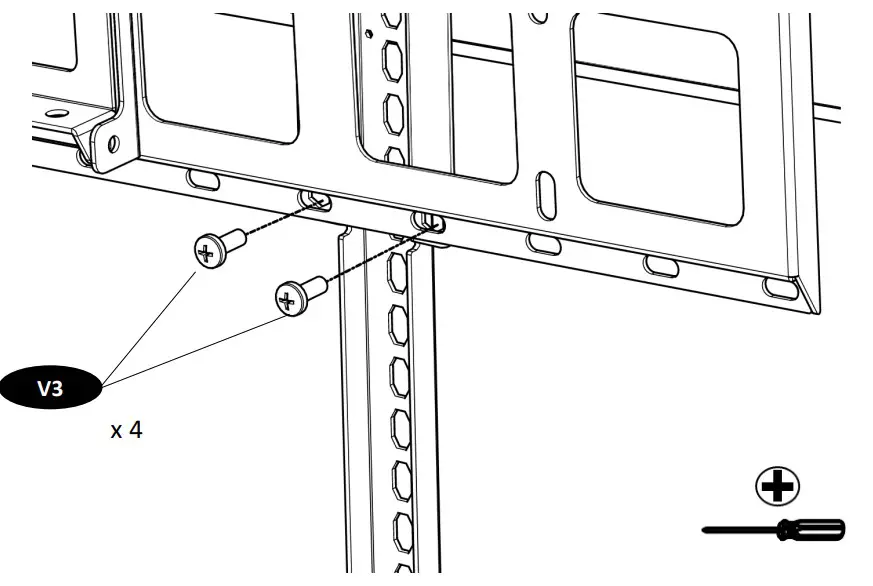 4-12 Set TV Cables – Cut Cable Grommet
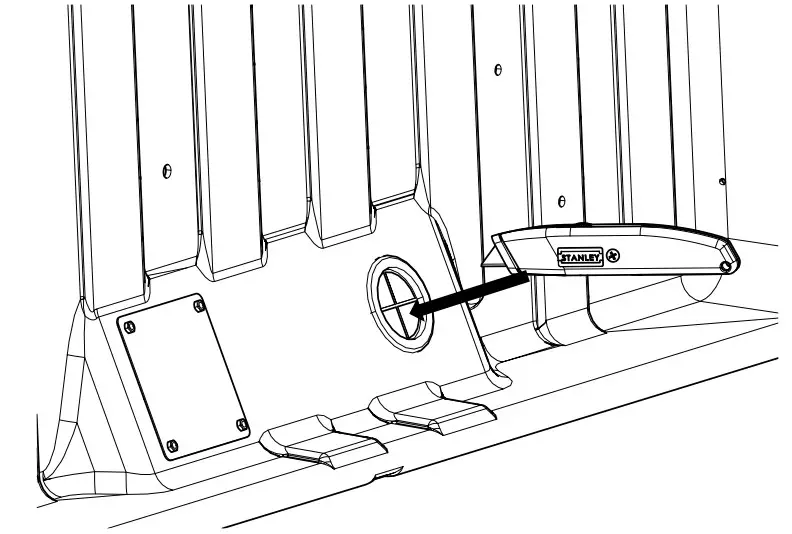 4-13 Set TV Cables