![]()
EV Portable Charger
User Manual

Enjoy it
Please read this instruction carefully before using the product.
Contents
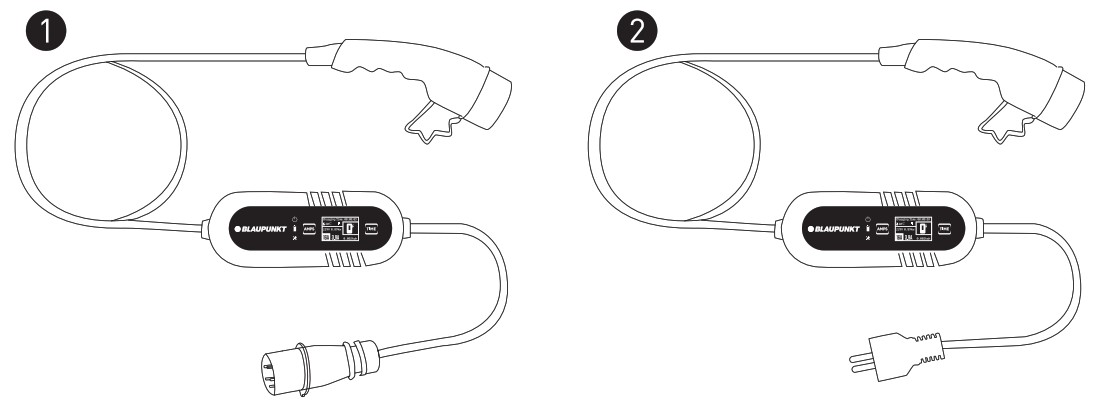
P3PM2T2 Portable Charging Box
EV Portable Charger
Please carefully read the following instructions before charging your Electrical Vehicle, be aware of the hazards involved with electrical circuity and standard practices for preventing accidents.
Introduction to the Portable EV Charger ( Mode 2 )
CAUTION
- Use the power source with external upstream Circuit Breaker.
- Make sure the charger is used in a safe, secure place and well out of the reach of young children or pets.
- Please use the charger in a dry, well ventilated and secure place. Keep weel out of reach of young children or pets. Avoid water pouring directly onto the power plug.
- Do not open the enclosure while charging or with the power on.
- Do not maliciously damage the product.
Introduction to the Portable EV Charger ( Mode 2 )
| Model | Power Supply Type |
Cable Total Length |
Voltage | Current | Connector Type |
| P1PM2T2 | Single-phase | 8m | 200-250V | 8/10/13/16A | T2 |
| P1PM2T1 | Single-phase | 8m | 200-250V | 8/10/13/16A | T1 |
| P1PM2T2C | Single-phase | 8m | 200-250V | 8/10/13/16A | T2 |
| P3PM2T2 | Three-phase | 8m | 380-450V | 8/10/13/16A | T2 |
| P1PM2T2BS | Single-phase | 8m | 200-250V | 8/10/13/16A | T2 |
| P1PM2T1BS | Single-phase | 8m | 200-250V | 8/10/13/16A | T1 |
Explanation of the operating display and technical parameters
1. Model: P3PM2T2

Explanation of the operating display
| Power light | |
| Charge lamp | |
| Trouble lamp | |
| Current switch button | |
| 00:00:03 | Charging time |
| Temperature | |
| PE Detection (Earthing Detection)* | |
| 405V | Voltage |
| 0.89kw | Power |
| 16A | Rated current |
| 3.9A | Constant current |
| 0.002kwh | Electricity consumption |
| Time function button |
*Warning :
Before charging, the user must check the “![]() ” symbol on the charger’s display. If “
” symbol on the charger’s display. If “![]() ” is displayed, the charger operates without an Upstream protective conductor ( PE )
” is displayed, the charger operates without an Upstream protective conductor ( PE )
Only trained electricians are allowed to use the charger if the “![]() ” symbol is displayed.
” symbol is displayed.
Control box:

Technical Parameters
| Dimensions (L x W x H) | 260 x 100 x 72.5 mm |
| Weight | 3Phase: 3.35 kg |
| Protection Degree ( Control box) | IP65 |
| Operating Temperature | -30°C to +50°C |
Explanation of the operating display and technical parameters
2. Model: P1IPM2T2/P1PM2T1 /P1PM2T2C / P1PM2T2BS / P1PM2T1BS

Explanation of the operating display
| Power light | |
| Charge lamp | |
| Trouble lamp | |
| Current switch button | |
| 00:00:03 | Charging time |
| Temperature | |
| PE Detection (Earthing Detection)* | |
| 245V | Voltage |
| 0.89kw | Power |
| 16A | Rated current |
| 3.9A | Constant current |
| 0.002kwh | Electricity consumption |
| Time function button |
* Warning :
Before charging, the user must check the “![]() ” symbol on the charger’s display. If “
” symbol on the charger’s display. If “![]() ” is displayed, the charger operates without an Upstream protective conductor ( PE )
” is displayed, the charger operates without an Upstream protective conductor ( PE )
Only trained electricians are allowed to use the charger if the “![]() ” symbol is displayed.
” symbol is displayed.
Control box:

Technical Parameters
| Dimensions (L x W x H) | 260 x 100 x 72.5 mm |
| Weight | 1 Phase: 2.65 kg |
| Protection Degree ( Control box) | IP65 |
| Operating Temperature | -30°C to +50°C |
Use of the charger – start charging
Start Charging
| Step | Illustration | Operation |
| 1 |   |
Insert the plug into the correct power supply socket. |
| 2 |  |
Remove the protective cap and fully insert the charging connector into the EV charging port. |
| 3 | 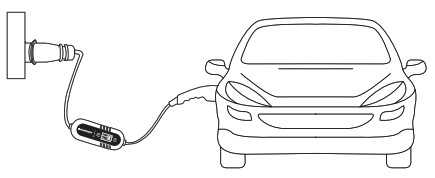 |
Start charging |
![]() Danger
Danger
Do not use the product if it appears to be damaged or the cable is broken.
Do not disassemble or assemble the connector and change the internal parts Do not clean the products using chemicals or cleaning the EV car while charging.
Use of the charger – stop charging
Stop Charging
| Step | Illustration | Operation |
| 1 | 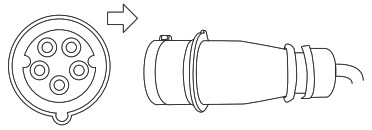 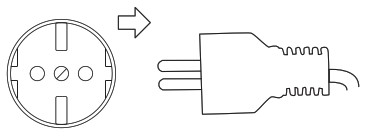 |
Disconnect the plug from the power supply socket. |
| 2 | |
Disconnect the charging connector from the EV car. |
| 3 | 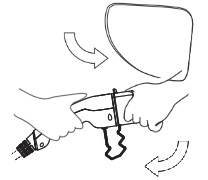 |
Close the protective shell of EV charging port,then cover the protective cap of the charging connector. |
| 4 | 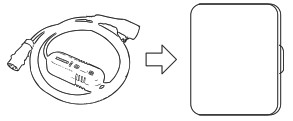 |
Put the portable charger into the bag. |
Display Light Status
Display Light Status
| Indicator Light | Status | Indicator Light | Status | Indicator Light | Status |
| Off | Blink | On | |||
| Off | Blink | On | |||
| Off | Blink | On |
Operation:
| 1 | Power Off | |||
| 2 | Check | |||
| 3 | Standby | |||
| 4 | Connected | |||
| 5 | Charging | |||
| 6 | Charge Complete |
Troubleshooting:
| CP Error | |||
| Relay Error | |||
| Over/Under Voltage | |||
| Over current protection | |||
| Electric leakage protection | |||
| No ground connection | |||
| Temperature warning | |||
| Persistent high temperature |
Function: Switch Current
Switch Current:
CAUTION
In order to switch charging current, Please make sure the power plug is firmly inserted into the socket and plug for the EV vehicle is disconnected.
| Step | Statu | |
| 1.Insert the plug into the correct power supply socket. | |
Ready |
| 2.Press the “Amps” switch button for 2 seconds |  |
Enter setting the switch current mode |
| 3.Continue to press the button briefly. The current will be changed. ( switch between 8-10-13-16A) |  |
Setting the current of User’s request |
| 4 Press the button for 2s again. |  |
Setting successfully |
Please complete setting within 4 seconds at each step, otherwise the feature setting will fail.
Function: Timer function
Timer function:
CAUTION
In order to switch charging current, Please make sure the power plug is firmly inserted into the socket and the plug for EV vehicle is disconnected.
| Step | Statu | |
| 1.Insert the plug into the correct power supply socket. |   |
Ready |
| 2.Press the “Time” switch button for 2 seconds. |  |
Enter setting the delay time mode |
| 3.Continue to press the button briefly.The time will be changed.( Switch between 1/2/4/6/8/10H ) |
 |
Setting the delay time of User’ s request |
| 4 Press the button for 2s again |  |
Setting successfully |
Please complete setting within 4 seconds at each step, otherwise the feature setting will fail.
Notice:
In case you want to cancel the timer setting – you can use one of the two options below:
- Directly to disconnect the plug from the outlet socket.
- Press the Time button for 5s.