![]() INOGENI CAM230
INOGENI CAM230
 User guide
Version 1.1
June 2, 2023
Contents
VERSION HISTORY
| Version | Date | Description |
| 1.0 | April 12, 2023 | First release. |
| 1.1 | June 2, 2023 | – Added new REMOTE connectivity. – Added power consumption limit for USB cameras. – Added RCM statement. – Added minor modifications to RESTAPI. – Added firmware update procedure. |
TYPICAL APPLICATION

BLOCK DIAGRAM
Here is a simple block diagram to better understand the usage of the product.  The device embeds a video switch that can connect to USB3.0/2.0 and HDMI cameras. The device will output video content from the selected source over HDMI and USB2.0 outputs simultaneously.
This can give you a great asset to your videoconferencing equipment to switch camera interface easily without going into your UC settings.
AUDIO ROUTING
The device can connect to USB microphones/speakerphones and on a HDMI feed that includes audio. These sources can be sent over the HDMI output and to the USB2.0 output.
The USB2.0 interface embeds a digital audio interface which implements a microphone and a speaker device. Ultimately, the UC software connected to the USB2.0 camera interface can receive and transmit audio from/to the connected USB videobar.
DEVICE INTERFACES
Here are the devices interfaces. 
| 1. Input selection buttons | 4. USB2.0 camera output | 7. RS232 and remote interface |
| 2. Input status LEDs | 5. USB3.0 camera inputs | 8. LAN/PoE interface |
| 3. HDMI output | 6. HDMI camera input | 9. +12VDC power input |
LEDS BEHAVIOR
Here are the LEDs behavior:
| Power input | |
| OFF | No power. |
| SOLID | Device is powered up. |
| PoE | |
| OFF | Not powered from PoE. |
| SOLID | Powered from PoE. |
| Input led | |
| OFF | Input not detected and not selected. |
| LOW | Input detected and not selected. |
| FLASH-LOW | Input not detected and selected. |
| HIGH | Input detected and selected. |
SPECIFICATIONS
Here is the complete specification.
| Physical details | |
| Dimensions (W x L x H) | 17.33 cm x 11.57 cm x 3.26 cm 6.82” x 4.55” x 1.28” |
| Power supply | 12V (100-240 VAC 50/60Hz to 12V/1.2A DC) – or – PoE source compliant with IEEE 802.3af (802.3at Type 1) |
| Weight | 606 g |
| Package content | 1 x USB 2.0 Type-B to Type-A cable (3ft). 1 x terminal block connection. 1 x 12V power supply. |
| Operating temperature | 0° to 45° C (32° to 113° F) |
| Storage temperature | -40° to 105° C (-40° to 221° F) |
| Relative humidity | 0% to 90% non-condensing |
| UPC code | 51497302825 |
| Origin | Canada |
| Warranty | 2 years |
| USB inputs | |
| 2x USB 3.0 inputs | 1x USB 3.0/2.0 camera Uncompressed, YUYV/NV12/I420 – 1080p30 MJPEG – 1080p30 |
| USB Power | Up to 1.2A shared between the USB ports |
| HDMI input | |
| Resolution | 1080p50/60 fps, 720p50/60 fps |
| Connector | HDMI |
| HDMI output | |
| Resolution | 3840x2160p23.98/24/25/29.97/30 fps, 1080p50/60 fps, 720p50/60 fps |
| Connector | HDMI |
| USB 2.0 output | |
| USB-B Type-B connector | Device will expose a UVC interface over USB 2.0 up to 1080p30 MJPEG with a digital audio input and output interfaces |
| Audio | |
| Digital audio I/O | Embedded in HDMI or USB |
| Control | |
| Control options | Front buttons RS-232 LAN USB |
| IP interface | 100 Mbps half-duplex (autonegotiation not supported) Supports DHCP or static IP addressing |
| RS232 interface | Baud rate: 9600 Data bits: 8 Stop bits: 1 Parity: None Flow control: None |
| Certifications | |
| HDCP compliant | The device does not decrypt BD/DVD movies, satellite/cable receivers or other encrypted sources. |
| Certifications | Cameras (or video Source) with a HDMI or USB outputs |
| TAA-compliant | UVC-compliant. Runs with all software compatible to DirectShow/MediaFoundation, V4L2, QuickTime and AVFoundation. |
SERIAL COMMUNICATION PROTOCOL
Here is the complete list of commands provided through the serial connection.
As written on the back of the device, here is the pinout of the terminal block.
 |
Pin 1: Receive Pin 2: GND Pin 3: Transmit Pin 4: 5V supply (for INOGENI Remote) |
Typically, commands will return ACK in case of success and NACK in case of failure.
Note that if serial interface was disabled using REST API, commands will not be parsed, and no response will be provided.
Baud rate: 9600 // Data bits: 8 // Stop bits: 1 // Parity: None // Flow control: None
| Command | Argument(s) | Description |
| HELP | None | Return command list with description |
| RSTR | None | Restore default settings (including password and rest api token) |
| RESET | None | Reset/reboot the device |
| IP | None | Returns IP address |
| VERSION | None | Returns firmware version |
| STATUS | None | Return devices, video/audio inputs and HDMI output status |
| PAN | 1 argument (integer) The sign specifies the direction. We multiply the argument by the camera smallest step, and if the speed is too fast, we go as fast asthe camera allow. We recommend using values between -10 and 10. |
Relative pan of the selected camera |
| TILT | 1 argument (integer) The sign specifies the direction. We multiply the argument by the camera smallest step, and if the speed is too fast, we go as fast as the camera allow. We recommend using values between -10 and 10. |
Relative tilt of the selected camera |
| ZOOM | 1 argument (integer) The sign specifies the direction. We multiply the argument by the camera smallest step, and if the speed is too fast, we go as fast as the camera allow. We recommend using values between -10 and 10. |
Relative zoom of the selected camera |
| SETHDMI | 1 argument (integer) Possible parameters: 0 => 1080P60 1 => 1080P50 2 => 720P60 3 => 720P50 4 => 4K24 5 => 4K25 6 => 4K30 |
Set HDMI output mode |
| SETVIDEOFORMAT | 2 arguments (integer) 1st arg: <inputPort> 1 => USB input #1 2 => USB input #2 4 => Test pattern 2nd arg: <formatIndex> |
Set video input format |
| GETVIDEOFORMATS | 1 argument (integer) | Get video input format |
| The argument specifies the port of the video input for which we want to get the available formats. 1 => USB input #1 2 => USB input #2 3 => HDMI input 4 => Test pattern |
||
| SETAUDIOINPUT | 1 argument (integer) The argument specifies the index (start at 0) of theaudio input. To see available inputs, use STATUS command. |
Set audio input |
| SETVIDEOINPUT | 1 argument (integer) The argument specifies the port of the video input.1 => USB input #1 2 => USB input #2 3 => HDMI input 4 => Test pattern To see available inputs, use STATUS command. |
Set video input |
| SETVIDEOINPUTMODE | 1 argument (integer) The argument specifies if we want manualautomatic switching. 0 => automatic switching 1 => manual switching |
Set video input switching mode |
INOGENI REMOTE

The INOGENI Remote needs to be connected to the terminal block port in order to operate. Apply wiring accordingly. This remote is sending serial commands to the device. Make sure to set the DIP SW6 below the device to ON in order to apply power to the remote before going further. See “DIP SWITCHES” section and user manual of the INOGENI REMOTE for more details.
![]() Do not plug a RJ45 cable between the INOGENI device and the REMOTE.
Do not plug a RJ45 cable between the INOGENI device and the REMOTE.
| Terminal block: Pin 1: Receive Pin 2: GND Pin 3: Transmit Pin 4: 5V supplyRJ45: Pin 1: 5V supply Pin 2,3,4,5: NC Pin 6: GND Pin 7: RX Pin 8: TX |
 |
LAN COMMUNICATION PROTOCOL
You can access the device settings through its LAN interface. The LAN interface use DHCP and static IP addressing. You can obtain the IP from the Inogeni Control App or from the serial port IP command. Note that LAN is set to 100Mbps halfduplex.
CDC-NCM COMMUNICATION PROTOCOL
The device can also be controlled through CDC-NCM interface exposed on the USB2.0 device port.
This interface has the same functions as the LAN interface, except the requests are done through USB to ease configuration.
CDC-NCM IP address: 169.254.10.10
POE
The device can be powered from a 12V power supply or from a PoE compliant source. If the 12V power supply is connectedthis one is taken in priority.
WEBPAGE
Here is the webpage that can be used to configure and upgrade the device. This webpage is accessible through IP or
through the CDC-NCM interface over USB2.0.
The username is “admin”, and the default password is “admin”.  The STATUS page will give you information about the firmware installed. video and audio devices that you can monitor.
  The CONFIGURATION tab will allow you to :
- Set the HDMI resolution over HDMI
- Set the selected camera source
- Set the video input switching mode
o AUTO : Device will switch to newly detected video source
o MANUAL : Device will only switch when we get the control to do it. - Set the audio input from USB sources or HDMI input.
 The SYSTEM tab will allow you to :
- Change the current password for accessing device settings.
- Get/Set REST API access token needed using REST API interface.
- Change network settings of your device.
- Restore default settings and reboot the system.
- Update your system.
 To update your system, please do the following :
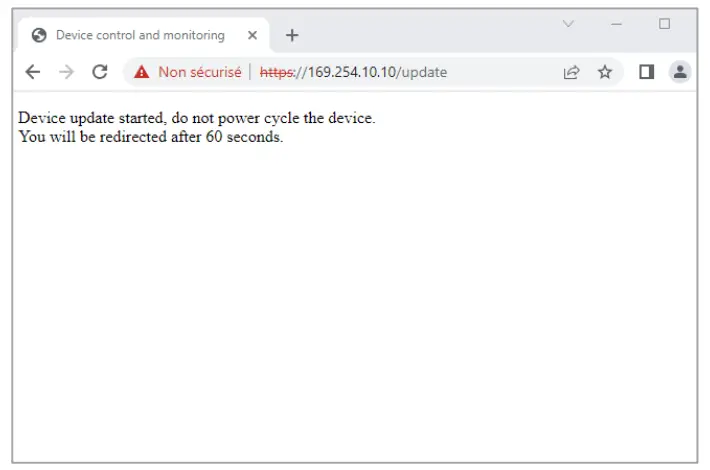
- Click on the “Choose File” button and browse to the WIC file downloaded from our website.
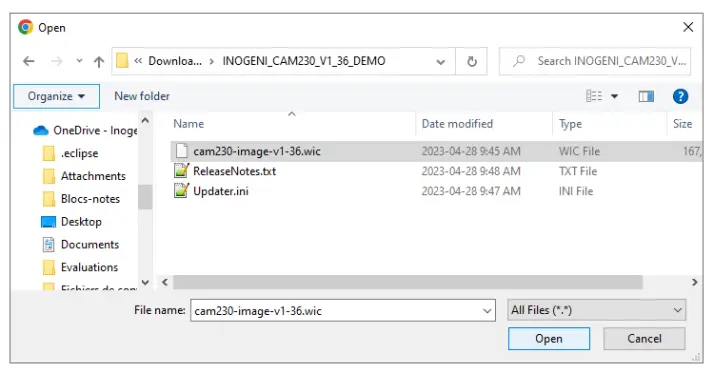
- Click on “Update CAM230” button to proceed to the update. The operation can take up to 1 minute. The device will reboot and browser will be refreshed.
The DOCUMENTATION tab will allow you :
- Get to the latest user guide.
- Go to product webpage.
 The first time you access the webpage, your web browser is likely to complain that the connection is insecure. The reason for this is because we are using self-signed HTTPS certificate, because certificate providers will not provide certificates for address that are not globally accessible.
The webpage can set HDMI resolution, USB video input format, webpage password, or the REST API access token. Please note that in the case of the REST API token, we can only ask for the device to generate a new randomly enerated token. It can also be used to upgrade the device firmware.
REST API
The response will usually be JSON formatted with a “message” field containing a JSON string explaining the cause of the error or “success” in case of success. Note that we are using self-signed certificate.
You can enable a bearer authentication in the HTTP header (Authorization: Bearer <token>) through our configuration page to increase security on the API.
Here is the complete list of commands supported through the REST API (excluding password change, firmware update, bearer token get/set):
| Command URL / Description | Body arguments | Return code | Return body |
| GET/POST https://<IP>/api/v1/rstrRestore default settings (including password and rest api token) |
200 => success 400 => error 401 => authorization error |
{ “message”: <String> } |
|
| GET/POST https://<IP>/api/v1/resetReset/reboot the device |
200 => success 400 => error 401 => authorization error |
{ “message”: <String> } |
|
| GET https://<IP>/api/v1/versionReturns firmware version |
200 => success 401 => authorization error |
{ “major”: <Integer>, “minor”: <Integer> } |
|
| GET https://<IP>/api/v1/statusReturn devices, video/audio inputs and HDMI output status |
200 => success 401 => authorization error |
JSON object with multiple fields |
|
| GET/POST https://<IP>/api/v1/panRelative pan of the selected camera |
pan=<Integer>
The sign specifies the direction. |
200 => success 400 => error 401 => authorization error |
{ “message”: <String> } |
| GET/POST https://<IP>/api/v1/tiltRelative tilt of the selected camera |
tilt=<Integer>
The sign specifies the direction. |
200 => success 400 => error 401 => authorization error |
{ “message”: <String> } |
| GET/POST https://<IP>/api/v1/zoomRelative zoom of the selected camera |
zoom=<Integer>
The sign specifies the direction. |
200 => success 400 => error 401 => authorization error |
{ “message”: <String> } |
| GET/POST https://<IP>/api/v1/zoomRelative zoom of the selected camera |
zoom=<Integer>
The sign specifies the direction. |
200 => success 400 => error 401 => authorization error |
{ “message”: <String> } |
| GET/POST https://<IP>/api/v1/setHdmiSet HDMI output mode |
mode=<hdmiModeIndex>
Possible <hdmiModeIndex>parameters: |
200 => success 400 => error 401 => authorization error |
{ “message”: <String> } |
| 1 => 1080P50 2 => 720P60 3 => 720P50 4 => 4K24 5 => 4K25 6 => 4K30 |
|||
| GET/POST https://<IP>/api/v1/setVideoFormatSet video input format |
x-www-form-urlencoded input=<inputPort> format=<formatIndex>Possible <inputPort> parameters: 1 => USB input #1 2 => USB input #2 4 => Test pattern |
200 => success 400 => error 401 => authorization error |
{ “message”: <String> } |
| GET https://<IP>/api/v1/getVideoFormatsGet video input format |
4 => Test pattern input=<Integer> If input argument is not provided, will use currently selected inputPossible <Integer> parameters1 => USB input #1 2 => USB input #2 3 => HDMI input 4 => Test pattern |
200 => success 400 => error 401 => authorization error |
JSON array containing all formats for requested input. |
| GET/POST https://<IP>/api/v1/setAudioInputSet audio input |
input=<Integer>
The argument specifies the index |
200 => success 400=> error 401 => authorization error |
{ “message”: <String> } |
| GET/POST https://<IP>/api/v1/setVideoInputSet video input |
input=<Integer>
Possible <Integer> parameters: |
200 => success 400=> error 401 => authorization error |
{ “message”: <String> } |
| GET/POST https://<IP>/api/v1/setVideoInputModeSet video input switching mode |
mode=<mode>
Possible <mode> parameters: |
{ “message”: <String> } |
|
| GET/POST https://<IP>/api/v1/ disableSerialInterfaceDisable serial interface |
200 => success 400 => error 401 => authorization error |
{ “message”: <String> }Message field contains characters read from RS232 |
|
| GET/POST https://<IP>/api/v1/serialWriteWrite serial data to RS232. Giving content to write in URL is not supported. |
<Content to write> | 200 => success 400 => error 401 => authorization error |
{ “message”: <String> } |
| GET/POST https://<IP>/api/v1/setNetworkConfigure network settings |
x-www-form-urlencoded mode=<static,dhcp> If mode is static, must provide following args: ip=<ipv4 address> netmask=<ipv4 netmask> If mode is static, you can also specify a gateway: gateway=<ipv4 gateway> |
200 => success 400 => error 401 => authorization error |
{ “message”: <String> } |
It is also possible to embed arguments to an API call inside the URL to ease configuration with some control systems with the following topology: GET https://<IP>/api/v1.COMMAND/ARG1=value&ARG2=value
For example, using the SETVIDEOFORMAT, you can issue the following request: GET https://<IP>/api/v1/setVideoFormat?input=1&format=0
This request will set the input #1 to format index 0.
The following commands allow to perform password management, bearer token management and firmware update. The authentication used is basic auth, and we use the same user and password as the webpage (default user=admin password=admin).
| Command URL / Description | Body arguments | Return code | Return body |
| POST https://<IP>/api/v1/changePassword? password=<newPassword>Change the webpage password to <newPassword> |
200 => success 400 => error 401 => authorization error |
{ “message”: <String> } |
|
| GET https://<IP>/api/v1/getAccessTokenReturn the bearer token |
200 => success 400 => error 401 => authorization error |
{ “token”: <String> }If no bearer token is set, the “token” field will be null. |
|
| POST https://<IP>/api/v1/generateAccessTo ken |
200 => success 400 => error 401 => authorization error |
{ “message”: <String> } |
|
| POST https://<IP/api/v1/update |
Must use formdata body. The key must be myFile, and the value is of type file. We expect a .wic file that should be present in our official update packages |
200 => success 400 => error 401 => authorization error |
{ “message”: <String> } |
INOGENI CONTROL APP
You can use our Control App to monitor firmware information and upgrade your unit.
![]() NOTE: You need to use the USB-B to USB-A cable provided with the box for the Control App to detect the unit.
NOTE: You need to use the USB-B to USB-A cable provided with the box for the Control App to detect the unit.
MECHANICAL SPECIFICATIONS
You can find the mechanical specification here that lists the holes. All dimensions are in mm [in]. 

DIP SWITCHES
Here you can find the behavior of the DIP switches located at the back of the unit.
| Switch | Position | Description |
| SW1 | OFF | For future use. |
| ON | ||
| SW2 | OFF | For future use. |
| ON | ||
| SW3 | OFF | For future use. |
| ON | ||
| SW4 | OFF | For future use. |
| ON | ||
| SW5 | OFF | For future use. |
| ON | ||
| SW6 | OFF | Disable 5V on terminal block |
| ON | Enable 5V on terminal block. This switch must be set to power up the connected remote. |
TROUBLESHOOTING SECTION
Here is the troubleshooting section for the device.
| Problem | Resolution |
| The device keeps rebooting when we connect USB powered cameras. The device is connected to a PoE switch. | If you connect high consuming USB cameras that are powered by the USB bus, we recommend using the provided power supply to accommodate for the power demand. |
| We cannot detect the USB output onthe PC when using it with a USB extender | The device has a USB2.0 interface only. Make sure that the USB extender you intend to use supports USB2.0. You can use our own set of USB extenders that are proven to work with our devices. https://inogeni.com/support/compatible-usb-extenders/ |
| We cannot get the HDMI feed to go through the device. | Please do the following checklist : – Make sure HDMI connection is correct. HDMI cable should be within 30ft. Otherwise, you need to have an active HDMI extension. – Monitor if the HDMI led is ON. – Monitor the video resolution through our app or through the web interface if it is detected properly. – Make sure that the HDMI feed is not an encrypted HDCP source like a bluray or set-top box. The HDMI input is compatible with HDMI cameras. |
| My camera software running on my computer is not detecting the camera while the CAM230 is connected in line. | Unfortunately, this is the expected behavior since the PC is agnostic of the USB camera. However, the device supports all UVC controls (pan, tilt and zoom controls) and can route them to the selected camera. |
| LAN interface is not working properly. Firmware updates from LAN interface takes a long time or hang/timeout. | Make sure the port that is connected to the LAN interface is using 100Mbps halfduplex. Slow updates through LAN interface can be caused by duplex mismatch. The LAN interface does not do any autonegotiation. |
SUPPORT
Engineered by video professionals, for video professionals, it is your most compatible USB 3.0 device. INOGENI expertise at your fingertips:
- Expert Technical Support team at [email protected] for immediate help or if you have any technical question about our products.
- Extensive Knowledge Base to learn from other customers experiences.
© Copyright 2023 by INOGENI INC. All Rights Reserved.
INOGENI name and logo are trademarks or registered trademark of INOGENI. Use of this product is subject to the terms and conditions of the license and limited warranty in effect at the time of purchase. Product specifications can change without notice.
INOGENI, Inc.
1045 Avenue Wilfrid-Pelletier
Suite 101
Québec, QC, Canada, G1W0C6
418-651-3383
CERTIFICATIONS
|
|
FCC Radio Frequency Interference Statement Warning This device complies with Part 15 of the FCC rules. Operation is subject to the following two conditions: (1) this device may not cause harmful interference, and (2) this device must accept any interference received including interference that may cause undesired operation. IC Statement This Class A digital apparatus complies with Canadian CAN ICES-3(A)/NMB-3(A). |
|
|
CE Statement We, INOGENI Inc., declare under our sole responsibility that the CAM230, to which this declaration relates, is in conformity with European Standards EN 55032, EN 55035, and RoHS Directive 2011/65/EU + 2015/863/EU. |
| WEEE Statement The European Union has established regulations for the collection and recycling of all waste electrical and electronic equipment (WEEE). Implementation of WEEE regulations may vary slightly by individual EU member states. Please check with your local and state government guidelines for safe disposal and recycling or contact your national WEEE recycling agency for more information. |
|
| RCM Statement This device is compliant with Regulator Compliance Mark (RCM) certification. |