Contents
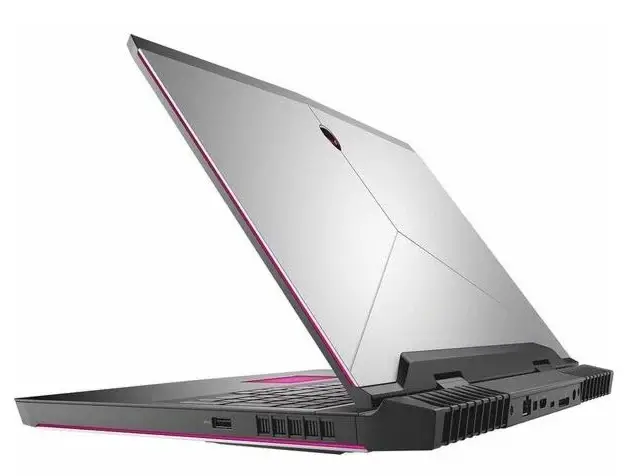
ALIENWARE 17 R4 Gaming Laptop
Product Information
The Alienware 17 R4 is a high-performance gaming laptop designed for immersive gaming experiences. It features powerful hardware and advanced technologies to deliver exceptional gaming performance.
Regulatory Model: P31E
Regulatory Type: P31E001
April 2023 Rev. A05
Product Usage Instructions
Chapter 1: Set up your computer
- Connect the power adapter to your computer.
- Press the power button to turn on the computer.
Chapter 2: Views
Refer to the user manual for detailed information on the different views of the Alienware 17 R4.
Chapter 3: Specifications
Refer to the user manual for detailed specifications of the Alienware 17 R4.
Chapter 4: Tobii Aware
Tobii Aware is a feature that utilizes eye-tracking technology.
Refer to the user manual for information on enabling or disabling Tobii Aware.
Chapter 5: Keyboard shortcuts
Refer to the user manual for a list of keyboard shortcuts available on the Alienware 17 R4.
Chapter 6: Getting help and contacting Alienware
If you need assistance or have any questions, refer to the user manual for information on how to contact Alienware’s customer support.
Set up the Virtual Reality (VR) headset (optional)
- Note: The VR headset is sold separately.
HTC Vive
- Download and run the setup tools for your HTC Vive headset.
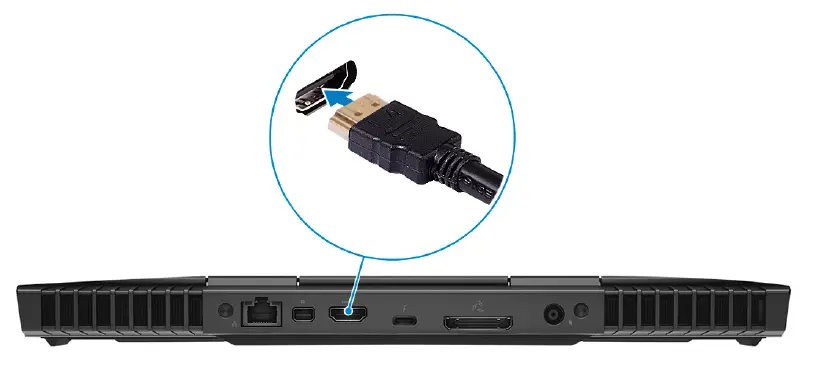
- Connect the HDMI cable of the HTC Vive headset to the back of your computer.
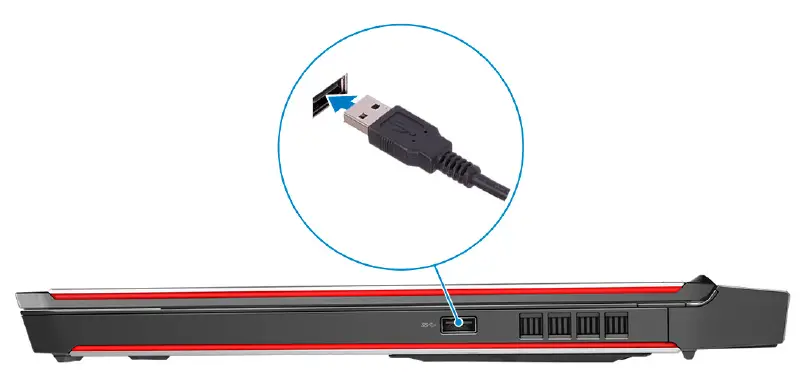
- Connect the USB cable from the Vive hub to the USB 3.1 Gen 1 port at the right side of your computer.
- Follow the on-screen instructions to complete the setup.
Oculus Rift
Note: The USB dongles are only shipped with computers that are Oculus certified.
- Download and run the setup tools for your Oculus Rift headset.
- Connect the HDMI cable of the Oculus Rift headset to the back of your computer.
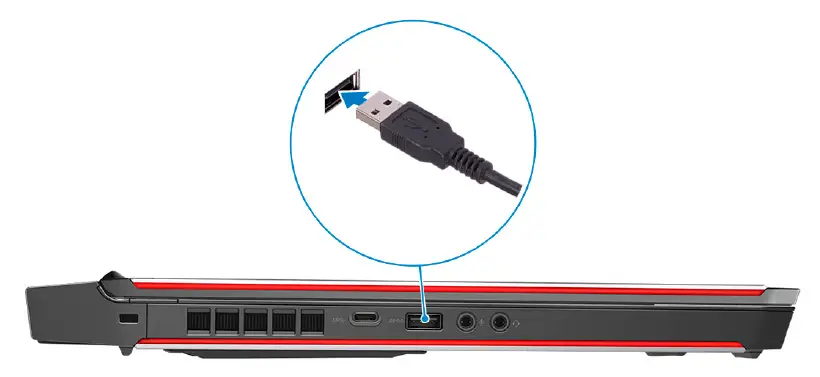
- Connect the Oculus Rift headset to the USB Type-A port at the right side of your computer.
- Connect the Oculus Rift tracker to the USB Type-A port at the left side of your computer.
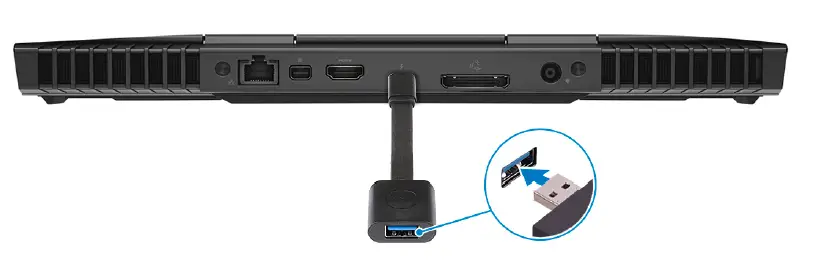
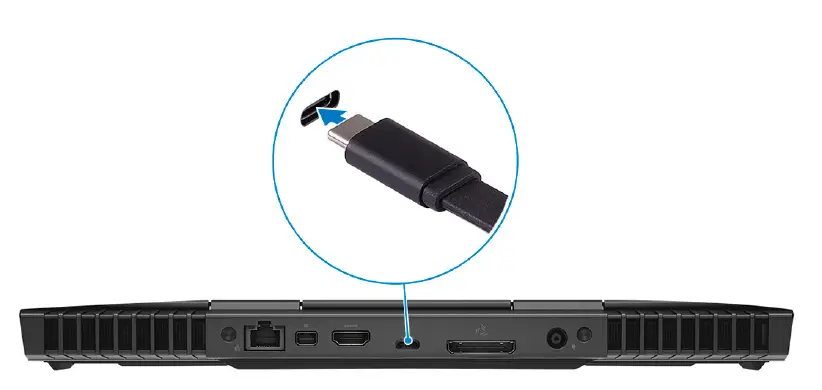
- Connect a USB Type-C to Type-A dongle to the Thunderbolt 3 (USB Type-C) port at the back of your computer.
- Connect the XBOX controller to the USB Type-A port on the USB dongle.
- Follow the on-screen instructions to complete the setup.
Oculus Rift with touch
Note: The USB dongles are only shipped with computers that are Oculus certified.
- Download and run the setup tools for your Oculus Rift headset.
- Connect the HDMI cable of the Oculus Rift headset to the back of your computer.
- Connect the Oculus Rift headset to the USB Type-A port at the right side of your computer.
- Connect the Oculus Rift tracker to the USB Type-A port at the left side of your computer.
- Connect a USB Type-C to Type-A dongle to the Thunderbolt 3 (USB Type-C) port at the back of your computer.
- Connect the XBOX controller to the USB Type-A port on the USB dongle.
- Follow the on-screen instructions to complete the setup.
Notes, cautions, and warnings
- NOTE: A NOTE indicates important information that helps you make better use of your product.
- CAUTION: A CAUTION indicates either potential damage to hardware or loss of data and tells you how to avoid the problem.
- WARNING: A WARNING indicates a potential for property damage, personal injury, or death.
© 2016-2023 Dell Inc. or its subsidiaries. All rights reserved. Dell Technologies, Dell, and other trademarks are trademarks of Dell Inc. or its subsidiaries. Other trademarks may be trademarks of their respective owners.
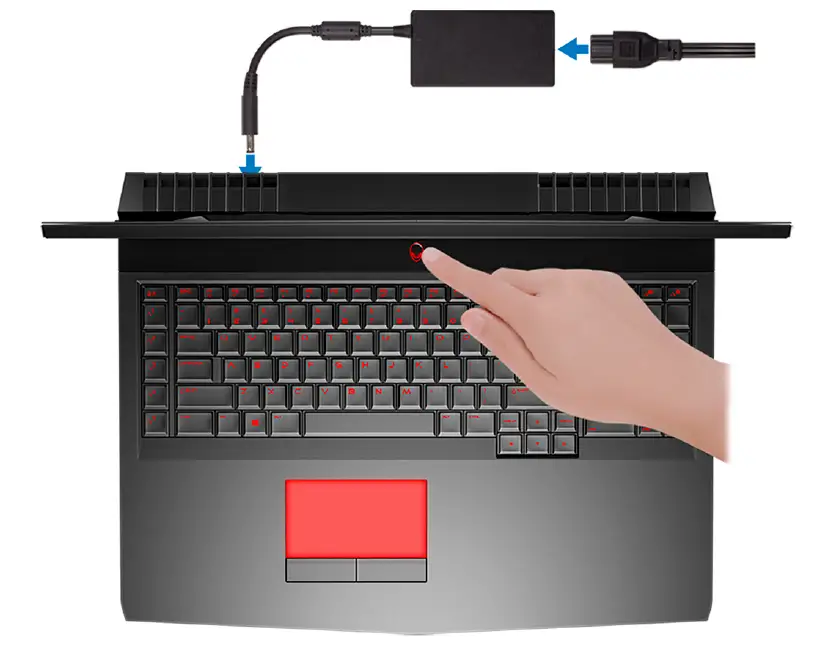
Set up your computer
Connect the power adapter and press the power button.
Set up the Virtual Reality (VR) headset—optional
- NOTE: The VR headset is sold separately.
- NOTE: If you are using Alienware Graphics Amplifier with your computer, see Alienware Graphics Amplifier.
HTC Vive
- Download and run the setup tools for your VR headset.
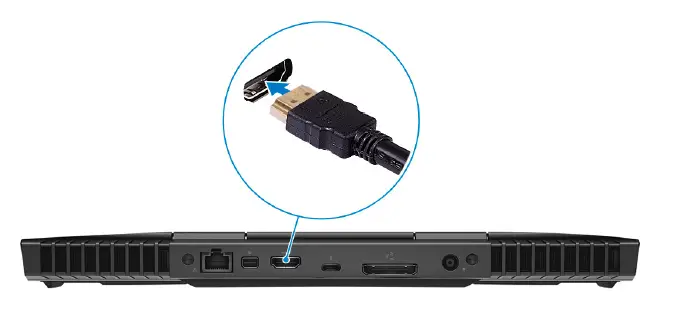
- Connect the HDMI cable of the HTC Vive headset to the back of your computer.
- Connect the USB cable from the Vive hub to the USB 3.1 Gen 1 port at the right side of your computer.
- Follow the on-screen instructions to complete the setup.
Oculus Rift
- NOTE: The USB dongles are only shipped with computers that are Oculus certified.
- Download and run the setup tools for your VR headset.
- Connect the HDMI cable of the Oculus Rift headset to the back of your computer.
 Connect the Oculus Rift headset to the USB Type-A port at the right side of your computer.
- Connect the Oculus Rift tracker to the USB Type-A port at the left side of your computer.
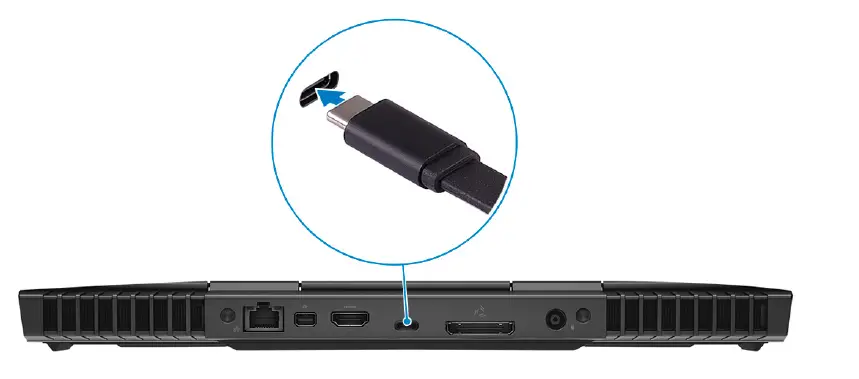
- Connect a USB Type-C to Type-A dongle to the Thunderbolt 3 (USB Type-C) port at the back of your computer.
- Connect the XBOX controller to the USB Type-A port on the USB dongle.
- Follow the on-screen instructions to complete the setup.
Oculus Rift with touch
NOTE: The USB dongles are only shipped with computers that are Oculus certified.
- Download and run the setup tools for your VR headset.
- Connect the HDMI cable of the Oculus Rift headset to the back of your computer.
- Connect the Oculus Rift headset to the USB Type-A port at the right side of your computer.
- Connect a USB Type-C to Type-A dongle to the Thunderbolt 3 (USB Type-C) port on the back of your computer.
- Connect the Oculus Rift tracker to the USB Type-A port at the left side of your computer.
- Connect a USB Type-C to Type-A dongle to the USB 3.1 Gen 2 (Type-C) port at the left side of your computer.
- Connect the XBOX controller to the USB Type-A port on the USB dongle.

- Connect the Oculus Rift tracker for Touch to the USB Type-A port on the dongle.
- Follow the on-screen instructions to complete the setup.
Alienware Graphics Amplifier
Alienware Graphics Amplifier enables you to connect an external graphics card to your computer.
When using the Virtual Reality (VR) headset, connect the HDMI cable to the graphics card installed on your Alienware Graphics Amplifier. The USB cables from the VR headset can be connected either to your computer or your Alienware Graphics Amplifier.
NOTE: The USB dongle is not required, if you are connecting the USB 3.0 cables on your VR headset to the USB 3.0 Type-A port on your Alienware Graphics Amplifier.
For more information about Alienware Graphics Amplifier, see Alienware Graphics Amplifier User’s Guide at www.dell.com/support.
Views
Base
- Power button (Alienhead)
Press to turn on the computer if it is turned off, in sleep state, or in hibernate state. Press to put the computer in sleep state if it is turned on.
Press and hold for 4 seconds to force shut-down the computer.
NOTE: You can customize the power-button behavior in Power Options. - Macro keys
Run pre-defined Macros.
Define the macro keys using the Alienware Command Center.
Display (with Tobii Aware)
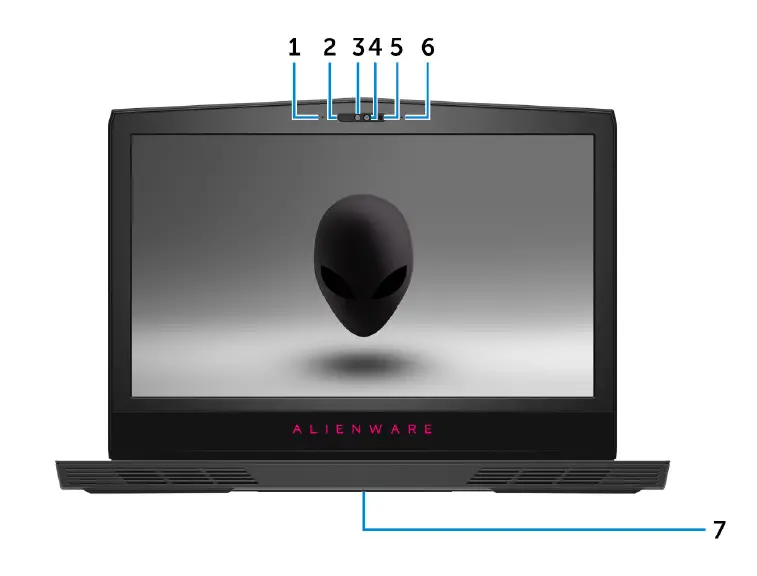
- Left microphone
Provides digital sound input for audio recording and voice calls. - Infrared emitter
Emits infrared light, which enables the infrared camera to sense depth and track motion.
NOTE: The infrared emitter blinks to detect the user’s presence. To stop the emitter from blinking, turn off the Tobii Aware. For more information about the Tobii Aware, see Tobii Aware. - Infrared camera
Enhances security when paired with Windows Hello face authentication. - Camera
Enables you to video chat, capture photos, and record videos. - Camera-status light
Turns on when the camera is in use. - Right microphone
Provides digital sound input for audio recording and voice calls. - Service Tag label
The Service Tag is a unique alphanumeric identifier that enables Dell service technicians to identify the hardware components in your computer and access warranty information.
Display (with Tobii Eye Tracker)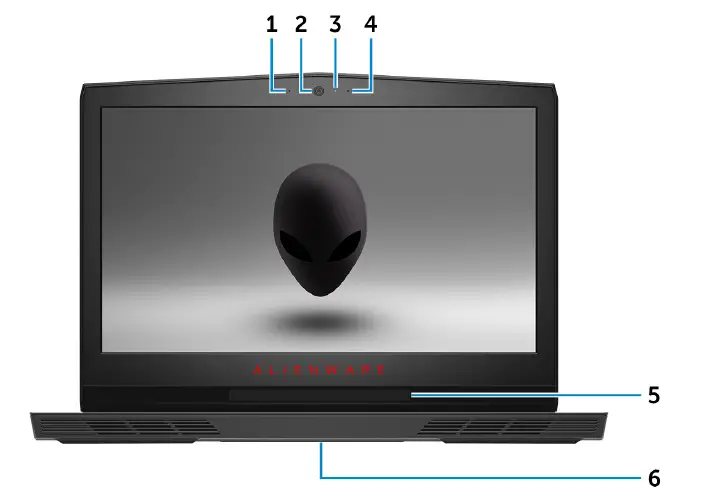
- Left microphone
Provides digital sound input for audio recording and voice calls. - Camera
Enables you to video chat, capture photos, and record videos. - Camera-status light
Turns on when the camera is in use. - Right microphone
Provides digital sound input for audio recording and voice calls. - Tobii Eye Tracker
Application that enables you to interact with your computer using your eyes. - Service Tag label
The Service Tag is a unique alphanumeric identifier that enables Dell service technicians to identify the hardware components in your computer and access warranty information.
Back
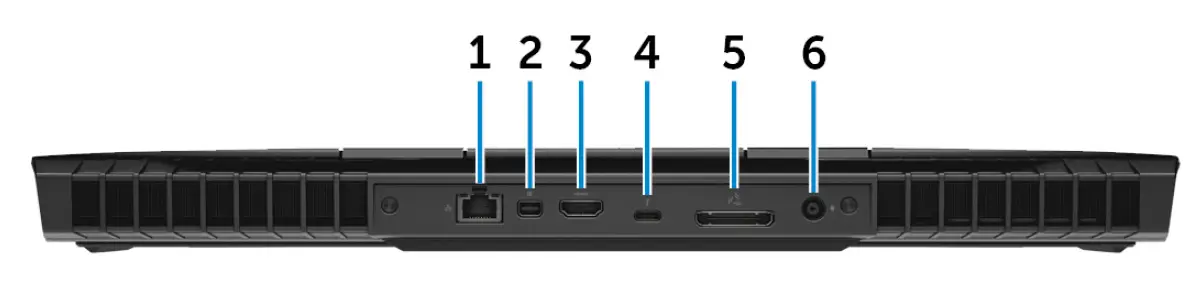
- Network port (with lights)
Connect an Ethernet (RJ45) cable from a router or a broadband modem for network or Internet access.
The two lights next to the connector indicate the connectivity status and network activity. - Mini DisplayPort
Connect to a TV or another DisplayPort-in enabled device. Provides video and audio output. - HDMI port
Connect to a TV or another HDMI-in enabled device. Provides video and audio output. - Thunderbolt 3 (USB Type-C) port
Supports USB 3.1 Gen 2, DisplayPort 1.2, Thunderbolt 3 and also enables you to connect to an external display using a display adapter.
Provides data transfer rates up to 10 Gbps for USB 3.1 Gen 2 and up to 40 Gbps for Thunderbolt 3.
NOTE: A USB Type-C to DisplayPort adapter (sold separately) is required to connect a DisplayPort device. - External graphics port
Connect an Alienware Graphics Amplifier to enhance the graphics performance. - Power-adapter port
Connect a power adapter to provide power to your computer and charge the battery.
Left
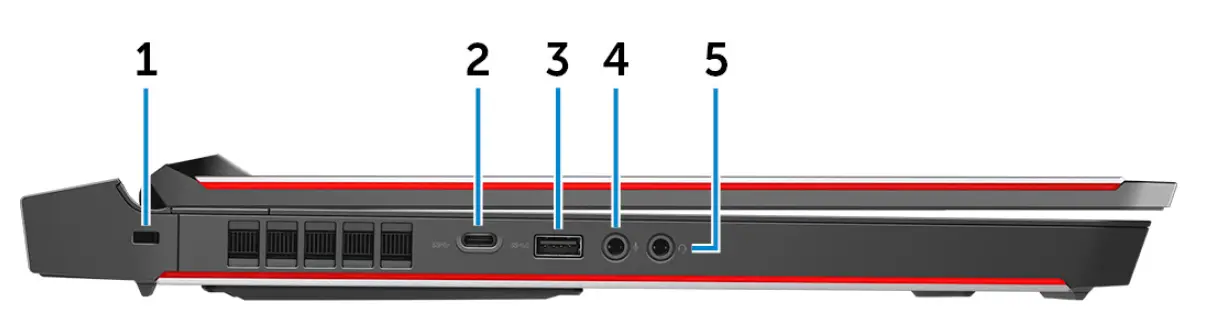
- Security-cable slot (for Noble locks)
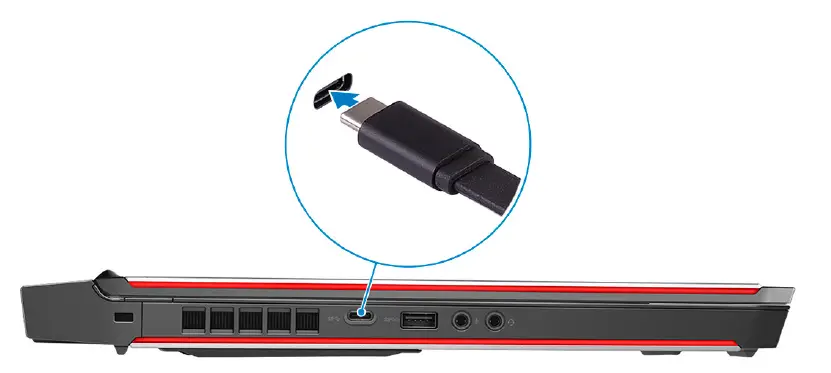
Connect a security cable to prevent unauthorized movement of your computer. - USB 3.0 (Type-C) port
Connect peripherals such as external storage devices and printers.
Provides data transfer speeds up to 5 Gbps. Supports Power Delivery that enables two-way power supply between devices. Provides up to 15 W power output that enables faster charging. - USB 3.0 port with PowerShare
Connect peripherals such as external storage devices and printers.
Provides data transfer speeds up to 5 Gbps. PowerShare enables you to charge your USB devices even when your computer is turned off.
NOTE: If the charge on your computer’s battery is less than 10 percent, you must connect the power adapter to charge your computer, and USB devices connected to the PowerShare port.
NOTE: If a USB device is connected to the PowerShare port before the computer is turned off or in hibernate state, you must disconnect and connect it again to enable charging.
- Microphone/headphone port (configurable)
Connect an external microphone for sound input or headphones for sound output. - Headset port
Connect headphones or a headset (headphone and microphone combo).
Right
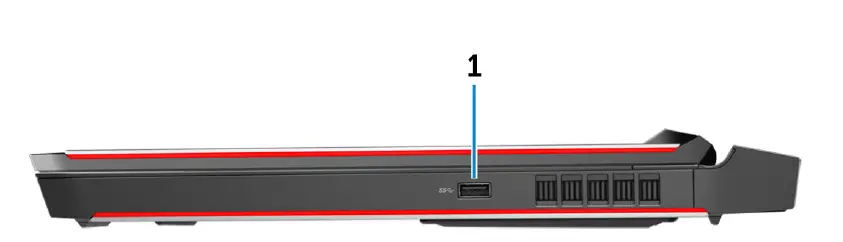
- USB 3.1 Gen 1 port
Connect peripherals such as external storage devices and printers. Provides data transfer speeds up to 5 Gbps.
Specifications
Dimensions and weight
Table 1. Dimensions and weight
| Height | 29.99 mm (1.18 in) |
| Width | 424 mm (16.69 in) |
| Depth | 332 mm (13.07 in) |
| Weight | 4.42 kg (9.74 lb)
NOTE: The weight of your computer varies depending on the configuration ordered and the manufacturing variability. |
System information
Table 2. System information
| Processor |
NOTE: If your computer is shipped with an Intel Core i7k processor, you can overclock the processing speed beyond the standard specifications. |
| Chipset |
|
Memory
Table 3. Memory specifications
| Slots | Two SODIMM slots |
| Type | DDR4 |
| Speed | 2133 MHz, 2400 MHz, and 2667 MHz |
| Configurations supported | 8 GB, 16 GB, and 32 GB |
Ports and connectors
Table 4. Ports and connectors
| External: | |
| Network | One RJ-45 port |
| USB |
|
| Audio/Video |
|
|
|
| Internal: | |
| Expansion slots | One 2.5″ hard drive SATA 3.0 connector |
| M.2 |
|
Communications
Table 5. Communications specifications
| Ethernet | 10/100/1000 Mbps Ethernet controller integrated on system board |
| Wireless |
|
Audio
Table 6. Audio specifications
| Controller | Realtek ALC 3266 |
| Speakers | Stereo |
| Speaker output |
|
| Subwoofer output |
|
| Microphone | Digital-array microphones |
| Volume controls | Media-control shortcut keys |
Storage
Your computer supports one hard drive and three solid-state drives.
Table 7. Storage specifications
| Interface |
|
| Hard drive | One 2.5-inch drive |
| Solid-state drive (SSD) |
|
Keyboard
Table 8. Keyboard specifications
| Type | Backlit keyboard |
| Shortcut keys | Some keys on your keyboard have two symbols on them. These keys can be used to type alternate characters or to perform secondary functions. To type the alternate character, press Shift and the desired key. To perform secondary functions, press Fn and the desired key.
NOTE: You can define the primary behavior of the function keys (F1–F12) by changing Function Key Behavior in BIOS setup program. Keyboard shortcuts |
Camera
Table 9. Camera specifications
| Resolution |
|
| Diagonal viewing angle | 74 degrees |
Touch pad
Table 10. Touch pad specifications
| Resolution |
|
| Dimensions |
|
Battery
Table 11. Battery specifications
| Type | 4-cell “smart” lithium-ion (68 WHr) | 6-cell “smart” lithium-ion (99 WHr) |
| Weight (maximum) | 0.32 kg (0.71 lb) | 0.42 kg (0.93 lb) |
| Voltage | 15.20 VDC | 11.40 VDC |
| Life span (approximate) | 300 discharge/charge cycles | |
| Temperature range: Operating | 0°C to 35°C (32°F to 95°F) | |
| Temperature range: Storage | –20°C to 60°C (–4°F to 140°F) | |
| Coin-cell battery | CR-2032 | |
| Dimensions: | ||
| Height | 13.50 mm (0.53 in) | |
| Width | 259.60 mm (10.22 in) | |
| Depth | 89.20 mm (3.51 in) | |
Operating time: Varies depending on operating conditions and can significantly reduce under certain power-intensive conditions.
Video
Table 12. Video specifications
| Integrated | Discrete | |
| Controller | ● Intel HD Graphics 530
● Intel HD Graphics 630 |
● AMD Radeon RX 470
● NVIDIA GeForce GTX 1060 ● NVIDIA GeForce GTX 1070 ● NVIDIA GeForce GTX 1080 |
| Memory | Shared system memory | ● 6 GB GDDR5
● 8 GB GDDR5 ● 8 GB GDDR5X |
Power adapter
Table 13. Power adapter specifications
| Type | 180 W | 240 W | 330 W |
| Input voltage | 100 VAC–240 VAC | 100 VAC–240 VAC | 100 VAC–240 VAC |
| Input frequency | 50 Hz–60 Hz | 50 Hz–60 Hz | 50 Hz–60 Hz |
| Input current (maximum) | 2.34 A/2.50 A | 3.50 A | 4.40 A |
| Output current (continuous) | 9.23 A | 12.30 A | 16.92 A |
| Rated output voltage | 19.50 VDC | 19.50 VDC | 19.50 VDC |
| Temperature range: Operating | 0°C to 40°C (32°F to 104°F) | 0°C to 40°C (32°F to 104°F) | 0°C to 40°C (32°F to 104°F) |
| Temperature range: Storage | –40°C to 70°C (–40°F to 158°F) | –40°C to 70°C (–40°F to 158°F) | –40°C to 70°C (–40°F to 158°F) |
Display
Table 14. Display specifications
| Type | 17.3-inch FHD (optional Tobii Eye-tracking) | 17.3-inch QHD (with Tobii Eye-tracking) | 17.3-inch UHD (with Tobii Eye-tracking) |
| G-Sync support | Optional | No | No |
| Resolution (maximum) | 1920 x 1080 | 2560 x 1440 | 3840 x 2160 |
| Viewing angle (Left/ Right/Up/Down) | 89/89/89/89 degrees | 70/70/60/60 degrees | 89/89/89/89 degrees |
| Pixel pitch | 0.1989 mm | 0.14925 mm | 0.0995 mm |
| Height (excluding bezel) | 214.81 mm (8.46 in) | 214.92 mm (8.46 in) | 214.94 mm (8.46 in) |
| Width (excluding bezel) | 381.89 mm (15.04 in) | 382.08 mm (15.04 in) | 382.12 mm (15.04 in) |
| Diagonal (excluding bezel) | 439.42 mm (17.30 in) | 439.42 mm (17.30 in) | 439.42 mm (17.30 in) |
| Refresh rate | 60 Hz | 120 Hz | 60 Hz |
| Controls | Brightness can be controlled using shortcut keys | ||
Computer environment
Airborne contaminant level: G2 or lower as defined by ISA-S71.04-1985
Table 15. Computer environment
| Operating | Storage | |
| Temperature range | 5°C to 35°C (41°F to 95°F) | –40°C to 65°C (–40°F to 149°F) |
| Relative humidity (maximum) | 10% to 90%
(non-condensing) |
0% to 95%
(non-condensing) |
| Vibration (maximum) | 0.26 GRMS | 1.37 GRMS |
| Shock (maximum)* | 40 G for 2 ms with a change in velocity of 20 in/s (51 cm/s)† | 105 G for 2 ms with a change in velocity of
52.5 in/s (133 cm/s)‡ |
| Altitude (maximum) | –15.20 m to 3048 m
(–50 ft to 10,000 ft) |
–15.20 m to 10,668 m
(–50 ft to 35,000 ft) |
- Measured using a random vibration spectrum that simulates user environment.
- Measured using a 2 ms half-sine pulse when the hard drive is in use.
- Measured using a 2 ms half-sine pulse when the hard-drive head is in parked position.
Tobii Aware
Tobii Aware application enables the infrared sensors on your computer to manage power, security, and Alien FX lighting.
Features
The following table shows the features of Tobii Aware.
Table 16. Features
| Dim brightness | Reduces screen brightness when you are not in front of it. |
| Turn off screen | Turns off the screen when you are not in front of it. |
| Sleep mode | Sends your computer to sleep before Windows power plan when you are not in front of the screen. |
| Turn off lights | Turns off the computer lights when you are not in front of the screen. |
| Windows Hello | Enables you to login to your computer without the login id or password when paired with Windows Hello face authentication. |
| Alien FX lighting | Enables Alien FX lighting feature when you are in front of your screen. |
Enabling or disabling Tobii Aware
- Select the Eye detection indicator on the activity field in Windows.
- Toggle the On/Off switch located on the top. Default: On
- Save the settings and exit.
Keyboard shortcuts
Table 17. List of keyboard shortcuts
| Keys | Description |
 |
Disconnect Alienware Graphics Amplifier |
 |
Disable/enable wireless |
 |
Mute audio |
 |
Decrease volume |
 |
Increase volume |
 |
Toggle integrated/discrete graphics |
 |
Switch to external display |
 |
Decrease brightness |
 |
Increase brightness |
 |
Disable/enable touch pad |
 |
Disable/enable AlienFX |
Table 18. List of Macro keys
| Keys | Description |
 |
Macro keys
NOTE: You can configure modes and assign multiple tasks for the macro keys on the keyboard. |
 |
|
 |
|
 |
|
 |
|
 |
|
 |
|
 |
|
 |
|
 |
Getting help and contacting Alienware
Self-help resources
You can get information and help on Alienware products and services using these online self-help resources: Table 19. Alienware products and online self-help resources
| Self-help resources | Resource location |
| Information about Alienware products and services | www.alienware.com |
| My Dell app | |
| Tips | |
| Contact Support | In Windows search, type Contact Support, and press Enter. |
| Online help for operating system | www.dell.com/support/windows |
| Access top solutions, diagnostics, drivers and downloads, and learn more about your computer through videos, manuals and documents. | Your Alienware computer is uniquely identified by a Service Tag or Express Service Code. To view relevant support resources for your Dell computer, enter the Service Tag or Express Service Code at www.dell.com/support.
For more information on how to find the Service Tag for your computer, see Locate the Service Tag on your computer. |
| Videos providing step-by-step instructions to service your computer | www.youtube.com/alienwareservices |
Contacting Alienware
To contact Alienware for sales, technical support, or customer service issues, see www.alienware.com.
NOTE: Availability varies by country/region and product, and some services may not be available in your country/region.
NOTE: If you do not have an active Internet connection, you can find contact information about your purchase invoice, packing slip, bill, or Dell product catalog.