VIDEO DOORBELL

User Manual
Please read the user manual before use
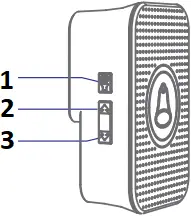
1 . Product Description


- SD Card
- USB interface
- Microphone
- Camera lens
- Light sensor
- PIR sensor
- Button
- on-off key
- reset key
- AC wiring place
- Security hole
- loudspeaker
Technical Parameters
| APP | SmartLife |
| Power Supply |
|
| Doorbell Button | Switch/reset button behind the doorbell |
| Indicator Light |
|
| Microphone | Captures sound for your video |
| Pixel | 1080P |
| Min Illuminance | Min Color [email protected] Color [email protected] Black and White [email protected] |
| Viewing Angle | 140° |
| Shutter | 1/25~1/100,000 per second |
| IR | 4pcs 5mm 850nm LED |
| Video Compression Standard | H.264 |
| Compression Output Bit Rate | 35Kbps~2Mbps |
| Maximum Image Resolution | 1920×1080 |
| Frame Rate | 1~25 per second |
| Audio | Full duplex audio |
| Storage | TF Card (Max.128G) & Cloud Storage |
| Image Setting | Support HD/SD, support mirror |
| Reset | Support |
| Interface Protocol | Private |
| Communication Protocol | TCP/IP,TCP,UDP,SMTP,DHCP,DNS,P2P |
| General Function | Dual stream, password protection |
| WIFI | Support 2.4G.WIFI |
| Triggering Method | Support button triggering, PIR motion detection triggering |
| Working Temperature & Humidity | -20°C ~ 50°C, humidity less than 80% (without condensation) |
| Waterproof | IP65 |
2. Download APP and Connect
SmartLife is available for both IOS and Android. Search the name “SmartLife” in APP Store or scan the OR-code to download the APP.
Support


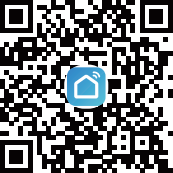
ipad IOS Android SmartLife Download
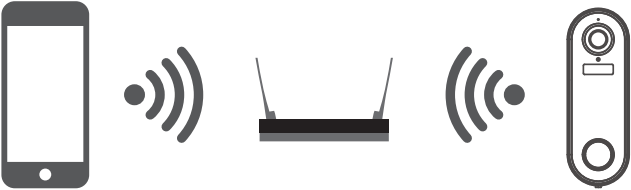
Set Up Router
This device only supports 2.4GHz WIFI router, does not support 5GHz router, please set the relevant parameters of the router before WIFI configuration. WIFI password is not allowed to include special characters such as ~!@ # $ %^&*() etc. When configure wifi for the device, the mobile phone and device are as close as to the router, which can speed up the configuration of device.
Please keep network available
Registration Process
Open the SmartLife APP, click “Register”, read the “Privacy Policy ” and click “Agree”. Input a legal and valid mobile number or email address, then click “Continue”. And enter verification code, then log in the APP.
Connect
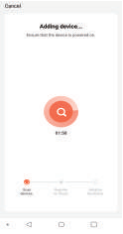
1. Click “Add Device” or “+” icon to add camera. Click “Security & Video Surveillance” >> “Smart Camera (Wi-Fi) or “Smart Doorbell”.


2. In “Add Device” interface, click “Next” icon, then enter WIFI name and password.


Note:
1) Camera only supports 2.4GHz WIFI network.
2) WIFI name and password mustn’t exceed 24 digits.
3) Please make sure the indicator light is flashing quickly before entering into WIFI page. If not, please try to reset device.
3. Use video doorbell to scan the OR code in the mobile phone (please place the mobile phone OR code facing the video doorbell about 15-20cm) until hear doorbell “dong dong” sound prompt and doorbell indicator flashes blue. Then click “I Heard a Prompt” icon.

4. When connecting, please make sure your router, mobile phone and doorbell are as close as possible When doorbell added successfully you can click “![]() ” icon to Rename the doorbell.
” icon to Rename the doorbell.

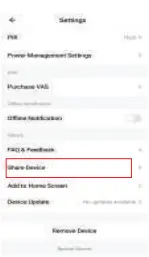
3. Setting
In the “Smart Video Doorbell” interface, you can click “![]() ” icon to set the doorbell basic functions.
” icon to set the doorbell basic functions.

Battery Power Tip: The battery power and charging status can be checked in the APP “Smart Video Doorbell” interface. indicates battery power status.
 indicates battery in charging status.
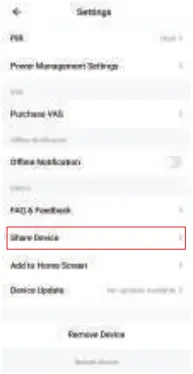
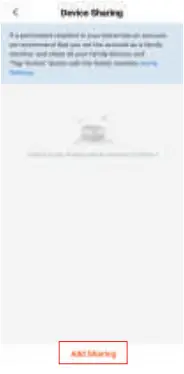
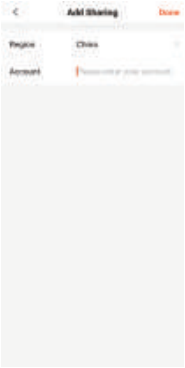
4. Share Device
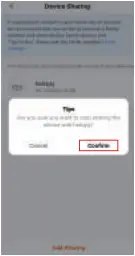
In “Smart Video Doorbell” interface, you can click “Share Device” icon, then chick “Add Sharing” icon and enter their phone number or email to share the device.
Remark: Please tell shared members to download and register SmartLife APP first.
5. Remove Device
Remove device
1. In “home” interface, click “Device Management” in the “…” icon, then select the smart video doorbell and click “Remove Device” to remove the device.


2. In “Smart Video Doorbell” interface, click “![]() ” icon, and click “Remove Device” at the end of setting interface to remove it.
” icon, and click “Remove Device” at the end of setting interface to remove it.
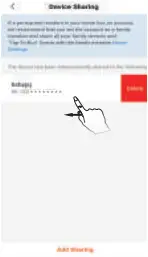
Remove shared device
If you don’t need to share the device, you can click the shared account, swipe left to click “Delete”, and no more share the device.
6. More Services
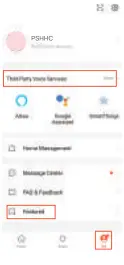
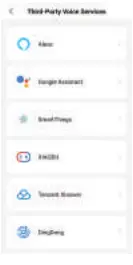
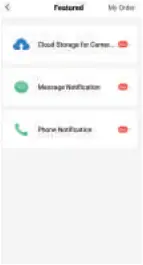
If you want to experience more services, you can click “Me” icon, then click “Third-Party Voice Services” >> “More >” (like Alexa, Google Assistant etc. voice service) or “Featured” (like Cloud Storage, Message Notification etc. service) but it may have charge for the service. Please check the app tips for specific fees.
7. Product Installation
Installation Precautions:
-This product is recommended to be installed and used in apartments, residential areas and other buildings.
-Recommended installation height: 1.2-1 5 meters.
-In a home environment, it is recommended to place the router, doorbell and wireless receiver in pairs within 3-5 meters.
-It is recommended to install the doorbell in a dry place.
-Installation is not recommended in the following 3 situations.
- Load-bearing corners;
- Metal door;
- There are many partitioned bedrooms.
-Before installation, please complete the installation according to the user manual and place the doorbell in the installation position to test whether the doorbell is working properly (if the network connection is successful, the place where the bell pressed will display a blue light; if the network connection is failed, the place where the bell pressed a red light will be displayed).
Doorbell Installation Methods
1. 3M double-sided tape installation:


(1) Tear off the 3M double-sided tape on the doorbell back plate.
(2) Fix the doorbell back plate to the wall (make sure smooth & dust-free surface), and hold for 30 seconds to fix it.
(3) Fix the doorbell to the back plate, then fix with anti-theft screw.
2. Screw installation:

- Wall


(1) Drill two holes in the wall with an electric drill (not included) and put the wall nails into the hole, use long self-tapping screws to fix the bracket on the wall.
(2) Install the 15-degree slope bracket, and put the screw to pass through the slope bracket, fix it to the wall or door.
(3) Fix the load-bearing bracket to the ramp bracket with screws.
(4) Finally, press the doorbell into the bearing bracket and lock the anti-falling screw.
Chime installation
The doorbell only supports the installation of local chime with AC 12-24V. Before installation, confirm that the local chime is work and turn off the power to install.
The wiring connections of the doorbell, local chime and transformer are shown in the below picture.
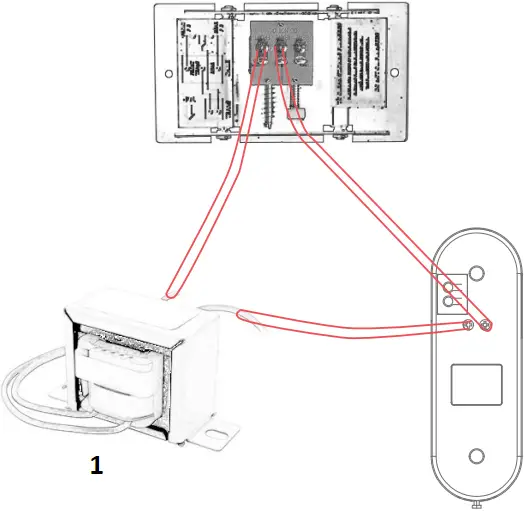
- Transformer: AC 12-24V
 Note: Please turn power off before installation.
8. Paired with Door Chime


55/38 1000 Feet 0-110 dB
RINGTONES 200 Meters 5 Levels
Features
- Modern & stylish design
- Easy installation
- Approx. 1000ft/200 mtrs operation range (open air)
- 5 Levels of volume
- 55/38 Ringtones
- Low power consumption
Notes
- The receiver is for indoor use only. Do not use outside or wet places.
- There are no user-serviceable parts. Do not attempt to repair either the transmitter or the receiver by yourself.
Installation
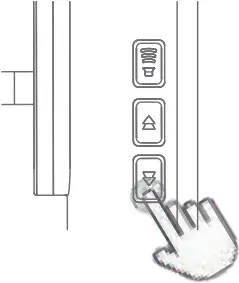
- Volume
- Previous music
- Next music
- Plug the receiver into a power socket and switch the socket on.
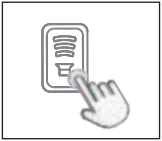
- Press the transmitter push button and confirm that the transmitter indicator flashes the doorbell receiver sounds “Ding Dong” and the receiver indicator flashes. That mean the doorbell is paired successfully. If pairing failed, please refer to “Changing the ringtone / pairing” part for pairing.
- Place the transmitter on where you intend to fix, and confirm that the doorbell receiver still sounds with the doors closed when you press the transmitter push button (If the doorbell receiver does not sound, Check if there is anything between the transmitter and receiver, especially metal objects and sources of electrical interference, such as power adapters or other wireless devices)
- Fix the transmitter with bracket.
Changing the ringtone / pairing
Step 1: Press the Backward or Forward button on the receiver to choose your favorite melody
Step 2: Press and hold down the Volume button on the receiver for 5 seconds, until it makes a “Ding” sound and the receiver indicator flashes (that means the doorbell entered into the Pairing Mode, the pairing mode will only last 8 seconds, then it will automatically exit).
Step 3: Press the button on the transmitter quickly, it will makes a “Ding Dong” sound and the receiver indicator flashes.
Step 4: Press the button on the transmitter again to confirm whether the current ringtone is the one you have set, if yes, the pairing is completed.
Remark: This method is also suitable for adding/pairing additional transmitters.


Step 1 Step 2 Step 3 – 4
Clearing the settings
Press and hold down the Forward button on the receiver for 5 seconds, until it makes a “Ding Dong” sound and the receiver indicator flashes all the settings will be cleared, the doorbell will back to the factory default settings (it means that the ringtone you have set and the transmitters you have added/paired will be cleared).
Settings
- The volume of the doorbell may be adjusted to five levels. Press the Volume button on the receiver to increase the volume by one level, the receiver will sound to indicate the selected level. If set the maximum level, the doorbell will switch to the minimum level, which is the Silent Mode.
- The melody played by the doorbell may be set to any one of 35/55 different selections. Press the Backward or Forward button to select the next available melody, the receiver will sound to indicate the selected melody. To set the doorbell ringtone to the selected melody, please refer to the “CHANGING THE RINGTONE” steps.
9. Functions
Two Way Audio
When the visitor push the doorbell button, you will get a call notification. You can see and hear the visitor if get through the call in your APP.
PIR Motion Detection
Call notification will be sent to your phone APP when movement is detected.
Share Device
The doorbell can be shared with families and friends and they can also preview online.
Record
Record every moment using SD card storage or cloud storage.
Night Vision
Powerful night vision means no interruptions even in the night.


Daytime Night
10. FAQ
A: Before you start adding devices, note the following:
1. Ensure that the device is turned on and the red light is blinking.
2. Ensure that the network connection is work. Please connect the mobile phone to a stable Wi-Fi connection, and use the mobile phone’s system browser to visit the website and check whether the network connection is fluent;
3. Ensure that the mobile phone and the device are on the same 2.4GHz Wi-Fi network (the device does not support 5GHz Wi-Fi at present);
If you are using a dual-band router, you can log in to your router’s background control panel to enable a 2.4GHz Wi-Fi connection, or contact your router provider to ask how to enable it.
4. Place the device near the router.
5. Restart the router.
Please note that the App needs access to the phone’s Wi-Fi information during the device addition process.
Due to privacy restrictions on Android and iOS, accessing Wi-Fi information also requires the phone’s location/location permission. Please agree to grant permissions. If you refuse to grant location permission, you can reauthorize it by:
IOS users: System Settings → Smart Life → Location → Select “Use when”
Android users: System Settings → Application Settings → Application Management → Intelligent Life → Permissions → Open “Location”
A: If the machine cannot scan the QR code, please first make sure that the red light of the device is flashing. Please try to solve the problem by following the following steps:
1. Place the camera on the table or platform and adjust the phone to scan the QR code;
2. Remove the protective film to ensure that the lens is clean;
3. Adjust the brightness of the mobile phone screen;
4. Click the TWO-DIMENSIONAL code to enlarge;
5. Adjust the distance between the lens and the screen, and the best distance is 10-15cm.
A: If the device is disconnected or offline, perform the following operations:
1. Check whether the router connected to the device can access the Internet. Connect the mobile phone to the same router and use the system browser to access common websites to check whether they are normally opened.
2. Ensure that your Wi-Fi account and password are correct. If you have changed the wi-fi name or password, add the device again.
3. Place the device near the router.
4. A single router can support only a limited number of devices at a time. Disconnect other devices before adding them.
5. Please make sure to use 2.4GHz network.
A: Please insert the SD card before doorbell powered on. And make sure whether SD card is good and FAT32 format or not.
A: Check whether network is good or not, you can place the doorbell close to the router. If still not works, pls reset the doorbell and add again.
A: Remove the device on the APP and configure the device again.
A: Please confirm that the APP has been running well on the phone, and relevant reminder function has been opened, such as message notification and authority confirmation in the phone system.
11. FCC WARNING
This device complies with part 15 of the FCC Rules. Operation is subject to the following two conditions: (1) this device may not cause harmful interference, and (2) this device must accept any interference received, including interference that may cause undesired operation.
Any changes or modifications not expressly approved by the party responsible for compliance could void the user’s authority to operate the equipment.
NOTE This equipment has been tested and found to comply with the limits for a Class B digital device, pursuant to Part 15 of the FCC Rules. These limits are designed to provide reasonable protection against harmful interference in a residential installation. This equipment generates, uses and can radiate radio frequency energy and, if not installed and used in accordance with the instructions, may cause harmful interference to radio communications. However, there is no guarantee that interference will not occur in a particular installation.
If this equipment does cause harmful interference to radio or television reception, which can be determined by turning the equipment off and on, the user is encouraged to try to correct the interference by one or more of the following measures:
— Reorient or relocate the receiving antenna.
— Increase the separation between the equipment and receiver.
— Connect the equipment into an outlet on a circuit different from that to which the receiver is connected.
— Consult the dealer or an experienced radio/TV technician for help.
To maintain compliance with FCC’s RF Exposure guidelines, This equipment should be installed and operated with minimum 20cm distance between the radiator and your body:
Use only the supplied antenna.
FCC WARNING
This device complies with part 15 of the FCC Rules. Operation is subject to the following two conditions: (1) this device may not cause harmful interference, and (2) this device must accept any interference received, including interference that may cause undesired operation.
Any changes or modifications not expressly approved by the party responsible for compliance could void the user’s authority to operate the equipment.
NOTE: This equipment has been tested and found to comply with the limits for a Class B digital device, pursuant to Part 15 of the FCC Rules. These limits are designed to provide reasonable protection against harmful interference in a residential installation. This equipment generates, uses and can radiate radio frequency energy and, if not installed and used in accordance with the instructions, may cause harmful interference to radio communications.
However, there is no guarantee that interference will not occur in a particular installation.
If this equipment does cause harmful interference to radio or television reception, which can be determined by turning the equipment off and on, the user is encouraged to try to correct the interference by one or more of the following measures:
— Reorient or relocate the receiving antenna.
— Increase the separation between the equipment and receiver.
— Connect the equipment into an outlet on a circuit different from that to which the receiver is connected.
— Consult the dealer or an experienced radio/TV technician for help.
To maintain compliance with FCC’s RF Exposure guidelines, This equipment should be installed and operated with minimum 20cm distance between the radiator and your body: Use only the supplied antenna.