![]() IPDA091
IPDA091
Android POS
User Manual
Contents
MU-IPDA091 POS Receipt Printer
 Version 1.00
product Overview

Packing Open and Installation
2.1. What in the box
When you receive the package, open and check the packing list in the package.
| Item Name | Picture | Quantity (pcs) | Description |
| I PDA091 POS Terminal |  |
1 | Android POS Terminal |
| Thermal Paper Roll |  |
1 | / |
| AC Power Adapter |  |
1 | / |
| Li-ion Battery |  |
1 | 2800mAh |
| USB Cable |  |
1 | USB Type C cable |
| User Manual |  |
1 | / |
Table 2-l Packing List
2.2. Installation Guidance
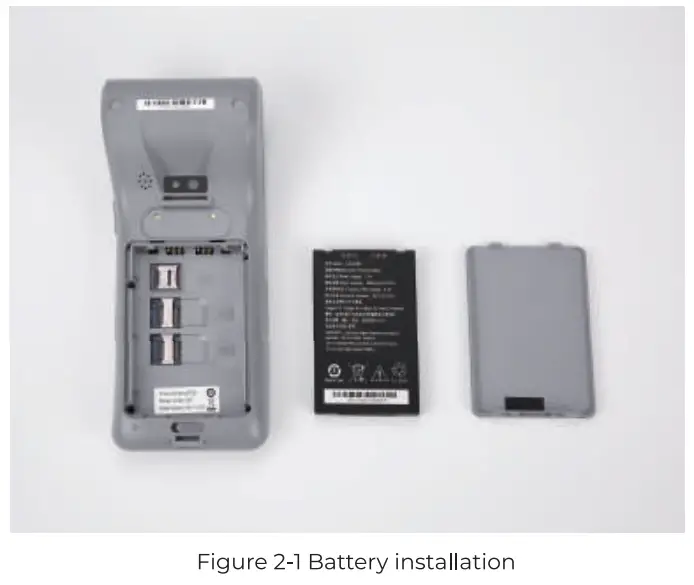
2.2.l. Install the battery
- Open the battery cover of the device
- Connect the cable of the battery to the battery connector on the machine and put the battery to its place. (Tag label on the battery upwards)
- Close the battery cover
2 2.2. Battery Usage Tips
- Do not use the battery in direct sunlight or smoky and dusty environments
- Do not strike, squeeze or step on the battery, nor throw it into equid or fire
- If the battery is deformed or damaged, replace immediately
- Any product warranty is only valid if batteries supplied by MUNBYN
- Charging time should not exceed 24 hours. Over-charging or over-discharging may damage the battery
- If the product is not being used for an extended period, whether in storage or otherwise, make sure to recharge the battery at least every6 months
2.2.3. Install SIM/SAM/TF card
- Open the battery cover and remove the battery
- Insert SIM/SAM/TF cards into the corresponding card slots
NOTE: 1 Confirm the machine is turned off when you install or uninstall the SIM/SAM card.
2. Do not paste any label on the SIM/SAM card to influence your card thickness, or it may result in loading or removing the card cannot be carried out smoothly

2.2.4. Power ON/OFF the device
- Power on: after installed battery/connect power adapter, press and hold the power key until the LCD display, then the machine will be turned on
- Power off: press and hold power key for 2 seconds, until the shutdown menu appears, tap Power Off > Click Power Off, and Shutting Down” will appear.
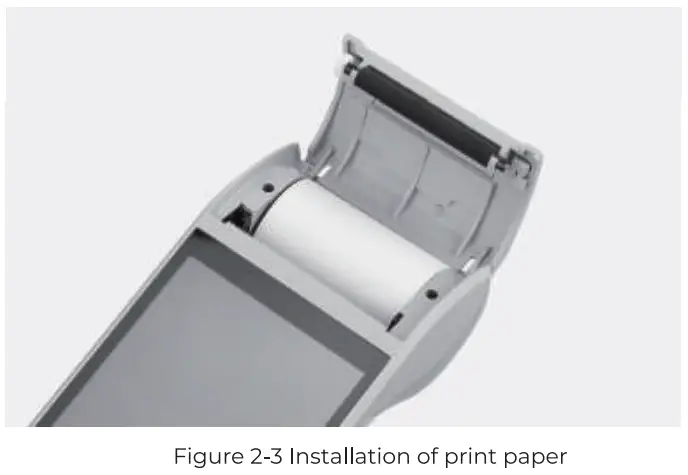
2.2.5. Install the printer paper
- Pull up the printer cover and put the thermal paper roll inside and close the cover.
NOTE: I. When install thermal paper, we need the side coated with thermal media facing the printer heating plate, or you cannot print out the characters correctly.
2.The temperature is high on the heating plate, please do not touch it without cooling.
Operation
3.1. Bluetooth printer
The 1ppA09l uses Bluetooth to connect to the built-in printer for printing, which has been correctly debugged in the factory state and can be selected for printing directly after receipt.
Test in the test app that comes with the system
- Open the Test” app and select print.

- In the Printer interface you can test the printing functions of the pDA09I, including text printing, images, 2D codes, barcodes, fonts and loops.

- Click on Print text to test that the print connection is working

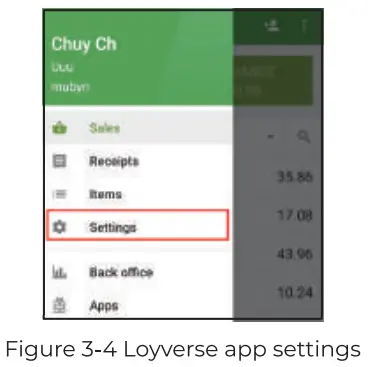
(Below we use the printer settings of the Louvers” App as an example)
- Setting as the below shown
- Set printer mode to other models” and interface to “Bluetooth”
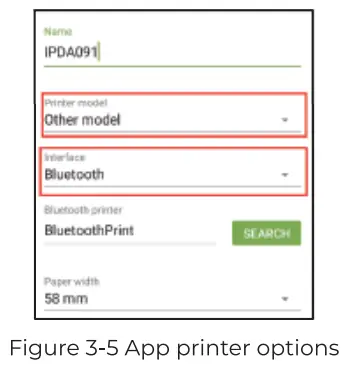 Click “Search” to search for Bluetooth printers and select the first default connected device.
- Click “PRINT TEST.

- Test receipt will pop up automatically that means Bluetooth printer is ready

3.2. Barcode Scanner(Optional)
The I9DAO9l can support the scanning of QR codes for payment collection. Barcodes or QR codes can be scanned and identified by scanning software .
- Open the Test” App, and choose “Scan”
(Note: The Test app is a supplementary software that helps you to test the printer and scan barcodes, NFC,LEDs, etc. It cannot be used without the optional fingerprint.)
- Select to Scan QRcode”
 Generate QRcode: This function allows you to generate a QR code by entering the corresponding number or letter in the dialog box.[Once generated, only scanning tests can be performed, not printing operations)
Scan QRcode: invoking the system’s camera for software-assisted scanning of QR codes
Scan HQR code: This function is optional for scan head retrofitting and is not supported by default. - Results appear after scanning (The scan result will support barcode format, type)

3.3. NFC
The NFC function helps you to identify unencrypted IC or ID cards.
(Note: the IPDAO9l does not support Bank Transfer/Credit Card)
- Before using NFC, please slide down the taskbar to open “NFC functions.

- Place the IC card to be scanned above the NFC icon on the body for recognition
Note: I9DAO9] Support ISO /IEC 14443 A&B, Mifare, Felica card and recognition distance less than 7cm.
- After recognition, the results will be output directly in the interface

3.4. Application Development (SDK)
SOK can helps customers with third party app development and We recommend the Java programming language and Android studio as your programming tool.
Please refer to the SOK files: https://u.pc.cd/qMnrtalK
- Before you start, please configure the IDE.
Get start
• Copy SmartPos_xxx.jar to applibs, then right click on it->add as library.
• Copy armeabi-v7a to src/main/jnilibs
• Base libs: libSmartPosJni.so, libSmartPos.so, libEmvCoreJni.so, SmartPos_xxx.jar
• QR scanning lib: libjava_camera.so, libsyno_getparam.so, libsyno_jni.so, libsynochip_qrcode.so(Business needs to be contacted for authentication password)
• Declare permissions <uses-permission android: name=”android. permission. READ_
EXTERNAL_STORAGE”/> <uses-permission android: name=”android. permission. WRITE_
EXTERNAL_STORAGE”/> - Built-in SOK printing(Text as an example)
If you call the print barcode or QR code interface, please add ZXing-core as the project dependency, otherwise the barcode QR code will not be generated normally.
Print text
into printStatus = mPrinter.getPrinterStatus();
if (printStatus == SdkResult.SDK_PRN_STATUS_PAPEROUT) {} else {
PrnStrFormat format = new PrnStrFormat();
format.setTextSize(30);
format.setAli(Layout.Alignment.ALIGN_CENTER);
format.setStyle(PrnTextStyle.BOLD);
format.setFont(PrnTextFont.CUSTOM);
format.setPath(Environment.getExternalStorageDirectory() +”/fonts/simsu n.ttf”);
mPrinter.setPrintAppendString(“POS SALES SLIP”), format);
format.setTextSize(25);
format.setStyle(PrnTextStyle.NORMAL);
format.setAli(Layout.Alignment.ALIGN_NORMAL);
mPrinter.setPrintAppendString(” “, format);
mPrinter.setPrintAppend String(“MERCHANGT NAME:” + ” Test “,format);
mPrinter.setPrintAppendString(“MERCHANT NO:” +”123456789012345 “, format);
mPrinter.setPrintAppendString(“TERMINAL NAME:” + ” 12345678″, format);
mPrinter.setPrintAppendString(“OPERATOR NO:” + ” O1″, format);
mPrinter.setPrintAppendString(“CARD NO: “, format);
format.setAli(Layout.Alignment.ALIGN_CENTER);
format.setTextSize(30);
format.setStyle(PrnTextStyle.BOLD);
mPrinter.setPrintAppendString(6214 44+ +er+ +er+ 7816″, format);
format.setAli(Layout.Alignment.ALIGN_NORMAL),
format.setStyle(PrnTextStyle.NOpMAL),
format.set Text Size(25)
mPrinter.setPrintAppendString(” —————–“,format,
mPrinter.setPrintAppendString(” , format),
mprinter.setPrintAppendString(” format);
mprinter.setprintAppendString(” format);
mprinter.setprintAppendString(” , format);
printStatus = mPrinter.setPrintStart() - There are demos available in the SDK for testing.

Technical Specifications
| Basic Characteristics |
OS | Asteroid OS (based on Android 9.0) |
| CPU | MTK Quad-Core Processor 1.3GHz | |
| ROM | 16GB ROM Emc | |
| RAM | 2G DDR3 | |
| Display | 5.5 inch TFT IPS LCD, resolution 7201280 | |
| Panel | Ultra-sensitive capacitive touch screen, can work with gloves and wet fingers | |
| Dimensions | 199.75mm x 83mm x 57.5mm | |
| Weight | 384g (Battery included) | |
| Keys | Physical keys: power on/off, Volume + /-, quick scan key | |
| Input | Chinese/English, and supports handwriting and soft keyboard | |
| Radio Communication |
WIFI | IEEE 802.11 a/b/g/n, support 2.4GHz and 5GHz |
| Bluetooth | BT 4.2 LE and earlier | |
| 4G | FDD-LTE: B1/B2/B3/B4/B5/B7/B8/B20/B28 TDD-LTE: B38/B39/B40/B41 | |
| 3G | WCDMA: B1/B2/B5/B8,TD-SCDMA: B34/B39 | |
| 2G | GSM/GPRS/EDGE: 850/900/1800/1900MHz |
| NFC | Contactless Card reader | Supports 14443A/14443B |
| Expansion and peripherals |
Printer | High-Speed Thermal Printer; Label printing; 58mm printing paper; 40mm paper ro II |
| Rear Camera | 5MP AF Camera with LED flash | |
| Satellite Positioning |
Support GPS(A-GPS)/ Bei-Dou/ Glonass or Galileo | |
| Audio | Speaker | |
| Interfaces | Micro SD Card | 1 Pcs support up to 128GB |
| Slot | ||
| SIM Card Slot | 1 Pcs Micro SIM | |
| PSAM Card Slot | 1 Pcs Conforms to 1507816 standard | |
| USB Port | 1 Pcs Type C USB | |
| Power | Battery | Li-ion battery, 7.4V/2800mAh |
| Charging Port | Type C USB Port, by DC/2A | |
| Environment | Operating Temperature | -10°C to 50°C |
| Storage Temperature | -20°C to 70°C | |
| Humidity | 5% to 95% Relative Humidity, Non-Condensing | |
| Certification | Electromagnetic | CE, ROHS, FCC |
| Optional | Barcode Scanner | Symbol 4710 2D Image Engine, Support 1D and 2D symbiology’s |
| Label Printer Paper |
4.1. FAQ
| Fault phenomenon | Elimination methods |
| No display on screen | • check if battery installed right • check if battery is enough for work |
| Cannot read card | • check if card slot is clean • check if card has enough magnet info |
| NFC card data read incorrectly |
• ensure card has NFC function • ensure read card in NFC area • ensure card/mobile be placed smoothly and steady in NFC area |
| Camera failure | • ensure camera not be covered • ensure if enough light for camera to work |
| Printer do not work | • ensure paper is sealed correctly • check if it has right size paper, and installed right • check If low battery |
| Communication failure | • check if sim card inserted, if card contactor clean • ensure there is signal • try to re-establish communication |
4.2. Cautions
- Strictly observe the following instructions while install and connect the device. Connect to stable power socket, try to avoid charging it together with high-power machines like air-condition er.
- Please try not to use the device during thunderstorm in case of lightening stroke, and power off as well as cut off its connection to host machine.
- This is electrical product, be sure not let anything like pin, thumbtack, wire or water slip into the device, or short circuit will be caused to destroy device.
- Be sure no heavy pressure on device or place anything on it.
- Prevent fierce vibration, strike or beat.
- Ensure good working condition, never use it in humid, high temperature, sun burn, dustiness or frost environment, never get close to strong electromagnetic field, never use device under flammable and explosive conditions.
- Avoid plug or swap any part or peripherals when power is on, or it may cause inner hardware damage. Shutoff device before cut power.
- This device is integrated with Lithium battery, change our original battery if needed. Other types battery may cause damage to device. Contact us or our distributor when you need to change battery.
- Cut off power and stop operation if device break down. DO NOT disassemble device yourself.
- Avoid sleet, solar exposure, mechanical shock or extrusion. Be careful when delivering.
Device should be kept in original package, temperature of warehouse should be -20°C 60C, relative humidity should be 5% ~ 95%. No noxious gas, flammable, explosive or mordant chemicals are allowed to be together, ensure no mechanical shock, impact or high magnetic.
Contact us
 https://wa.me/qr/RVWJAJIUJWG6L1
Scan the QR code for whatsapp online chat
Email: [email protected]
WhatsApp: +86-17817881067
Skype: I’ve: Munby
If you meet any problem during using
the I PDA09l, please contact us.
MUNBYN provides 18 months warranty and lifetime free service.
If you encounter any issues with the product, please contact the
MUNBYN team to promptly receive troubleshooting tips or a replacement.
Email: [email protected] (24-7 on line support)