Contents
PREVUE HENDRYX 58501 Ferret Stack One Story

CUSTOMER SUPPORT
Please contact Prevue Pet Products:
PHONE 1 312-243-3624
ONLINE www.prevuepet.com
EMAIL [email protected]
PARTS LIST
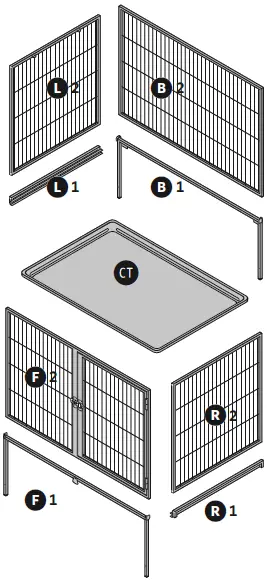


KEY:
- L = Left Side
- B = Back
- F = Front
- R = Right Side
- CR = Center/Roof
- CG = Center/ Floor Grille
- CT = Center/Tray
- CS = Center/Shelf
HARDWARE & TOOLS

These pieces are interchangeable:
L1 = R1
L2 = R2
HOW TO TELL THE DIFFERENCE : Several parts and panels may look similar. Here’s how to tell the difference:
CENTER PANELS
The roof panel (CR) has an attached sliding door on top, and a screw hole on both ends of the frame.
The ground floor grille panel (CG) has NO door and NO screw hole on the ends.
The shelf (CS) is longer, and has threaded screw holes on the front and back corners of the frame.
NO ADDITIONAL TOOLS REQUIRED • For best results, follow the Assembly Steps in the order presented.
KEY:
- L = Left Side
- B = Back
- F = Front
- R = Right Side
- CR = Center / Roof
- CG = Center /
- Floor Grille CT = Center / Tray
- CS = Center / Shelf
PIECES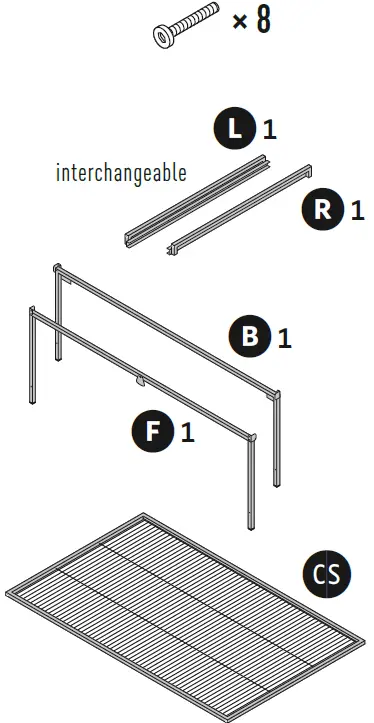 Orient the front legs (F1) with the wind bell lock facing forward. The extended portion of the tray channel rail (L1) dovetails into the inside of the frame leg. Attach frames together with a hex screw through the bottom hole.
 Orient the back legs (B1) with the tray channel backstop facing the back. Attach legs to sides with hex screws in the bottom holes.
 Attach the shelf (CS) with hex screws through the holes near the base of the legs.
 PIECES
 Turn the assembled unit upside down. Fully insert a caster in each leg.
 Turn it right-side up and set the floor grille (CG) in place.
 PIECES
Stand the side panel (L2) and the lower back panel (B2) in position and attach together with a hex screw at the top and bottom corners. → Hand-tighten the screws so they remain loose. This will ease the assembly of the roof.
Continue adding and attaching the right side (R2) and front (F2)] panels with hex screws at the top and bottom corners. Place the roof (CR) in position and attach and attach with a hex screw on each end.
- Tighten the screws over the entire cage with the hex key until all screws are snug.
PIECES Hook a ramp to the underside of the platform.
 Place the platform in the cage, on the middle horizontal wire.
 Add the hammock.
Rotate the wind bell lock up and slide the tray into the channels.